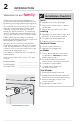
Refrigerator use & care Introduction........................................................2 Automatic Ice and Water Dispenser....... 19 Important Safety information.....................3 Storage Features............................................ 21 Features ............................................................6 Normal Operating Sounds......................... 22 Installation..........................................................7 Filter Replacement......................................
INTRODUCTION Welcome to our family Thank you for bringing Frigidaire into your home! We see your purchase as the beginning of a long relationship together. This manual is your resource for the use and care of your product. Please read it before using your appliance. Keep it handy for quick reference. If something doesn’t seem right, the troubleshooting section will help you with common issues.
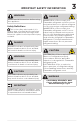
IMPORTANT SAFETY INFORMATION WARNING Please read all instructions before using this appliance. Safety Definitions This is the safety alert symbol. It is used to alert of potential personal injury hazards. Obey all safety messages that follow this symbol to avoid possible injury or death. DANGER DANGER indicates an imminently hazardous situation which, if not avoided, will result in death or serious injury.
IMPORTANT SAFETY INFORMATION Child Safety Proper Disposal of your Appliance This appliance is not intended for use by persons (including children) with reduced physical, sensory or mental capabilities, or lack of experience and knowledge, unless they have been given supervision or instruction concerning use of the appliance by a person responsible for their safety.
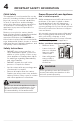
IMPORTANT SAFETY INFORMATION Electrical information • The appliance must be plugged into its own dedicated 115 Volt, 60 Hz., 15 Amp, AC only electrical outlet. The power cord of the appliance is equipped with a three-prong grounding plug for your protection against electrical shock hazards. It must be plugged directly into a properly grounded 3-prong receptacle. The receptacle must be installed in accordance with local codes and ordinances. Consult a qualified electrician.
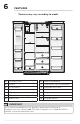
FEATURES *Features may vary according to model E D E G F H C B E I J B E K E L A L N M A Fixed Door Bins H Dairy Compartment B Shelves I Temperature Sensor/Thermistor C Ice Container J Adjustable Door Bins D Ice Maker K Deli Drawer (some models) E LED Lights (some models) L Crisper Pan F Damper/Air filter housing M Toe Grille G Water Filter N Slide Out Basket IMPORTANT Accessories are available for your appliance and may be purchased at Frigidaire.
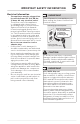
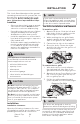
INSTALLATION This Use & Care Manual provides general operating instructions for your model. Use the unit only as instructed in this Use & Care Manual. Before starting the appliance, follow these important first steps. Location • • • • NOTE If your unit is placed with the door hinge side against a wall, you may have to allow additional space for the handle so the door can be opened wider. Choose a place that is near a groundToe Grille Installation and Removal ed electrical outlet.
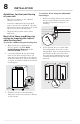
INSTALLATION Guidelines for final positioning of your unit: • Rest all 4 corners of the cabinet firmly on the floor. • Level the cabinet at the front and rear so the front is raised ¼" (6 mm) above the rear to ensure the door will open/close and seal properly. • Align the doors with each other and level. To level the doors using the adjustable lower hinge: 1. Set Screw Tornillo de fijacion Vis fixe Meet all of these conditions by raising or lowering the adjustable leveling feet.
INSTALLATION 3. After leveling, verify the door stop contacts the lower hinge and the top of the door does not contact the upper hinge through full movement of the door (from fully closed to fully open). 12 mm Adjustment Screw El tornillo de ajuste Vis de réglage 9 4. Reinstall the set screw, locking the door height. 5. Replace the toe grille by fitting it into place (see Toe Grille Installation and Removal in the INSTALLATION section).
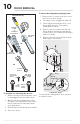
DOOR REMOVAL To remove the refrigerator top hinge/cover: Tools Necessary: 1. Remove the 2 screws from the cover over the top door hinge. Phillips™ Head & Phillips™ Flathead Head Screwdriver Adjustable Wrench 2. Lift hinge cover straight up and off. 3. Trace lightly around the door’s top hinge with a pencil. This makes reinstallation easier. 4. Remove the 2 screws from the top hinge and lift the hinge straight up. Lift the door off of the bottom hinge and set it aside. 5.
DOOR REMOVAL To remove the freezer top hinge cover: 1. 2. To Disconnect 1. Press outer ring against face of fitting Remove the 2 screws from the cover over the top door hinge. Lift hinge cover straight up and off. 2. Pull to remove tube To Connect Insert tube and push until mark touches face of fitting Door Closer Pin Hinge Release the wires from the routing clip. NOTE: To prevent wire damage, ensure the wires are rerouted through the routing clip when reassembling the hinge cover. 2.
DOOR HANDLE INSTALLATION CAUTION Wear gloves and safety goggles and use extreme CAUTION when installing these handles. The rounded end of the handles may be sharp (some models). IMPORTANT To ensure proper installation of handles, please review these instructions and illustrations thoroughly prior to installing the handles. 1. Remove handles from carton and any other protective packaging. 2.
WATER SUPPLY CONNECTION WARNING To avoid electric shock, which can cause death or severe personal injury, disconnect the unit from electrical power source before connecting a water supply line to the appliance. • A shutoff valve to connect the water supply line to your household water system. DO NOT use a self-piercing type shutoff valve. • Do not reuse compression fitting or use thread seal tape.
WATER SUPPLY CONNECTION A B C D G E F H I A Plastic Water Tubing to Ice Maker Fill Tube B Steel Clamp C Brass Compression Nut D Ferrule (Sleeve) E Copper Water Line F Water Valve Bracket G Valve Inlet H Water Valve I Copper Water Line from Household Water Supply* J Braided Flexible Stainless Steel Water Line K 6 ft. (1.
CONTROLS AND SETTINGS 15 NOTE Your appliance may have some or all of the features listed below. Become familiar with these features and their use and care. Front of Door User Interface Ice Maker Cube Press the Cube button to get cubed ice. A white LED light will indicate the mode is selected. Press glass against the ice dispensing paddle as far up as possible to catch all the ice. Crush Press the Crush button to get crushed ice. A white LED light will indicate the mode is selected.
CONTROLS AND SETTINGS Alarms Power Outage In the event of a power outage the Power Outage indicator appear and an alarm will sound. Press any button to clear the alarm. Door Open When a door is open the Door Open indicator will appear and will disappear when the door is closed. If a door is left open for more than 5 minutes an alarm will sound. The alarm will continue to go off every 10 seconds until acknowledged.
CONTROLS AND SETTINGS 17 In-Door User Interface Active Mode View Inactive Mode View Sleep Mode View
CONTROLS AND SETTINGS In-Door Control Display Mode Views Your display is equipped with a sleep and inactive mode to prevent accidental changes to the unit settings during opening and closing of the doors. When both doors are closed, the display will be in sleep mode. When either door is first opened, the display will be in inactive mode where all the current settings are visible but dimmed. Pressing any button on the display will activate the display and a tone will be played.
AUTOMATIC ICE AND WATER DISPENSER 19 Priming the water supply system Turning the ice maker on CAUTION For proper dispenser operation, the recommended water supply pressure should fall between 30 psi and 100 psi. Excessive pressure may cause the system to malfunction. 1. Begin filling the system by pressing and holding a drinking glass against the water dispenser paddle. Keep the glass in this position until Dispenser water comes (varies by model) out of the dispenser. It may take about 1½ minutes.
AUTOMATIC ICE AND WATER DISPENSER Ice Maker/Dispenser Tips • Ice cubes stored too long may develop an odd flavor. Empty the ice container as explained in Cleaning the Ice Storage Bin. • Occasionally shake the ice container to keep ice separated. • If your refrigerator is not connected to a water supply or the water supply is turned off, turn Off the ice maker. • If you need a large quantity of ice at one time, it is best to get cubes directly from the ice container.
STORAGE FEATURES 21 Glass shelves Crispers Shelves are easily adjusted to suit individual needs. Before adjusting the shelves, remove all food. Shelves are supported by side rails. See Glass Shelves in CARE AND CLEANING for proper shelf removal. Crispers allow you the flexibility to store any manner of items including fruits, vegetables, nuts, etc. Crispers do not feature humidity controls. Door storage Door bins and shelves are provided for convenient storage of jars, bottles, and cans.
NORMAL OPERATING SOUNDS Understanding the Sounds you may Hear Your new, high-efficiency unit may introduce unfamiliar sounds. These sounds normally indicate your appliance is operating correctly. Some surfaces on floors, walls, and kitchen cabinets may make these sounds more noticeable. Following is a list of major components in your unit and the sounds they can cause: A Evaporator Refrigerant through the evaporator may create a boiling or gurgling sound.
FILTER REPLACEMENT PurePour™ Water Filter Keep safe, great-tasting water flowing with a PurePour water filter. Using a PurePour water filter: • Makes Safe Water Second Nature PurePour water filters are certified to reduce contaminates* and keep great-tasting water flowing for you and your family. • Produces Purity You Can Trust Know for certain your PurePour water filter is a protector. Counterfeits and knockoffs put your refrigerator and health at risk.
FILTER REPLACEMENT PureAir Ultra II™ Air Filter Damper/Air Filter Housing Some models are pre-loaded with an air filter located at the top of the fresh food compartment, next to the water filter. In humid regions certain products stored too close to the damper/air filter housing may freeze. If this scenario occurs, adjust the fresh food temperature settings and reconfigure the top shelf storage to allow for proper air diffusion.
CARE AND CLEANING Protecting your investment Keeping your appliance clean maintains appearance and prevents odor build-up. Wipe up any spills immediately and clean the freezer and refrigerator compartments at least twice a year. When cleaning, take the following precautions: • Never use CHLORIDE or cleaners with bleach to clean stainless steel. • Do not wash any removable parts in a dishwasher. • Always unplug the electrical power cord from the wall outlet before cleaning.
CARE AND CLEANING Glass Shelves CAUTION To avoid personal injury or property damage, handle tempered glass shelves carefully. Shelves may break suddenly if nicked, scratched, or exposed to sudden temperature change. Allow the glass shelves to stabilize to room temperature before cleaning. Do not wash in the dishwasher. CAUTION To avoid personal injury or property damage, handle the freezer glass shelves carefully. These shelves are fixed and are not to be used as sliding shelves.
CARE AND CLEANING To reassemble the freezer shelf, slide the glass and rear trim along the shelf rails while pressing the shelf downward until it is fully locked into place in the rear (Figure 3). Finally, rotate the front trim upward on the front edge of the glass shelf (Figure 4).
CARE AND CLEANING Care & Cleaning Tips Part What To Use Tips and Precautions Interior & Door Liners • Soap and water • Baking soda and water Use 2 Tbsp of baking soda in 1 qt of warm water. Be sure to wring excess water out of sponge or cloth before cleaning around controls, light bulb or any electrical part. Door Gaskets • Soap and water Wipe gaskets with a clean soft cloth. Drawers & Bins • Soap and water Use a soft cloth to clean drawer runners and tracks.
TROUBLESHOOTING 29 Let us help you troubleshoot your concern! This section will help you with common issues. If you need us, visit our website, chat with an agent, or call us. We may be able to help you avoid a service visit. If you do need service, we can get that started for you! 1-800-374-4432 (United States) Frigidaire.com CONCERN CAUSE 1-800-265-8352 (Canada) Frigidaire.ca SOLUTION AUTOMATIC ICE MAKER Ice maker is not making any ice. • The ice maker is not on.
TROUBLESHOOTING CONCERN CAUSE DISPENSER (Ice & Water) (Continued) Dispenser will not • Water filter not dispense water. seated properly. • Water filter is clogged. Water has an odd taste and/ or odor. Water pressure is extremely low. • Household water line valve is not open. • Water has not been dispensed for an extended period of time. • Unit not properly connected to cold water line. • Cut-off and cut-on pressures are too low (well systems only).
TROUBLESHOOTING CONCERN CAUSE 31 SOLUTION OPENING/CLOSING OF DOORS/DRAWERS (Continued) • Food is touching shelf • Remove top layer of items in drawer. Drawers are on top of drawer. difficult to move. • Track that drawers • Ensure drawer is properly installed slide on is dirty. on track. • Clean drawer, rollers, and track. See CARE & CLEANING. RUNNING OF REFRIGERATOR • Freezer control is set • Set freezer control. Compressor to “OF” or “0”. does not run.
TROUBLESHOOTING CONCERN CAUSE SOLUTION WATER/MOISTURE/FROST INSIDE REFRIGERATOR • The rate of frost buildup and internal Moisture collects • Weather is hot and humid. sweating increases. on inside of re• Door is slightly open. • See CONCERN column OPENING/ frigerator walls. CLOSING OF DOORS/DRAWERS. • Vegetables contain • It is not unusual to have moisture on Water collects and give off moisture. the bottom side of the cover. on bottom side • Move humidity control (some modof drawer cover.
LIMITED WARRANTY 33 Your appliance is covered by a one year limited warranty. For one year from your original date of purchase, Electrolux will pay all costs for repairing or replacing any parts of this appliance that prove to be defective in materials or workmanship when such appliance is installed, used and maintained in accordance with the provided instructions. Exclusions This warranty does not cover the following: 1.
welcome home Our home is your home. Visit us if you need help with any of these things: owner support accessories service registration (See your regristration card for more information.) Frigidaire.com 1-800-374-4432 Frigidaire.