
Complete Owner's Guide


7
INSTALLATION
NOTE
If your unit is placed with the door
hinge side against a wall, you may have
to allow additional space for the handle
so the door can be opened wider.
This Use & Care Manual provides general
operating instructions for your model. Use
the unit only as instructed in this Use &
Care Manual. Before starting the appli-
ance, follow these important first steps.
Installation
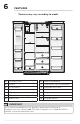
Installation clearances
Allow the following clearances for ease
of installation, proper air circulation, and
plumbing and electrical connections:
Sides & Top ⅜"
Back 1"
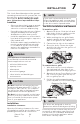
Location
• Choose a place that is near a ground-
ed electrical outlet. Do Not use an
extension cord or an adapter plug.
• If possible, place the unit out of direct
sunlight and away from the range,
dishwasher or other heat sources.
• Install the appliance on a floor that is
level and strong enough to support a
fully loaded unit.
• Consider water supply availability for
models equipped with an automat-
ic ice maker. If you do not hook up
water to the appliance, remember to
turn the ice maker o.
CAUTION
Do Not install the unit where the tem-
perature will drop below 55°F (13°C) or
rise above 110°F (43°C). The compres-
sor will not be able to maintain proper
temperatures inside the appliance.
Do Not block the toe grille on the lower
front of your unit. Sucient air circula-
tion is essential for the proper opera-
tion of your appliance.
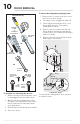
Toe Grille Installation and Removal
To install toe grille
1. Open both doors. Slide the left and
right sides of the toe grille over the
lower hinges of the appliance.
2. While pushing the toe grille firmly
against cabinet, fasten the bottom
clips of toe grille to the cabinet.
3. Fasten the top clips to the cabinet.
4. Close the doors. Fasten the right
and left side clips into the groove of
the bottom hinge.
To remove the toe grille
1. With both doors closed, unfasten
the right and left side clips of toe
grille from the bottom hinge groove.
2. Open both doors. Press firmly on the
top of the toe grille until the top of
the toe grille pops o.
3. Pull the toe grille outward toward
your body and o of the lower hinges.
1
2
3
2
3
1
4
4
Installing Toe Grille
1
2
3
2
3
1
Removing Toe Grille
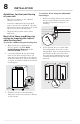
Door Opening
Position your unit to allow easy access to
a counter or table when removing food.
For the best use of drawers and freezer
baskets, position the appliance where
both doors can fully open.
NOTE
The doors are designed to shut by
themselves within a 20 degree opening.
WARNING
This appliance is intended for use
in residential household and similar
interior applications such as:
• a kitchen/kitchenette
• a pantry room
• a basement
• an enclosed garage
• other interior residential-type
environments