REFRIGERATOR use & care Introduction........................................................2 Automatic Ice and Water Dispenser...... 22 Important Safety Information.....................3 Storage Features........................................... 25 Features...............................................................7 Storing Food and Saving Energy............ 29 Installation..........................................................8 Normal Operating Sounds.........................
INTRODUCTION family Welcome to our Thank you for bringing Frigidaire into your home! We see your purchase as the beginning of a long relationship together. This manual is your resource for the use and care of your product. Please read it before using your appliance. Keep it handy for quick reference. If something doesn’t seem right, the troubleshooting section will help you with common issues.
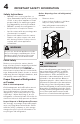
IMPORTANT SAFETY INFORMATION WARNING Please read all instructions before using this refrigerator. Safety Definitions This is the safety alert symbol. It is used to alert of potential personal injury hazards. Obey all safety messages that follow this symbol to avoid possible injury or death. DANGER DANGER indicates an imminently hazardous situation which, if not avoided, will result in death or serious injury.
IMPORTANT SAFETY INFORMATION Safety Instructions • DO NOT store or use gasoline, or other flammable liquids in the vicinity of this or any other appliance. Read product labels for warnings regarding flammability and other hazards. • DO NOT operate the refrigerator in the presence of explosive fumes. • Avoid contact with any moving parts of automatic ice maker. • Remove all staples from the carton.
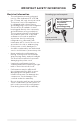
IMPORTANT SAFETY INFORMATION Electrical information • The refrigerator must be plugged into its own dedicated 115 Volt, 60 Hz., 15 Amp, AC only electrical outlet. The power cord of the appliance is equipped with a three-prong grounding plug for protection against electrical shock hazards. It must be plugged directly into a properly grounded three prong receptacle. The receptacle must be installed in accordance with local codes and ordinances. Consult a qualified electrician.
IMPORTANT SAFETY INFORMATION FCC Interference Statement This equipment has been tested and found to comply with the limits for a Class B digital device, pursuant to part 15 of the FCC Rules. These limits are designed to provide reasonable protection against harmful interference in a residential environment. This equipment generates, uses, and can radiate radio frequency energy and, if not installed and used in accordance with the instructions, may cause harmful interference to radio communications.
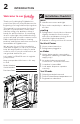
FEATURES L 7 M N K I O H P J S P Q H P R H S G F G D E C B A A A Anti-tip Leg J Ice Chute B Lower Freezer Basket K Ice Maker C Upper Freezer Basket L Flipper Guide D Custom-Flex™ Temp Drawer M Water Filter E Ice/Water Dispenser N Dairy Compartment F External Appliance Control Display O Air Filter G Adjustable Hinges P Shelves H Door Bin Q Adjustable Door Bin I Flipper Mullion R CrispSeal� Fresh Crispers S Gallon Door Bins IMPORTANT Accessories are av
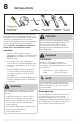
INSTALLATION Tools Necessary: (OR) Phillips Head or Quadrex Head Screwdriver AND 8mm Socket 6mm Wrench Allen Wrench This Use & Care Manual provides general installation and operating instructions for this model. We recommend using a service or kitchen contracting professional to install the refrigerator. Use the refrigerator only as instructed in this Use & Care Manual. Before starting the refrigerator, follow these important first steps.
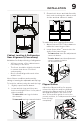
INSTALLATION 1 in 3. 9 Ensure both doors are bind-free with their seals touching the cabinet on all 4 sides and that cabinet is stable. 12.25 in 8.75 in Door Door Door Door 25.4 mm 1 in 36.75 in 933.4 mm To make final door height adjustments: 9.5 mm .37 in 9.5 mm .37 in Cabinet Leveling & Refrigerator Door Alignment (if necessary) Guidelines for final positioning of refrigerator: • All four corners of the cabinet must rest firmly on the floor.
DOOR REMOVAL Getting through narrow spaces If refrigerator will not fit through an entrance area, doors can be removed. Check first by measuring the entrance. 5. Pull up on water line gently to remove from door. To prepare for removing the doors: 1. Make sure the electrical power cord is unplugged from the wall outlet. 2. Remove any food from the door shelves and close the doors. To remove the refrigerator doors: 1. Open doors to 90°. 2.
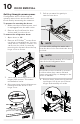
DOOR REMOVAL 7. In certain circumstances, you may need to remove the lower hinges for clearance purposes. To gain access to the lower hinges, first extend the Custom-Flex Temp Drawer. Unscrew the 3 lower hinge screws and slide the hinge inward. 11 To remove the Custom-Flex Temp Drawer 1. Fully open the drawer. 2. Remove the basket from the drawer. 3. Unsnap the 4 cable ties by pressing clip sides together and pushing them through the opening. Lower Hinge Removal 8.
5. DOOR REMOVAL Remove the drawer by pressing on the liner clips and slide the rail past the clips on both sides to fully remove drawer from cabinet. 4. Reattach the electrical harness by positioning the cable clips over the black markings on the harness and push the 4 cable clips through the openings in the rail to secure the harness in place. Reinstalling the Custom-FlexTM Temp Drawer 1.
DOOR REMOVAL Reinstalling Freezer Drawer CAUTION 1. Place the drawer with brackets and sliders inside the cabinet and click into place. 2. Replace the lower freezer basket first, and then the upper freezer basket. Ensure the upper freezer basket rollers are seated correctly into the tracks before closing the freezer drawer. Drawer is heavy. Use caution when lifting. Removing Freezer Drawer 1. Open the drawer and fully extend it. 2. Remove the upper freezer drawer. 3.
DOOR HANDLE INSTALLATION CAUTION Wear gloves and safety goggles. Use extreme CAUTION when installing these handles. Door Handle Mounting Instructions Mounting Refrigerator Handles 1. Remove handles from carton and any other protective packaging. 2. Position fresh food handle end caps over upper and lower preinstalled shoulder bolts (A) that are fastened into door, ensuring the holes for the set screws are facing towards the opposite door. 3.
WATER SUPPLY CONNECTION Then add approximately 6 ft. (1.8 m), so the refrigerator can be moved out for cleaning. WARNING To avoid electric shock, which can cause death or severe personal injury, disconnect the refrigerator from electrical power before connecting a water supply line to the refrigerator. CAUTION To Avoid Property Damage: • Copper or Stainless Steel braided tubing is recommended for the water supply line. Water supply tubing made of ¼ inch plastic is not recommended to be used.
WATER SUPPLY CONNECTION Connection to Household Water Supply with 1/4" compression fitting 3. Water inlet fitting Plastic tubing to water valve 6 ft. (1.8 Meters) Stainless Steel water line from household water supply line Plastic Cap Remove plastic cap from water inlet fitting Water Inlet Brass Fitting Open the locking clips and grab water line coming from the refrigerator. Remove plastic cap from water inlet fitting and discard cap. 4.
CONTROLS AND SETTINGS 17 External Dispenser Display Sleep Mode Display Sleep Mode As a default, the display will go to sleep after a short time. If any icon is pressed, the display will be awakened. After a short time, it will go back to sleep. When in sleep mode, wake up the display to confirm ice maker is On/Off. Sleep mode can be turned off to have the display on full time (awake mode). When sleep mode is Off, the display will always be illuminated.
CONTROLS AND SETTINGS External Dispenser Display 1 14 13 5 6 15 2 7 8 9 16 3 4 10 11 1 Freeze Boost (on/off) Prior to grocery shopping, activate Freeze Boost so newly purchased food designated for the freezer will be preserved as quickly as possible. It automatically deactivates after 12 hours. 2 Ice Maker Press and hold for 3 seconds to turn the ice maker on/off. When the indicator is lit, the ice maker is on. When the ice maker is OFF, the Ice Maker Off indicator is lit.
CONTROLS AND SETTINGS 19 External Dispenser Features (Continued) 6 7 8 9 Adjusting Temp Illuminates when temperatures are changed on the display and will remain illuminated until the desired temperatures are reached inside the refrigerator and freezer. Press either the + or — to adjust to desired temperature setting. Freezer temp Control temperatures range from -6°F / -21°C to +6°F / -15°C. Refrigerator temp Control temperatures range from +34°F / +1°C to +44°F / +7°C.
CONTROLS AND SETTINGS External Dispenser Features (Continued) NOTE Control features and alarms may vary by model. Alarms Power Outage In the event of a power failure, the power outage alert will be illuminated once power has been restored and a tone will sound. The alert will only be illuminated if the refrigerator or freezer reached unsafe temperatures during the outage. Press any button to silence the tone. Water Filter When illuminated, the water filter needs to be replaced.
CONTROLS AND SETTINGS To connect the refrigerator to your home internet: Requirements: • Apple iOS 11 or later or Android 8.0 OS or later • A secure password-protected 2.4 or 5 GHz internet connection on a WPA/WPA2 compliant network • Valid email address and password • A Wi-Fi router that supports IEEE 802.11 b/g/n • When setting up your connection, make sure you are in front of the appliance. Download the free Frigidaire® 2.0 app. • Open the app and follow the prompts to connect.
AUTOMATIC ICE AND WATER DISPENSER Using the ice maker after installation Before making ice for the first time, be sure to prime the water supply system. Air in new plumbing lines can result in two or three empty ice maker cycles. Furthermore, if the system is not flushed, the first ice cubes may be discolored or have an odd flavor. Priming the water supply system CAUTION For proper dispenser operation, recommended water supply pressure should fall between 30 psi and 100 psi.
AUTOMATIC ICE AND WATER DISPENSER NOTE The ice maker also has a built-in plastic signal arm that automatically stops ice production when the ice bin is full. This signal arm should not be used to manually stop the ice maker. Ice maker/dispenser tips • If refrigerator is not connected to a water supply or the water supply is turned off, turn off the ice maker as described in the previous section.
AUTOMATIC ICE AND WATER DISPENSER Remove and empty the ice bin if: • • An extended power failure (one hour or longer) causes ice cubes in the ice bin to melt and refreeze together after power is restored, jamming the dispenser mechanism. The ice dispenser is used infrequently. Ice cubes will freeze together in the bin, jamming the dispenser mechanism. Shake the bin to loosen the cubes, or clean as explained above.
STORAGE FEATURES CAUTION To avoid personal injury or property damage, handle tempered glass shelves carefully. Shelves may break suddenly if nicked, scratched, or exposed to sudden temperature change. Allow the glass shelves to stabilize to room temperature before cleaning. Do not wash in dishwasher. NOTE 25 To adjust slide-under shelf: 1.
STORAGE FEATURES To remove the CrispSeal Fresh drawer for cleaning: 1. Pull the drawer out until it stops. 2. Lift the front slightly and remove the drawer. 4. Remove the humidity membrane from the housing by lifting up sliding over. Removing Auto Humidity Control Membrane Removing CrispSeal Fresh Drawer To remove the auto humidity control membrane for cleaning: 1. Reach to back of humidity control cover. 2. Place fingers between the humidity control and the back wall, pull up on cover. 3.
STORAGE FEATURES 1 2 3 IMPORTANT Do not use the Custom-FlexTM Temp Drawer to store fresh produce as these items may freeze and cause damage to the fruits and leafy vegetables stored in the drawer. Using Your Custom-Flex Temp Drawer Controls 1 he drawer automatically defaults to a T locked state to prevent any unwanted use. To change the drawer’s settings, it first needs to be unlocked. To unlock, press and hold the UNLOCK icon for 3 seconds.
STORAGE FEATURES To move door bin side-to-side: 4. Tilt bin up so the back of the bin is off the door but the hook is still engaged. 5. Slide bin along rail to desired position. 6. Lower bin back into place. To move door bin up or down: 7. Lift bin up disengaging the hook. 8. Move bin to desired rail location. 9. Push bin hook into rail engaging the hook. IMPORTANT There are wheels on the bottom of the drawer. Make sure all wheels are aligned on their respective tracks for proper function.
STORING FOOD AND SAVING ENERGY Ideas for storing foods Fresh food storage • Keep the fresh food compartment between 34°F and 44°F with an optimum temperature of 37°F. • Avoid overcrowding the refrigerator shelves, which reduces air circulation and causes uneven cooling. • • Store fruits and vegetables in crisper drawers, where trapped moisture helps preserve food quality for longer time periods. • Do not wash items until ready to use. Remove excess water before placing inside unit.
NORMAL OPERATING SOUNDS Understanding the sounds coming from the refrigerator High-efficiency refrigerators may introduce unfamiliar sounds. These sounds normally indicate the refrigerator is operating correctly. Some surfaces on floors, walls, and kitchen cabinets may make these sounds more noticeable. The following is a list of major components in the refrigerator and the sounds they can cause: A Evaporators Refrigerant through the evaporators may create a boiling or gurgling sound.
FILTER REPLACEMENT Air Filter (select models) 31 Water Filter The air filter is located in the top center of The refrigerator is equipped with a water filtering system. The water filtering the fresh food compartment. system filters all dispensed drinking water, as well as the water used to produce ice. Replacing the AirTM AF-2 The water filter is located at the top right Air Filter side of the fresh food compartment.
FILTER REPLACEMENT PurePour Connect™ PWF-2™ Water Filter More about the Advanced Water Filter The PurePour Connect ice and water filter system is tested and certified to NSF/ANSI Standards 42, 53, 401 and CSA B483.1 for the reduction of claims specified on the performance data sheet. Keep safe, great-tasting water flowing with a PurePour Connect water filter.
FILTER REPLACEMENT 7. Press a drinking glass against the water dispenser while checking for any leaks at the filter housing. Any spurts and sputters that occur as the system purges air out of the dispenser system are normal. 8. Push the cover up toward the liner. Then push the filter cover toward the rear of the cabinet. The filter cover will snap back into place. 9. After filling one glass of water, continue flushing the system for about 4 minutes.
CARE AND CLEANING Care & Cleaning Tips Keeping the refrigerator clean maintains its appearance and prevents odor build-up. Wipe up any spills immediately and clean the freezer and fresh food compartments at least twice a year. NOTE Do not use abrasive cleaners such as window sprays, scouring cleansers, flammable fluids, cleaning waxes, concentrated detergents, bleaches, or cleansers containing petroleum products on plastic parts, interior doors, gaskets, or cabinet liners.
CARE AND CLEANING Part 35 Care & Cleaning Tips What To Use Tips and Precautions Interior & Door Liners • Soap and water • Baking soda and water Use two tablespoons of baking soda in one quart of warm water. Be sure to wring excess water out of sponge or cloth before cleaning around controls, light bulb or any electrical part. Door Gaskets • Soap and water Wipe gaskets with a clean soft cloth. Drawers & Bins • Soap and water Use a soft cloth to clean drawer runners and tracks.
TROUBLESHOOTING Let us help you troubleshoot your concern! This section will help you with common issues. If you need us, visit our website, chat with an agent, or call us. We may be able to help you avoid a service visit. If you do need service, we can get that started for you! 1-800-265-8352 (Canada) Frigidaire.ca 1-800-374-4432 (United States) Frigidaire.com Concern Potential Cause Automatic Ice Maker Ice maker is not making any ice. Ice maker is not making enough ice.
TROUBLESHOOTING 37 Concern Potential Cause Common Solution Automatic Ice Maker (continued) Ice cubes are freezing together. • Ice cubes are not being used frequently enough or interruption of power for prolonged time. • Remove ice container and discard ice. The ice maker will produce fresh supply. Ice should be used at least twice weekly to keep the cubes separated. • Ice cubes are hollow (shells of ice with water inside).
Concern TROUBLESHOOTING Potential Cause Water not cold enough. • Water has an odd taste and/or odor. • • Common Solution As warmer tap water goes through the filter and enters the water supply system, the chilled water is pushed through to the dispenser. Once the chilled water is used up, it will take several hours to bring the freshly replaced water to a cooler temperature. Water has not been dispensed for an extended period of time. • Add ice to cup or container before dispensing water.
TROUBLESHOOTING Concern Potential Cause Running of Refrigerator Compressor does not run. Refrigerator seems to run too much or too long. 39 Common Solution • Refrigerator is in defrost cycle. • This is normal for a fully automatic defrost refrigerator. The defrost cycle occurs periodically, lasting about 30 minutes. • Plug at electrical outlet is disconnected. • Ensure plug is tightly pushed into outlet. • House fuse blown or tripped circuit breaker.
TROUBLESHOOTING Concern Potential Cause Common Solution Water/Moisture/Frost Outside Refrigerator Moisture collects on outside of refrigerator or between doors. • Weather is humid. • This is normal in humid weather. When humidity is lower, the moisture should disappear. Food/Drinks in Fresh Food Compartment/Custom-Flex™ Drawer Food is freezing. • Temperature setting is too low. • Move the setting to a higher degree. • Temperature sensor is covered by food (right side of fresh food area).
LIMITED WARRANTY 41 Your appliance is covered by a one year limited warranty. For one year from your original date of purchase, Electrolux will pay all costs for repairing or replacing any parts of this appliance that prove to be defective in materials or workmanship when such appliance is installed, used and maintained in accordance with the provided instructions. Exclusions This warranty does not cover the following: 1.
welcome home Our home is your home. Visit us if you need help with any of these things: owner support accessories service registration (See your registration card for more information.) Frigidaire.com 1-800-374-4432 Frigidaire.