Fuego F27S-Griddle & F27S-Griddle-NG Use And Care Manual
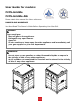
User Guide for models: F27S-Griddle F27S-Griddle-NG Please retain this manual for future reference. DANGER AND WARNINGS You Must Read This Owner’s Guide Before Operating Your Gas Grill. DANGER If • • • • you smell gas: Shut off gas to the appliance. Extinguish any open flames. Open lid. If odor continues, keep away from the appliance and immediately call your gas supplier or your fire department.
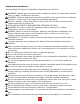
Thank you for your Fuego Gas Grill purchase. We are excited to present to you our new Fuego ALL 304 Stainless Steel Gas Grill. We set out to design a grill that eliminated all of the bulky features you see on most gas grills. We started with the shelves and recessed them into the side panels which creates a more compact footprint and stylish design when closed as wells as a fully functional shelf system when open. Next we tackled the front panel.
DANGER AND WARNINGS You Must Read This Owner’s Guide Before Operating Your Gas Grill. WARNING: Leaking gas may cause a fire or explosion, which can cause serious bodily injury or death, or damage to property. WARNING: Follow all leak-check procedures carefully in this manual prior to barbecue operation. Do this even if the barbecue was dealer-assembled. Notice to Installer: These instructions must be left with the owner and the owner should keep them for future use.
Use heat-resistant barbecue mitts or gloves when operating barbecue. Keep any electrical supply cord and fuel supply hose away from any heated surfaces. CALIFORNIA PROPOSITION 65 WARNING: The burning of gas cooking fuel generates some by-products which are on the list of substances known by the State of California to cause cancer and reproductive harm. California law requires businesses to warn customers of potential exposure to such substances.
• The pressure regulator supplied with the gas barbecue must be used. This regulator is set for 11 inches of water column (pressure). • This gas barbecue is designed for use with liquid propane (LP) gas by default. A NG conversion kit must be used when converting the LP unit to NG unit to use natural gas. A separate natural gas (NG) kit must be purchased which includes different hoses and orifices for use with NG. 7.0" W.C. • Do not use with charcoal fuel.
• Details of 20lb LP cylinder • Diameter: 12+1/4”~11+3/4” • Height: 17+15/16”~17+7/16” • Weight: 18lb, Empty • 38lb, Full WARNING: Do not leave items on or against the barbecue. Keep flammable products and sprays away. For outdoor use only. Storage And / Or Non Use • The gas must be turned off at the liquid propane cylinder when the gas barbecue is not in use. • When the gas barbecue is stored indoors, the gas supply must be DISCONNECTED and the LP cylinder stored outdoors in a well-ventilated space.
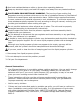
F27S-Griddle
F27S-Griddle
F27S-Griddle-NG
F27S-Griddle-NG
ti Item ID Descrip on F27S-Griddle F27S-Griddle-NG Part Number BS Griddle Lid Handle 1 1 FSP1730 BT 27" Griddle Lid 1 1 FSP1740 BU Transparent Rubber Bumper 4 4 FSP1750 BV Griddle Plate 1 1 FSP1760 F U Shape Main Burner 3 3 FSP1060 G Burner Bracket 3 3 FSP1070 BW Burner Rain Shield 2 2 FSP1770 BX 27" Griddle Fire Box 1 1 FSP1780 AE 27" Griddle Freestanding Manifold ASM. LP 1 0 FSP1470 AE 27" Griddle Freestading Manifold ASM.
Installation Items Needed (Not Included) Utility Knife / Box Cutter Two People Stainless Steel Cleaner Scissors AA Battery Non Abrasive Towel
Quick Set-up Guide Step 1 1A. Remove the outer carton from the pallet by lifting it vertically off the pallet*. 1B. Remove all of the foam, cardboard and plastic packing around the grill. *Please note that it is helpful to cut the tape on the top and open the flaps for easy removal.
Step 2 Lift the grill off of the pallet. Please lift from the designated support bar lifting areas as noted in the images below.* *This item should be lifted off the pallet by a team of 2 or more people. To lighten the load we recommend opening the lid and removing the internal grates and diffuser panels.
Step 3 Install the AA battery. Please ensure that the + end of the battery faces out towards the battery cap. The cap button can be removed by unscrewing by rotating counterclockwise.
Step 4 Remove the grease tray and discard the protective packaging material. Re-install the grease tray before operation.
Step 5 Side shelf operation. The grill can be used with the side shelves in either the open or closed position. 8A. To open, pull the shelf upward from the black handle until the shelf support brackets lock into the slot. The shelf is now sitting horizontal for use. 8B. To close, lift up on the shelf support brackets to allow the shelf to fold back down into the side panel.
Step 9 Remove the laser film from the lid. Clean the entire exterior grill surfaces with a stainless steel cleaner and non-abrasive towel. Do NOT clean the cooking surface with stainless steel cleaner. Please see griddle seasoning instructions.
Step 10 Propane Gas Hook Up A. Open the front door and install a standard 20lb LP cylinder (Type 1) into the opening of the grill base (Note: the tank must be hanging from the tank hook) and connect the LP gas hose with regulator assembly to the LP cylinder. B. Connect the regulator to the propane tank. Proper procedures for gas leakage testing must be obeyed. Please note the Gas Hook-Up, Danger, and Warnings pages for more information.
Step 11 Natural Gas Hook Up Open the front door and run the flexible gas hose through hole in the back panel. Proper procedures for gas leakage testing must be obeyed. Connect to existing house gas line. Please note the Gas Hook-Up, Danger, and Warnings pages for more information. Directions for proper assembly and for assembly of field-installed parts and accessories supplied with the outdoor cooking gas appliance, and proper procedures for gas leak testing.
LP Gas Hook-Up for Type 1 or QCC1 Regulator LP Tank Requirements: The Element by Fuego grill is orificed for use with LP gas and comes equipped with a high capacity hose and regulator assembly for connection to a standard 20lb. LP cylinder (Type 1). The LP tank is not included. LP hose and fittings are included. Operating pressure: 11” W.C. To connect the LP regulator and hose assembly to the tank/valve assembly, first make sure the main valve on the tank is completely closed.
Leak Testing General: Although all gas connections on the grill are leak tested at the factory prior to shipment, a complete gas tightness check must be performed at the installation site due to possible mishandling in shipment, or excessive pressure unknowingly being applied to the unit. Periodically check the whole system for leaks, or immediately if the smell of gas is detected. Before Testing: Do not smoke while leak testing. Extinguish all open flames. Never leak test with an open flame.
Lighting Instruction Manual Warning: Before Lighting, please make sure that the control knob is in the off position and the regulator assembly is in good condition. Control Knob. IMPORTANT Do not leave items on or against the barbecue. Keep flammable product and sprays away. For outdoor use only. SHUT DOWN INSTRUCTIONS: 1.Turn burner control knob to the OFF position. 2.Turn gas supply OFF. 3.The gas supply must be turned off when appliance is not in use. LIGHTING INSTRUCTIONS 1.
Maintenance WARNING: IMPORTANT! General Instructions: Before lighting, inspect the gas supply piping or hose prior to turning the gas “on”. If there is evidence of cuts, wear or abrasion, it must be replaced prior to use. Replacement pressure regulators and hose assemblies must be those specified by the outdoor cooking gas appliance manufacturer. Keep the outdoor cooking gas appliance area clear and free from combustible materials, gasoline and other flammable vapors and liquids at all times.
Grill Burner Exterior Cleaning 122.9 3 1. Clean the exterior of the burner with a wire brush. 2. Clean stubborn scale with a metal scraper. 3. Clear any clogged ports with a straightened paper clip. 4. Never use a wooden toothpick as it may break off and clog the port. 5. Shake out any debris. 6. Use a flashlight to inspect the burner inlet to ensure it is not blocked. 7. If obstructions can be seen, use a metal wire coat hanger that has been straightened out. 8.
304HL T=1.0mm 上盖支撑右 WARNING: IT IS EXTREMELY IMPORTANT TO CENTER THE BURNER ON THE ORIFICE PROPERLY TO PREVENT A FIRE HAZARD OR EXPLOSION. PLEASE USE DRAWINGS BELOW FOR PROPER PLACEMENT REFERENCE. PLEASE NOTE THAT WHEN PROPERLY INSTALLED, BOTH SCREWS HOLDING THE BURNER IN PLACE WILL BE ABLE TO SCREW IN WITHOUT FORCE. 15 304HL T=1.5mm Residue Tray Cleaning: The residue tray can be washed by hand with standard dish soap and water. Please clean every 2-4 weeks depending upon use.
Recommended Cooking Times: Type of Meat Thickness Doneness Grilling Time* Safe Internal Temperature* *approx *data from USDA Beef Boneless Rib Eye or Tenderloin 1 in Med Rare Med 14-18 18-22 145°F / 62.8°C Boneless Sirloin Steak 1 in Med Rare Med 14-18 18-22 145°F / 62.8°C T-bone, Porterhouse steak 1 in Med Rare Med 8-12 12-15 145°F / 62.8°C Ground Meat patties 3/4 in No longer pink 10-16 160°F / 71.
Limited Warranty Information: Fuego Living LLC (“Seller”) and the person or entity that acquires these goods from Seller (“Purchaser”) hereby agree to the following terms and conditions of the sale: Shipping fees are the responsibility of the Purchaser whether freight prepaid or freight collect.
In the event of any dispute between Seller and Purchaser arising out of or relating to these terms and conditions or to the goods sold generally, Purchaser must first file a written claim with Seller within ten days of the occurrence giving rise to the claim and wait an additional thirty days for a response before initiating any legal action. The sale and all terms are subject to California law.