Fujitsu LifeBook A Series BIOS Guide LifeBook A Series Models: A3040 Document Date: 2/10/06 Document Part Number: FPC58-1482-01 F U J I T S U C O M P U T E R S Y S T E M S 1
LifeBook A Series Notebook BIOS A Series BIOS ■ Selecting a field causes a help message about that field to be displayed on the right-hand side of the screen. ■ Pressing the Enter key with the highlight on a selection that is not a submenu or auto selection will cause a list of all options for that item to be displayed. Pressing the Enter key again will select the highlighted choice. BIOS SETUP UTILITY The BIOS Setup Utility is a program that sets up the operating environment for your notebook.
BIOS Setup Utility 3. If an error message is displayed on the screen, and you want to enter the setup utility, press the [F2] key. 4. When the setup utility starts with a fault present, the system displays the following message: Warning! Error message [Continue] 5. Press any key to enter the setup utility. The system will then display the Main Menu with current parameters values.
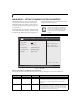
LifeBook A Series Notebook BIOS MAIN MENU – SETTING STANDARD SYSTEM PARAMETERS The Main Menu allows you to set or view the current system parameters. Follow the instructions for Navigating Through The Setup Utility to make any changes. (See Navigating Through The Setup Utility on page 2 for more information.) the field’s function and any special information needed to help understand the field’s use. System Time and System Date can also be set from your operating system without using the setup utility.
Main Menu Table 1: Fields, Options and Defaults for the Main Menu Note that the parameters listed in the following table may vary depending upon your system’s configuration. Menu Field Options Default Description Primary Master: Selects Primary Master submenu The product number of the hard drive. Display the type of device on this ATA/ATAPI interface, if there is one. Pressing the Enter key selects the Primary Master submenu allowing additional device configuration options for this interface.
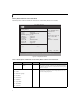
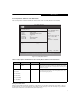
LifeBook A Series Notebook BIOS Primary Master Submenu of the Main Menu The Primary Master submenu identifies the characteristics of the Primary Master device installed. BIOS SETUP UTILITY Main Primary Master: Select ATA/ATAPI drive installed here. Device :Hard Disk Vendor :TOSHIBA MK8025GAS Maximum Capacity :80.0GB LBA Mode :Supported Block Mode :16Sectors PIO Mode :4 Async DMA :MultiWord DMA-2 Ultra DMA :Ultra DMA-5 S.M.A.R.T. :Supported Type [Auto] The BIOS auto-types the drive on boot time.
Main Menu Secondary Master Submenu of the Main Menu The Secondary Master submenu identifies the characteristics of the Secondary Master device installed. BIOS SETUP UTILITY Main Secondary Master: Select ATA/ATAPI drive installed here. Device Vendor LBA Mode PIO Mode Async DMA Ultra DMA :ATAPI CDROM :MATSHITADVD-RAM UJ841S :Supported :4 :MultiWord DMA-2 :Ultra DMA-2 Type [Auto] The BIOS auto-types the drive on boot time. [None] The drive is disabled. [Auto] F1: Help Esc: Exit v02.
LifeBook A Series Notebook BIOS ADVANCED MENU – SETTING DEVICE FEATURE CONTROLS The Advanced Menu allows you to: ■ ■ ■ ■ ■ ■ Set the I/O addresses for the serial and parallel ports. Set the keyboard and mouse features. Select between the display panel and an external CRT display. Enable or disable compensation for your display. Enables or disables the internal controllers. Configure USB features in your system. Follow instructions for Navigating Through the Setup Utility to make any changes.
Advanced Menu Keyboard Features Submenu of the Advanced Menu The Keyboard Features submenu is for enabling or disabling the NumLock feature. BIOS SETUP UTILITY Advanced Keyboard/Mouse Features [On] or [Off] Numlock is On or Off. Numlock [Off] [On/Padlock Off] Numlock is On, but use with [Fn] for 10-key input. * Windows XP preserves Numlock state when the user logs off. F1: Help Esc: Exit v02.59 (C) Copyright 1985-2006, American Megatrends, Inc. Figure 5.
LifeBook A Series Notebook BIOS Video Features Submenu of the Advanced Menu The Video Features Submenu is for setting the display parameters. BIOS SETUP UTILITY Advanced Video Features Select display terminal. Display: Compensation: * This setting is not effective after operating system starts up. [Auto] [Enabled] F1: Help Esc: Exit v02.59 (C) Copyright 1985-2006, American Megatrends, Inc. Figure 6.
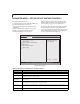
Advanced Menu Internal Device Configurations Submenu of the Advanced Menu The Internal Device Configuration submenu allows the user to configure other internal devices. BIOS SETUP UTILITY Advanced Internal Device Configurations IDE Controller: LAN Controller: [Disabled] No IDE ports are enabled. [Both] [Enabled] [Primary] Only primary IDE port is enabled. [Secondary] Only secondary IDE port is enabled. [Both] Both primary and secondary IDE ports are enabled. F1: Help Esc: Exit v02.
LifeBook A Series Notebook BIOS USB Features Submenu of the Advanced Menu The USB Features Submenu provides options for enabling or disabling the USB Floppy Disk Drive. BIOS SETUP UTILITY Advanced USB Features [Disabled] The feature is disabled. Legacy USB Support SCSI SubClass Support [Enabled] [Disabled] [Enabled] Legacy USB Emulation is enabled and USB devices are available without USB aware OS. F1: Help Esc: Exit v02.59 (C) Copyright 1985-2006, American Megatrends, Inc. Figure 8.
Advanced Menu Miscellaneous Configurations Submenu of the Advanced Menu The Miscellaneous Configurations Submenu provides options for enabling or disabling the power button and the Wake Up On LAN feature, and for adjusting the volume setting and video memory size. BIOS SETUP UTILITY Advanced Miscellaneous Configurations Power Button Wake up on LAN Volume Setting UMA Video Memory Size Configures the power button. [Disabled] [Disabled] [Middle] [64MB] *ACPI OS ignores this setting.
LifeBook A Series Notebook BIOS Event Logging Submenu of the Advanced Menu The Event Logging Submenu configures event logging features for DMI events. BIOS SETUP UTILITY Advanced Event Logging Press key to view the contents of the event log. Event Log Capacity: Space Available Event Log Validity: Valid View Event Log [Enter] Event Logging System Boot Event [Enabled] [Disabled] Clear All Event Logs [Enter] Mark Events as Read [Enter] F1: Help Esc: Exit v02.
Security Menu SECURITY MENU – SETTING THE SECURITY FEATURES The Security menu allows you to set up the data security features of your notebook to fit your operating needs and to view the current security configuration. Follow the instructions for Navigating Through the Setup Utility to make any changes. (See Navigating Through The Setup Utility on page 2 for more information.
LifeBook A Series Notebook BIOS Table 11: Fields, Options and Defaults for the Security Menu Menu Field Options Default Description Supervisor Password is: –— Clear A display-only field. Set is displayed when the system supervisor password is set and Clear when it is not. User Password is: –— Clear A display-only field. Set is displayed when the general user password is set, and Clear when it is not. Set Supervisor Password –— [Enter] Sets, changes or cancels the Supervisor Password.
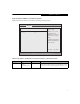
Security Menu Hard Disk Security Submenu of the Security Menu The Hard Disk Security Submenu is for configuring hard disk security features. BIOS SETUP UTILITY Security Hard Disk Security Primary Master Password Is: Clear Set Primary Master Password: [Enter] Password Entry on Boot: [Enabled] Press key to set Hard Disk Password. The hard disk is locked with the password. Data in the locked disk can not be read on other systems. F1: Help Esc: Exit v02.
LifeBook A Series Notebook BIOS Owner Information Submenu of the Security Menu The Owner Information Submenu is for setting owner information. Note that the owner information cannot be set without having entered a Supervisor password. BIOS SETUP UTILITY Security Owner Information Owner Information Is: Clear Set Owner Information [Enter] Foreground Color Background Color [Gray] [Black] F1: Help Esc: Exit v02.59 (C) Copyright 1985-2006, American Megatrends, Inc. Figure 13.
Boot Menu BOOT MENU – SELECTING THE OPERATING SYSTEM SOURCE The Boot Menu is used to select the order in which the BIOS searches sources for the operating system. Follow the instructions for Navigating Through the Setup Utility to make any changes. (See Navigating Through The Setup Utility on page 2 for more information.
LifeBook A Series Notebook BIOS Table 14: Fields, Options and Defaults for the Boot Menu Menu Field Options Default Description Boot Device Priority — — This submenu allows setting up the source for the operating system. See “The Boot Device Priority Submenu” in the following section. Hard Disk Drives Priority — — This submenu allows you to specify the Boot Device Priority of available hard disk drives. See “The Boot Device Priority Submenu” in the following section.
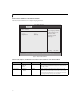
Boot Menu Boot Device Priority Submenu of the Boot Menu The Boot Device Priority Submenu is for setting the order of checking of sources for the operating system. BIOS SETUP UTILITY Boot Specifies the boot sequence from the available devices. Boot Device Priority 1st Boot Device 2nd Boot Device 3rd Boot Device [! Removable Drvs] [Hard Disk Drives] [CD/DVD Drives] A device with an exclamation mark (!) has been disabled in the corresponding type menu. F1: Help Esc: Exit v02.
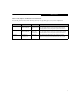
LifeBook A Series Notebook BIOS INFO MENU - DISPLAYS BASIC SYSTEM INFORMATION The Info menu is a display only screens that provides the configuration information for your notebook. The following table shows the names of the menu fields for the Info menu and the information displayed in those fields. These fields are for information purposes only, and cannot be modified by the user.
Exit Menu EXIT MENU – LEAVING THE SETUP UTILITY The Exit Menu is used to leave the setup utility. Follow the instructions for Navigating Through the Setup Utility to make any changes. (See Navigating Through The Setup Utility on page 2 for more information.) The following table shows the names of the menu fields for the Exit menu, the default settings and a description of the field's function and any special information needed to help understand the field's use.