English Français AIR CONDITIONER Compact Wall Mounted Type Español OPERATING MANUAL MODE D’EMPLOI MANUAL DE FUNCIONAMIENTO KEEP THIS OPERATING MANUAL FOR FUTURE REFERENCE CONSERVER CE MANUEL D’UTILISATION POUR POUVOIR LE CONSULTER ULTÉRIEUREMENT CONSERVE ESTE MANUAL DE FUNCIONAMIENTO PARA FUTURA REFERENCIA PART NO. 9319356051 9319356051_OM.
CONTENTS P/N9319356051 SAFETY PRECAUTIONS..................................................... 2 FEATURES AND FUNCTIONS ............................................ 3 NAME OF PARTS ................................................................ 4 PREPARATION .................................................................... 6 OPERATION......................................................................... 7 ADJUSTING THE DIRECTION OF AIR CIRCULATION ...... 9 SWING OPERATION ..........................
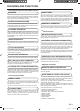
FEATURES AND FUNCTIONS ■ Energy saving and Comfortable function INVERTER At the start of operation, large amount of power is used to bring the room quickly to the desired temperature. Afterward, the air conditioner automatically switches to a low power setting for economic and comfortable operation. ENERGY SAVING PROGRAM When the sensor detects that there is no one in the room, it automatically reduces the operating power. It saves you money by reducing the power consumed.
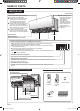
NAME OF PARTS INDOOR UNIT Intake Grille Open Panel It opens at the same time of operation, and shuts when operation stops. ● Please do not touch by hand or put your finger into it during the open panel opening/shutting operation. Or your finger might be injured. ● Please do not move the open panel by hand. It may cause breakdown, vapor may condense near the outlet louvers and drops of water may drip from it if you move it forcibly.
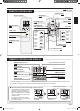
Signal Transmitter MODE button ►7 SENSOR button ► 10 FAN button ►7 SWING button ►9 ECONOMY button ► 11 MIN. HEAT button ► 12 TEMP.
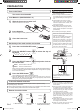
PREPARATION CAUTION Turn on the Power ● Take care to prevent infants from accidentally swallowing batteries. ● When not using the Remote Controller for an extended period, remove the batteries to avoid possible leakage and damage to the unit. ● If leaking battery fluid comes in contact with your skin, eyes, or mouth, immediately wash with copious amounts of water, and consult your physician.
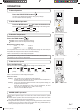
OPERATION To Start Operation Press the START/STOP button . The indoor unit’s OPERATION Indicator Lamp (green) will light. The air conditioner will start operating. To Select Mode Operation Press the MODE button to select the desired mode. ▲ ▲ ▲ Each time the button is pressed, the mode will change in the following order. AUTO COOL DRY ▼ ▼ HEAT FAN About 3 seconds later, the entire display will reappear. Example: When set to COOL. To Set the Temperature Press the TEMP. button .
OPERATION About AUTO CHANGEOVER Operation AUTO: ● When AUTO CHANGEOVER operation first selected, the fan will operate at very low speed for about a few minutes, during which time the indoor unit detects the room conditions and selects the proper operation mode.
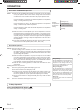
ADJUSTING THE DIRECTION OF AIR CIRCULATION Vertical (up-down) direction of airflow is adjusted by pressing the Remote Controller's SET button. Horizontal (right-left) airflow direction is adjusted manually, by moving the Airflow Direction Louvers. Whenever making horizontal airflow adjustments, start air conditioner operation and be sure that the vertical air direction louvers are stopped. Vertical Air Direction Adjustment Press the SET button DANGER .
ENERGY SAVING PROGRAM This program automatically controls the temperature setting when there is no one in the room for a while, and prevents electricity from being wasted. To enable the ENERGY SAVING ENERGY SAVING is set at the time of purchase. Press the SENSOR button “ . ” on the remote controller will be displayed flashing. ● ENERGY SAVING is set. ● It will be on until the ENERGY SAVING setting is turned off. To disable the ENERGY SAVING Press the SENSOR button “ (If ENERGY SAVING is set) .
POWERFUL OPERATION The product will operate at maximum power, which is convenient when you want to quickly cool down or warm up the room. Begin Air Conditioner operation before performing this procedure. To use POWERFUL Operation Press the POWERFUL button . Only as for this button operation, the beep sound is different from the others. Powerful operation start: Beep 3 times (Pi Pi Pi !) / Others: Beep 2 times (Pi Pi !) To stop POWERFUL Operation Press the POWERFUL button again.
MIN. (Minimum) HEAT OPERATION To use MIN. HEAT Operation Press the MIN. HEAT button . While MIN. HEAT OPERATION is in progress, only the following operation can be used. • SET The ECONOMY indicator lamp (green) will light. To stop MIN. HEAT Operation Press the START/STOP button . The ECONOMY indicator lamp (green) will go out. Then the operation stops. Indicator Lamp OPERATION About the MIN. HEAT Operation • The Heating mode will not operate if the room temperature is high enough.
ON/OFF TIMER OPERATION : The air conditioner will start at the time you set. ● ON TIMER ● OFF TIMER : The air conditioner will stop at the time you set. ● Before using the timer function, be sure that the Remote Controller is set to the correct current time. To use the ON timer or OFF timer 1 Press the TIMER SETTING button At the beginning, “ ” will be flashing, so press the SELECT button within “ ”. to select either “ Press the NEXT button 2 . ” or “ ” .
PROGRAM TIMER OPERATION ● The program timer allows you to integrate OFF timer and ON timer operations in a single sequence. The sequence can involve 1 transition from OFF timer to ON timer, or from ON timer to OFF timer, within a 24 hour period. ● Before using the timer function, be sure that the Remote Controller is set to the correct current time. To use the PROGRAM Timer 1 Press the TIMER SETTING button At the beginning, “ ” will be flashing, so press the SELECT button ”. “ 2 3 .
SLEEP TIMER OPERATION You can set the OFF TIMER to any time you want when you go to sleep. The product adjusts the temperature to make it suitable for sleeping, which helps you sleep comfortably. Once you set the time you want, you can easy set the timer to run from the next time, simply by pressing the SLEEP button once. To use the SLEEP timer 1 Press the TIMER SETTING button ” will be firstly displayed flashing. “ Press the SELECT button to select “ Press the NEXT button 2 0.
WEEKLY TIMER OPERATION Using in these cases of WEEKLY timer The “OFF Timer” at which the operation will be stopped and the “ON Timer” at which the operation will be started can be combined, ) can be applied for one day, and 28 reservations for a week. and up to 4 reservations (program Before creating the program, please adjust the week and time first, and than send it to the air conditioner. If the week and time are not adjusted, the program will not be operated at the set time.
WEEKLY TIMER OPERATION To use WEEKLY timer operation 1 Press the TIMER SETTING button Firstly, since “ . ” will be flashing. Press the NEXT button . Flashing the “ 2 Select the program and the day using the SELECT button Program 1Week Program Monday Program Program 1Week Program Monday Tuesday Program . Program Sunday Saturday Program Sunday Press the NEXT button , when the program number and day you want to set are flashing. 3 Using the SELECT button ”.
WEEKLY TIMER OPERATION 4 Press the SELECT button time or OFF time. to set the desired ON If you selected OFF in step 3 to go back to step 2 and configure 1. Press the NEXT button the next setting. . 2. Press the SEND button Press the NEXT button . The time indicator / “ 5 Press the SELECT button ” will be flashing to set the temperature. If you want to move on to the next setting, press the , return to step 2 and configure the NEXT button next setting.
WEEKLY TIMER OPERATION Check the schedule 1 Press the TIMER SETTING button ” will be flashing. Firstly, since “ Press the NEXT button 2 . Check the program, the day, and the time with the SELECT button 3 . . Press the TIMER SETTING button the regular screen. to return to To cancel the WEEKLY timer 1 2 ● When Press the WEEKLY button displayed. “ “ when “ ” is ” will disappear from the display. ” is not shown, press the WEEKLY button to set the WEEKLY TIMER again.
CLEANING AND CARE 3. Replace the air filters. CAUTION ● Before cleaning the indoor unit, be sure to turn it off and disconnect the electrical breaker and so on. ● Be sure the Intake Grille is installed securely. ● When removing or replacing the air filters, be sure not to touch the heat exchanger, as personal injury may result. ● Do not operate the air conditioner with being opened the intake grille.
CLEANING AND CARE Install or Replace the Air Cleaning Filter 1. Open the intake grille and remove the air filters. Please refer to the page 20. 2. Remove the dirty air cleaning filters attached to the frames of the front panel. (When replacing) Air cleaning filter frame About the Air Cleaning Filters ● When Air Cleaning Filters are used, the effect will increased by setting the fan speed to “High”. [POLYPHENOL CATECHIN AIR CLEANING FILTER] (1 sheet) ● The Air Cleaning Filters are disposable filters.
TROUBLESHOOTING WARNING In the event of a malfunction (burning smell, etc.), immediately stop operation, turn off the electrical breaker and consult authorized service personnel. Merely turning off the unit’s power switch will not completely disconnect the unit from the power source. Always be sure to turn off the electrical breaker to ensure that power is completely off.
TROUBLESHOOTING Symptom Doesn’t operate at all: CHECK ONCE MORE Items to check ● Has the circuit breaker been turn off? ● Has there been a power failure? ● Has a fuse blown out, or a circuit breaker been tripped? ● Is the intake grille completely closed? ● Is the timer operating? Poor Cooling (or Heating) performance: The unit operates differently from the Remote Controller’s setting: See Page — 20 13 - 19 ● ● ● ● ● Is the Air Filter dirty? Are the air conditioner’s intake grille or outlet port block
9319356051_OM.