DESKPOWER 5000 Series User’s Manual Fujitsu endeavours to ensure that the information in this document is correct, but accepts no liability for any error or omission in the same. Any procedures described in this document for operating Fujitsu products should be read and understood by the operator before such products are used. To ensure that Fujitsu products function without risk to safety and health, such procedures should be strictly observed by the operator.
IMPORTANT SAFETY INSTRUCTIONS 1. Read these instructions carefully. Save these instructions for future reference. 2. Follow all warnings and instructions marked on the product. 3. Unplug this product from the wall outlet before cleaning. Do not use liquid cleaners or aerosol cleaners. Use a damp cloth for cleaning. 4. Do not use this product near water. 5. Do not place this product on an unstable cart, stand, or table. The product may fall, causing serious damage to the product. 6.
13. Unplug this product from the wall outlet and refer servicing to qualified service personnel under the following conditions: a. When the power cord or plug is damaged or frayed. b. If liquid has been spilled into the product. c. If the product has been exposed to rain or water. d. If the product does not operate normally when the operating instructions are followed.
Before reading this manual This section describes safety precautions and convention used in this manual. Be sure to read this. For Safe Operation This manual contains important information for using the DESKPOWER personal computer. Read this manual thoroughly before using your PC. In particular, “Safety Precautions” in this manual must be read and understood. This manual including “Safety Precautions” must be readily available at all times.
Using this Product for High-Safety Applications This product is for office, personal, home, ordinary industry and other general use. It is not designed and manufactured for use in high-safety applications. Do not use this product for such applications without taking measures to satisfy the high-safety requirements. High-safety applications require extremely high level of safety, and involve serious hazards to life and health if the required safety is not assured.
Microsoft Service Pack Microsoft Corp. offers Service Pack to provide the users of Microsoft® Windows® with more stable system operation (http://www.microsoft.com/). The latest version of the Service Pack helps you configure the most stable system using Microsoft® Windows® provided at that time by Microsoft Corp. We recommend you to use the latest version. In some environments, however, the Service Pack may cause unexpected failure. Read Readme.txt for the Service Pack before use.
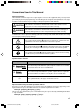
Conventions Used in This Manual Warning messages This manual uses various signs. These signs urge the user to use the equipment safely so as to prevent personal injury and/or property damage. The following are alert signals and explanations. The signs should be understood before proceeding to subsequent portions of this manual. CAUTION This indicates a hazardous situation that could result in death or severe injury if the user does not perform the procedure correctly.
Command entry (keying in) In this manual, a command entry is represented as follows: diskcopy a: a: ↑ ↑ • Where character spacing is provided as shown by [↑], press the [Space] key once. Commands, an example of which is given above in lowercase, can also be entered in uppercase. • [CD-ROM drive] indicates the name of the CD-ROM drive being used. Enter the drive name in accordance with your PC environment. [CD-ROM drive]:\setup.
Reference to products In this manual, the product names are referred to as follows: This manual includes information on other operating systems. Product name Description used in the manual Microsoft® Windows® XP Professional Windows XP Professional Microsoft® Windows® XP Home Edition Windows XP Home Edition Microsoft® Windows® 2000 Professional Windows 2000 Microsoft® Windows NT® Workstation Operating System Version 4.
Recycling Disposal of the PC unit Disposal of the PC unit (including accessories except the LCD unit) is controlled by the Waste Disposal and Public Cleaning Law. ● To institutional and corporate customers Personal computers must be disposed of as industrial waste. Institutional and corporate customers are obliged to entrust an authorized industrial-waste disposer. ● To individual customers Personal computers should be disposed of as general waste.
Warning and caution labels Your PC bears the warning and caution labels as shown below. The warning and caution labels must not be removed or damaged. Rear of the PC main unit DESKPOWER MODEL P N FPC–DB0000 CP118040 – 01 U® L LISTED UL1950 7J61 100-120V(4.5A) 200-240V (2.25A) 50/60Hz MADE IN SINGAPORE By Fujitsu Limited.
Organization of This Manual Before Reading This Manual This section contains cautions for safe operation, representations and symbols used in this manual. Be sure to read this first! Chapter 1 Part Names This chapter provides the names and functions of individual parts. Chapter 2 Installation and Connection This section describes the location of installation and installation of the computer. Chapter 3 Hardware This chapter provides the basic information on the PC and operation.
Contents CHAPTER 1 1 Part Names Part Names and Functions .............................................................. 2 Front of the PC Unit .......................................................................................... 2 Rear of the PC Unit .......................................................................................... 4 Inside the PC Unit ............................................................................................ 6 Motherboard ....................................
CHAPTER 4 System Expansion 1 2 Before Installing a Peripheral Device ............................................ 42 Removing the Cover ....................................................................... 44 3 Installing Memory Modules ............................................................ 45 Removing the Cover ....................................................................................... 44 Location of Memory Modules ..................................................................
CHAPTER 1 Part Names CHAPTER 1 Bennett (01-08) 1 6/7/02, 3:50 PM
1 Part Names and Functions This section explains the names and functions of the parts of the PC unit and the motherboard. Point The remaining part of this manual assumes vertical placement.When you place the PC unit horizontally, be careful about geometrical difference. ■ Front of the PC Unit 1 Power button Press this button to turn on the PC unit or set the system to the standby mode (power-saving mode). 2 Power lamp This lamp lights up when the PC is on.
3 Disk access lamp This lamp lights up while the hard disk is accessed. 4 USB connector Slide the cover down and connect USB peripherals. 5 Foot Used for placing the PC. This also prevents the PC in a vertical placement from tipping over. 6 CD eject button Press this button to load or eject a CD-ROM disk or a music CD.This button can be used when the PC is on.Do not press this button when the CD access lamp is on.
■ Rear of the PC Unit 1 Burglarproof lock Install a key to prevent burglary of the components in the PC. 2 Expansion card slots Insert an optional expansion card to this slot. This slot accommodates a half-size PCI card. Put the supplied nylon band through the USB fixture slit to tie up the cable. 3 Inlet Connect the power code of the PC unit to this connector. 4 Mouse connector Connect a mouse. 5 Keyboard connector Connect the keyboard.
6 Serial connector Connect an RS-232C device connector. 7 Parallel connector Connect a printer or scanner cable. 8 CRT connector Connect the cable of an analog RGB display. 9 LAN connector Connect a LAN cable. 10 USB connector Connect a USB device. 11 Line OUT terminal A terminal for sound output.Connect the input terminal of audio equipment to this terminal. When connecting speakers, use those with a built-in amplifier. 12 Line IN terminal A terminal for sound input.
■ Inside the PC Unit 1 Internal hard disk drive An IDE-compliant hard disk drive. 2 Expansion card slots Insert an optional expansion card to this slot. This slot accommodates a half-size PCI card. A SCSI card allows you to use an external hard disk drive or a magneto-optical disk drive.
■ Motherboard 1 CPU 2 DIMM slots Memory modules are inserted into these slots. Increasing the memory capacity increases the amount of data that the system can read at one access, thereby improving the processing capability of the PC. When viewed from the front of the PC unit, the front slot is DIMM1 and the behind is DIMM2. The standard memory module is seated in the DIMM1 slot. 3 Secondary IDE connector (IDE2) The standard CD-ROM drive is connected.
CHAPTER 2 Installation and Connection CHAPTER 2 Bennett (09-18) 9 6/8/02, 10:11 AM
1 Installation This section describes the location and installation of the PC. ■ Location of Installation Avoid the following conditions when installing your PC. ● Location with a large amount of humidity, dusts and oily smoke. ● Location with poor ventilation. ● Location with a fire source. ● Bathroom, shower room, and other location with water splashes. ● Location with elevated temperature such as direct sunlight or heating equipment. ● Location at the temperature below 10°C.
● When using a single foot When installing your PC in the vertical layout and in contact withthe wall, use the following installation procedure. 1 Disassemble the foot. 2 Mount the disassembled foot on the PC unit. Fix the foot by tightening the setscrew. ❒ Horizontal Placement 1 Disassemble the foot. 2 Place the PC on the disassembled foot.
Point You can also mount five rubber feet at the center and four corners of the PC bottom plate during horizontal placement. Take care not to contact the rubber feet with the foot of PC during vertical placement. Wipe and clean the mounting surface of the PC when you fix the rubber feed to the PC housing. Also, do not slide the PC when you move it if you have already mounted the rubber feet on it. ■ Example of Installation To locate the PC, follow the procedure below.
❒ Horizontal Placement 17-inch or less CRT display unit (below 19kg) can be placed on the PC housing in horizontal layout. Display PC unit Foot Keyboard Mouse Point The remaining part of this manual assumes vertical PC placement. When you place the PC unit horizontally, be careful about geometrical difference.
2 Connection Connect the display, keyboard, and power cord to the PC. WARNING ● Connect the grounding leads to the device that needs to be grounded before turning it on. You may get electrical shock if you do not provide grounding. Do not connect the grounding wire to the gas pipe. Otherwise it may cause a fire. ● Turn the PC and attached devices off and unplug power cords from their power outlet before installing or uninstalling the display, keyboard, mouse and others.
■ Connecting the Display/Keyboard/Mouse 4 3 5 1 2 1 Plugging the power cord into power receptacle. Plug the power cord of the display unit into the power outlet of the PC. 2 Plugging the power cord into inlet of display unit. Plug the other end of power cord into the power inlet at the rear of the display unit. 3 Connecting the mouse.
4 Connecting the keyboard. Plug the keyboard cable into the socket at the rear of the PC, by facing the connector mark to the right and matching the connector color to the keyboard label at the rear of the PC. 5 Connecting the display cable to the PC unit. Securely plug the signal cable of the display unit into the display socket at the rear of the PC, and tighten connector setscrews.
■ Connect the Power Cord When you attach a peripheral device such as the display to your PC, plug its power cord into socket by following the instructions given. ● Do not plug or unplug the power cord with wet hands. ● Do not damage or modify the power cord. ● Do not compress, pull, twist, or heat the power cord. ● Do not use the power cord or power outlet if they are damaged or loose. ● Use a dry cloth to clean the plug pins and power outlet, if they are covered with dust.
1 Plug the power cord into the power inlet at the rear of the PC. 2 Connect the power cord to the 230 VAC power source. Plug the other end of power cord into the 230 VAC power receptacle.
3 Power On Cautions ● When turning on the PC for the first time after purchase, do not connect any peripheral equipment. ● The power lamp shines orange when the PC is in the standby mode. ● Before turning the PC power switch ON, make sure that the display unit has been connected to the PC. If the display unit is not connected, it is not recognized when you turn the PC power switch on. In such case, the on-screen display may be abnormal when the display unit is connected later.
■ How to Power On CAUTION ● Do not carry or give impact/vibrations to the PC when it is on. Or, it may cause a failure. 1 Press the display power button. Nothing appears on the screen at this time. 2 Press the PC power button. The green power lamp will light on both the PC and display unit. When you turn on the PC, it displays a FUJITSU logo, and starts up the system. Power button When you turn on the power for the first time, you need to set up Windows.
4 Setting Up This section describes how to set up the Windows when you turn on the PC for the first time. Make sure that you follow the procedure described in this manual. Read the following Considerations before turning on the PC for setting up the Windows. Considerations ● Do not perform the following before setting up Windows. If you do the following, Windows may not be set up correctly, or error messages appear.
■ Setting Up Windows XP 1 Turn on the PC. After a few seconds, [Welcome to Microsoft Windows] appears. 2 Click [Next]. [License Agreement] is displayed. This License Agreement describes the agreement for using preinstalled Windows on the computer. 3 Read the [License Agreement] carefully, and click [I agree], and then [Next]. Point If you select [I do not agree], click [Next] and follow the instruction message. [Give a name to the Computer] is displayed.
Important You need to perform [Run this] to finalize the setup. Be sure to perform the procedure as it is described here. 12 Click [Perform]. Final setup is performed, and the restart message is displayed. 13 Click [OK]. The PC restarts. You have completed the Windows setup. ■ Setting Up Windows 2000 Point While setting up Windows 2000, you will see a message "The file "xxxxx.xxx" is required from the Windows 2000 Professional CD-ROM" (where "xxxxx.xxx" is replaced with a file name such as "courf.
5 Fill out [Computer name], [Administrator password], and [Reenter password], and click [Next]. [Setting up network] appears. To set up the network, ask your network administrator to check the setup after completing the setup, and set it up for your operating environment. 6 Click [Standard setting] and [Next]. Point With [Standard setting], the following network components are installed.
Point Make sure you select [User for this computer ...]. If you select items other than [User for this computer ...], the setup may not be carried out correctly. [Finishing the Network Identification Wizard] appears. 11 Click [Finish]. The [Windows logon] dialog box appears. 12 Enter the password you entered in the step 5, and click [OK]. The [Introducing Windows 2000] dialog box appears. 13 Click [Start] → [Shutdown]. The computer restarts, showing the [Selecting an Operating System] screen.
■ Problem During Setup? If the computer freezes during setup, or if you have any other problem, see the following items. ❒ The screen does not show anything when the computer is turned on. ● Turn of the computer, and check the connection of display. ❒ I cannot go on with the Windows setup. ● See “Turn off the computer”, turn off the computer, and repeat the setup procedure.
5 Turn Off the Computer Cautions ● Before turning off the computer, finish the work and save your data. ● Before turning of the computer, make sure that the disk access lamp or floppy disk access lamp are all off. If you turn off the computer while these lamps are on, your data may not be saved, or the data stored in the floppy disk or hard disk may be damaged.
For Windows 2000: Click [Start] and [Shutdown], select [Shutdown] and click [OK]. For Windows Me: Click [Start] and [Exit Windows], select [Place into mode of readiness for turning off], and click [OK]. Point • If the power is not turned off by the above operation, cut the power by following steps below: 1. Press [Ctrl] + [Alt] + [Delete] keys. 2. To turn off the computer automatically, carry out the following steps: – For Windows XP Click [Shutdown] and [Turn off computer].
CHAPTER 3 Hardware CHAPTER 3 Bennett (29-40) 29 12/6/02, 10:17 AM
1 Keyboard This section explains the functions of the keys on the keyboard. Point Key functions may vary depending on the operating system and applications used. See manuals attached to the operating system and applications. 1 Esc key Pressing this key cancels the operation the application program is executing. 2 F keys These F keys are assigned specific functions for each application. 3 Back space key Press the Back Space key to move the cursor to the left while deleting characters.
8 Caps Lock key Use the Caps Lock key to type alphabetical characters. Press [Shift] + [Caps Lock] to switch between uppercase and lowercase. 9 Ctrl key Use the Ctrl key in combination with another key. Its function varies with each application. 10 Windows key Press the Windows key to display the Start menu. 11 Alt key Use the Ctrl key in combination with another key. Its function varies with each application. 12 Application key This key has the same function as clicking the right mouse button.
2 CDs This section describes how to handle, insert, and remove a CD. Notes on Handling Follow the following guidelines to prevent faults when handling a CD. Guidelines for CD Media ● Apply no label to any side of the disk. Do not use a ballpoint pen or pencil. ● Do not touch or damage the data side. ● Do not bend the disk or put a heavy object on it. ● If the disk has dirt or water droplets, use a damp cloth to wipe them off and clean the disk with a dry cloth. Always wipe the disk along the radius.
■ Inserting or Removing a CD ● Inserting a CD 1 Press the CD eject button. Press the middle of the CD eject button, and the CD tray pops out. CD access lamp CD eject button 2 Pull the tray out with a hand. As shown in the figure, hold the center of the tray. Tray 3 Mount the CD by facing its label to the left, and push the CD until it snaps onto the hub at the center of the tray. When pressing the CD, hold the tray not to tip over the PC.
4 Manually push the tray until it clicks. The tray goes into the computer, and sets the CD. Point • The CD access lamp lights when the CD is set. Wait until the CD access lamp turns off, and then do the following. • The tray is not set correctly, if you press the CD eject button while pushing in the tray. ● Removing the CD Before ejecting the CD, make sure that the CD access lamp is off. If OK, press the CD eject button.
3 Floppy Disks This section explains how to handle, insert, and remove a floppy disk. Notes on Disk Handling To prevent faults, note the following when handling floppy disks. ● Keep the disks dry. ● Do not touch the disk inside. ● Do not bend the disk or put a heavy object on it. ● Keep the disks away from magnetism. ● Do not drop the disks. ● Do not place the disks in an extreme temperature environment. ● Do not place the disks in a humid and dusty environment. ● Do not affix two or more labels.
● Removing a Floppy Disk 1 Make sure that the floppy disk access lamp is off. Floppy disk access lamp Point Do not press the floppy disk eject button while the floppy disk access lamp is on. Data stored on the disk may be damaged. 2 Press the Floppy disk eject button. The floppy disk comes out.
4 Hard Disk This section provides cautions on handling the hard disk drive. Cautions To prevent faults, note the following. ● Data is read from the hard disk drive or written to it while the internal disk that stores data is rotating at high speeds. Since it is a very delicate device, do not carry the PC with the power on or do not apply shock or vibration to the PC. ● Do not use or store the hard disk drive in an area where temperature changes sharply in an extremely wide range.
5 Maintenance of the Hardware ■ Maintenance of the PC Unit CAUTION ● Before starting maintenance work, turn off the PC and all devices connected to it, and unplug them. Otherwise, electric shock may occur. ● Clean the PC using a soft dry cloth. Wipe remaining dirt off using a damp cloth, moistened with neutral detergent and wrung well. Once the dirt is wiped off, remove the neutral detergent from the PC with a well-wrung cloth moistened with water. Be careful not to let water enter the PC system.
3 Clean the inside of the mouse. Wipe the inside of the mouse, roller, and the bottom cover with a damp cloth. Roller 4 Reassemble the ball and bottom cover. When the ball and the inside of the mouse are dry, reassemble the ball and cover. ■ Maintenance of the Keyboard Clean the PC using a soft dry cloth. ■ Cleaning CDs ● If the disk has dirt or water droplets, use a damp cloth to wipe them off and clean the disk with a dry cloth. Always wipe the disk along the radius.
CHAPTER 4 System Expansion CHAPTER 4 Bennett (41-52) 41 12/6/02, 10:18 AM
1 Before Installing a Peripheral Device This PC can accommodate various peripheral devices to expand its functions. CAUTION ● Use only peripheral devices recommended by Fujitsu. Otherwise, electric shock, fire or a fault may occur. CAUTION ● When installing or removing a peripheral device, do not remove screws other than those specified in the manual. Otherwise, personal injury or a fault may occur. ● Read this manual carefully to ensure correct cable connections.
● After removing the feet, place the PC unit on a soft cloth. Placing the PC directly on a hard surface may cause scratches on the PC. ● Be careful with the cables and components inside. Do not damage or modify them. ● Be careful of static electricity. PC boards and electronic parts of internal peripheral devices are exposed. They may be damaged by static electricity generated on your body. Before handling these parts, touch a large metallic object to discharge static electricity.
2 Removing the Cover When mounting a peripheral device, remove the upper cover so that the inside can be seen. ■ Removing the Cover Remove the feet, if any, from the PC unit. Place the PC unit in a horizontal position and remove the upper cover. 1 Remove the two screws on the PC unit. 2 Remove the upper cover. Slide the upper cover to the front of the PC unit and lift it for removal. Point For installation, use the removal procedure in the reverse order.
3 Installing Memory Modules Increasing the memory capacity increases the amount of data that the system can read at one access, thereby improving the processing capability of the PC. Point If you want to install a memory module to the PC you have just purchased, set up Windows, turn off the PC, and then install the memory module. CAUTION ● Before installing or removing a memory module, turn off the PC and all devices connected to it, and unplug them. Otherwise, electric shock may occur.
■ Location of Memory Modules ■ Applicable Memory Modules Use Fujitsu 1 84-pin DDR SDRAM DIMM memory (PC 2100 ECC-incompatible) memory modules. The maximum memory capacity is 1 GB (512 MB x 2). For the standard configuration, memory is installed in DIMM1.To add memory, install it in DIMM2. The memory module in slot DIMM1 must be changed depending on the total memory capacity you want.
■ Installing Memory Modules 1 Unplug the PC. 2 Remove the upper cover. 3 Remove the expansion card mounting bracket and reinforcing fitting. Remove the two screws and pull straight up the expansion card mounting bracket. (The reinforcing fitting is removed together with the expansion card mounting bracket.) When an expansion card has been installed, remove the cable from the card and remove the bracket. 4 Pull the hooks on both sides of the slot outward. 5 Insert a memory module into the slot.
6 Install the expansion card mounting bracket and reinforcing fitting. Secure it with the two screws you have removed in Procedure3. 7 Installing Memory Modules Reinstall the upper cover. Point To remove a memory module, open module hooks at both sides of the slot. Do not pull the hooks too violently. Otherwise, the memory module may jump out of the slot and become faulty.
4 Installing an Expansion Card Expansion cards are used to enhance the PC functions. Point If you want to install an expansion card to the PC you have just purchased, set up Windows, turn off the PC, and then install the card. CAUTION ● Before installing or removing an expansion card, turn off the PC and all devices connected to it, and unplug them. Otherwise, electric shock may occur. ● Use Fujitsu expansion cards. Otherwise, electric shock, fire or a fault may occur.
■ Location of expansion Cards ■ Applicable Expansion Cards This PC accommodates a PCI expansion card. The PCI1 slot holds an expansion card with a maximum length of 176 mm (half size) and the PC2 slot holds an expansion card with a maximum length of 120 mm (half size). To run the expansion card, the generally called resource necessary for operation must be assured.
3 Remove the expansion card mounting bracket. Remove the two screws and pull straight up the expansion card mounting bracket When an expansion card has been installed, remove the cable from the card and remove the bracket. 4 Remove the slot cover. Remove one screw from the position where the expansion card is installed, and remove the slot cover. Point Keep the removed slot cover. Use the cover to keep an empty slot from dust.
5 Insert the expansion card into the slot. Insert the expansion card into the slot, and secure it with the screw removed in Procedure 4. 6 Install the expansion card mounting bracket. Secure it with the four screws you have removed in Procedure 3. 7 Reinstall the upper cover. Point To remove the expansion card, use the installation procedure in the reverse order. 8 Plug the PC. 9 Turn on the PC. The system configures the device driver and resource to enable the expansion card.
CHAPTER 5 Technical Information CHAPTER 5 Bennett (53-60) 53 12/6/02, 10:31 AM
1 List of Specifications ■ PC Specifications DESKPOWER 5000 Intel® Pentium® 4 processor 1.7/1.9/2.0/2.2 GHz Intel® Pentium® 4 processors 2A GHz Primary 8KB + Secondary 512KB (CPU integrated) Cache memory Intel® Pentium® 4 processors 1.70GHz Primary 8KB + Secondary 256KB(CPU integrated) System bus 400MHz BIOS ROM 512 KB (Flash ROM) Main memory 128 MB (184Pin PC2100 DDR SDRAM DIMM) as a standard feature, ECC-incompatible 1GB, max.
DESKPOWER 5000 Product Name Power/Frequency Outer dimensions Weight Burglarproof lock *1: *2: *3: *4: *5: 100/230 VAC, 50/60 Hz 80(W)•326(D)•305(H)mm(excluding foot and protrusions) Approx. 7 kg Yes The capacity is automatically changed by Intel Dynamic Video Memory Technology according to system conditions. Disk capacities are based on a conversion of 1 MB = 1000 2 bytes and 1 GB = 1000 3 bytes.
■ LAN function LAN Controller Transmission buffer RAM External Interface Transmission media Intel 82801DB(ICH4)integrated + 82562EM 3K bytes for transmission (send/receive) ISO8802-3 100BASE-TX/10BASE-T Twisted pair cable *1 (100Mbps: Category 5, 10Mbps: Category 3 - 5) Baseband CSMA/CD 100 Mbps, 10 Mbps Star form 100 m Depending on the hub unit*2 Transmission system Access method Data transfer rate Cabling form Maximum segment length Maximum nodes/segments *1: To successfully activate the network at 100
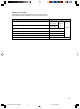
2 Connector Specifications The following table provides the pin assignment and signal names.
● LAN connector (100BASE-TX/10BASE-T) Pin number 1 2 3 4 5 6 7 8 Signal name TD+ TD– RD+ NC NC RD– NC NC Direction Output Output Input – – Input – – Description Send data + Send data – Receive data + Not connected Not connected Receive data – Not connected Not connected Direction Input and output Input and output Input and output Input and output Input and output Input and output Input and output Input and output Input and output Input Input Input Input Output Input Output Output – Description Strobe
● Serial connector Pin number 1 2 3 4 5 6 7 8 9 Signal name CD RD TD DTR GND DSR RTS CTS RI Direction Input Input Output Output – Input Output Input Input Description Carrier detect Receive data Transmission data Data terminal ready Ground Data set ready Request to send Clear to send Ring indicate Direction Input and output – – – Input and output – Description Data Not connected Ground Power Clock Not connected Direction Input and output – – – Input and output – Description Data Not connected Ground
Glossary Symbol 100BASE-TX/10BASE-T ............................ 58 C CD - inserting ............................................. 33 - removing ............................................ 33 - maintenance ...................................... 39 Connector specifications ............................ 57 CRT connector ........................................... 57 E Expansion card .......................................... 49 - installation ......................................... 50 F Floppy disk ........