
Installation Instructions


26
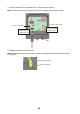
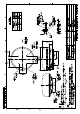
3. Confirm that the LED on the board is OFF, and then replace the fuse.
Note: DO NOT change the fuse if the LED is ON; this indicates high voltage is present.
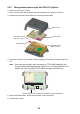
4. Reattach the base and install the unit.
Note: Before fixing the base, make sure the waterproofing gasket is correctly seated in the groove
in the chassis.
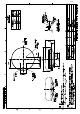
J1
1: Brown (P48V)
2: Red (DC_N)
TB1
1: White (DC_P)
2: Black (DC_N)
LED
Fuse F2 (1.5A 125V)
Fuse F1 (7A 125V)
Waterproofing gasket
Groove in chassis