
Installation Instructions


13
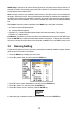
5. Press T or S to select the transducer frequency and then press the ENTER key.
6. Press S to select “Transducer” and then press the ENTER key. The list of programmed trans-
ducers appears.
7. Press T to select transducer connected and then press the ENTER key.
8. Jot down the alphabet which appears on the “TAP” line. You may need to change the tap set-
ting at the rear of the display unit depending on the transducer type which is connected. For
details, see below.
9. If a low frequency transducer is fitted, repeat steps 2 to 8.
Note: Leave the “Tx Power” setting at “Auto”.
10.To connect to the NavNet 3D system, press T to select “NavNet Mode” and then press the
ENTER key. Select “On” and press the ENTER key.
The following program versions can be connected to the FCV-1150.
MFD8/12: 1950055-02.01 and later
MFDBB: 1950064-02.01 and later
11.Press and hold down the [ /BRILL] key to turn off the power.
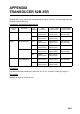
Tap setting
Set the tap according to the alphabet shown when you selected transducer type.
200B-5S
50/200-1T
50/200-1ST
200B-8B
200B-12H
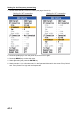
(Example: 200 kHz)
Display unit rear panel
(connector cover removed)
Tap setting plug
(for high frequency)
E D C B A
Common point
Tap setting plug
(for low frequency)
Set this side according to indication.
jumper
connection