
Operator's Manual


5. INSTALLATION AND INITIAL SETTINGS
5-3
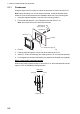
5.1.2 Frontmount (Option)
The optional frontmount kit may be used to install the FI-70 where access behind the
console is limited.
1. Using the template supplied with the frontmount kit, cut a hole in the mounting
location.
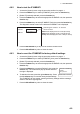
2. Fit the snap pins and washers (supplied in the frontmount kit)
to the FI-70, as shown in the figure above.
3. Fit the frontmount panel to the console with four self-tapping
screws (supplied in the frontmount kit).
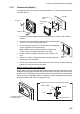
Note: Check that the frontmount panel is oriented in the
correct manner, referring to the figure on the right.
4. Feed the cable through the cutout, then fit the cable to the
FI-70.
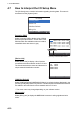
5. Set the FI-70 into the frontmount panel, using the snap pins
and snap pin slots as guides.
6. Push the FI-70 into the frontmount panel until a “click” sound is made, indicating
that the FI-70 is now secure in the panel.
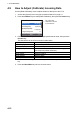
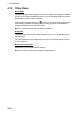
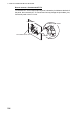
How to waterproof the mounting holes
Where there is a risk of water seepage around the frontmount hole, the hole must be
waterproofed using marine sealant. Care must be taken not to fill the soft cover locking
points on the FI-70. (Eight in total, four at the top rear of the unit and four at the bottom
rear of the unit, see the figure below for reference.) Silicone seepage into the locking
points prevents the soft cover from fitting correctly.
Snap pin
Self-tapping
screw
Frontmount
panel
Console
Washers
Snap pin
slots
Indicates soft cover
locking points
Detailed view of marine sealant application area
FI-70
Marine sealant
Console
Frontmount panel