
Operator's Manual
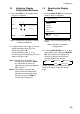

2. TRACK
2-3
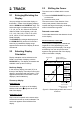
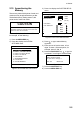
234.0˚
34˚ 23.456´ N 135˚ 45.678´ E
BRG
345.0˚
RNG
123
12.3
SOG
NM
kn
COG
H
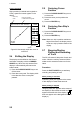
Hold icon
(appears while recording
of track is stopped)
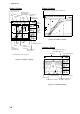
D3D 100m
* SAFE
Recording
is stopped.
This portion of track
does not appear on
the display.
Recording of
track turned off
Ship’s track
while recording is
stopped
Own ship
Recording of
track started
Figure 2-3 Track not plotted or recorded when
plotting is stopped
2.8 Erasing Track
The track stored in the memory and
displayed on the screen can be erased.
CAUTION
Track cannot be restored once erased. Be
absolutely sure you want to erase all track.
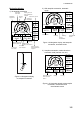
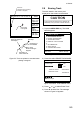
1) Press the MENU ESC key. The MAIN
MENU appears.
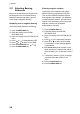
MAIN MENU
2. TRACK/MARK SETUP
3. ERASE TRACK/MARK
4. ALARM SETTINGS
5. MANUAL CALCULATION
6.
7. GPS MONITOR
8. SELF TESTS
9. SYSTEM SETTINGS
1. DISPLAY SETUP
ENT: Enter MENU: Escape
Figure 2-4 MAIN MENU
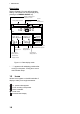
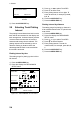
2) Press 3 to select ERASE TRACK/MARK.
ERASE TRACK/MARK
Erase Mark
No
Erase Track
No
Yes
Yes
Track Pts. Used:
Mark Pts. Used:
123/1000 Pt
345/1000 Pt
: Select
MENU: Escape
Figure 2-5 ERASE TRACK/MARK menu
3) Press
or to select Erase Track.
4) Press
to select Yes. The message
shown in Figure 2-6 appears.