
Operator's Manual


3-1
3. MARKS
3.1 Entering/Erasing Marks
Marks can be inscribed on the Plotter 1 and
Plotter 2 displays. You may inscribe a mark
anywhere, in one of 13 shapes. Further,
marks can be connected with lines.
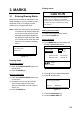
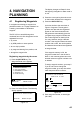
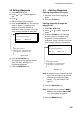
Note 1: When the mark memory becomes full
no marks can be entered. When this
occurs, the buzzer sounds and the
message shown below appears on
the display for three seconds to alert
you. To enter a mark when the mark
memory is full, erase unnecessary
marks.
Can’t save mark
Memory full
Figure 3-1
Entering marks
At own ship position
1) Press the CURSOR ON/OFF key to turn
off the cursor.
2) Press the MARK key.
At cursor intersection
1) Press the CURSOR ON/OFF key to turn
on the cursor.
2) Operate the cursor keys to place the
cursor on the location for the mark.
Select a mark shape you want. Refer to
section 3.2.
3) Press the MARK key.
Erasing marks
CAUTION
All marks, including event marks and the
MOB mark, are erased on the ERASE
MARK menu. Be absolutely sure you want
to erase all marks; erased marks cannot
be restored.
Erasing individual marks
1) Place cursor on the mark to erase.
2) Press the CLEAR key.
Erasing all marks
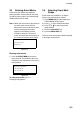
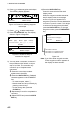
1) Press MENU ESC and 3 to display the
ERASE TRACK/MARK menu.
ERASE TRACK/MARK
Erase Mark
No
Erase Track
No
Yes
Yes
Track Pts Used:
Mark Pts Used:
123/1000 Pt
345/1000 Pt
: Select
MENU: Escape
Figure 3-2 ERASE TRACK/MARK menu
2) Press
or to select Erase Mark.
3) Press
to select YES.
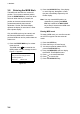
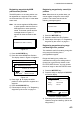
Are you sure to erase ?
ENT: Yes
MENU: No
Figure 3-3
4) Press the NU/CU ENT key.
5) Press the MENU ESC key.