
Installation Instructions


6
• The power cable supplied is 10 ft [3m], however it can be extended up to 60 ft
[see power cable installation].
• The antenna cable supplied is 25 ft [7.6m], however alternative lengths can be
ordered [35 ft, 50 ft, 90 ft and 135 ft. Be advised that the 135 ft cable comes with
its own “inline amplifier”.
Mounting the Antenna:
• The antenna can be installed as a standard “pedestal” mounting or “surface”
mounting [non metallic surface only].
• Depending on the method of mounting and thickness of mounting substrate, the
hardware screws supplied may not be suitable.
• First determine the method of mounting to be used. For “pedestal” mounting it is
required to drill both the 9/16” hole and the three 7/64” dia. holes. For the “direct
surface mount” method, only the 9/16” dia. hole is required.
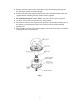
Pedestal mounting: [see fig. 1]
1. Unscrew the base from the lower plastic body [note the “O” ring and retain].
2. Use the rubber gasket or base as a template to mark the locations of the three
mounting holes and the centre hole for passing through the short antenna cable
with the connector.
3. Use the 9/16” drill bit for the centre hole and the 7/64” drill bit for the three fixing
holes.
4. Thread the short cable and connector through the gasket and centre hole.
5. Mount the gasket and flange of the antenna using the supplied screws.
6. Attach the antenna base to the lower body plastic, making sure the “O” ring is in
place.
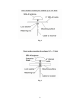
Surface mounting: [FOR NON METALIC SUBSTRATES ONLY]. See fig. 2
& fig. 3.
There are two options available depending on location and mounting structure.
1. Up to ¼” thick mounting substrate.
2. ¼” – 1” thick mounting substrate.
• For substrates up to ¼” thick - only the 9/16” dia. hole is required.