
Operator's Manual


9. INSTALLATION
9-3
5. Attach the F mount cushion (supplied as accessories) to the remote display from
the rear side.
6. Connect the cable connectors (see section 9.3).
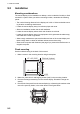
7. Set the remote display to the cutout and fasten it with four self-tapping screws
(supplied as installation material; 3x20).
8. Set the front panel to the remote display.
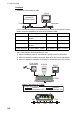
Note: When you remove the remote display from the flush mounting location, use the
panel remover (supplied as accessories) to remove the panel as shown below.
Desktop or table underside mounting
See the outline drawing in the back of this manual.
1. Make four pilot holes for self-tapping screws (5x20) in the mounting location.
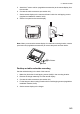
2. Remove the hanger assembly from the remote display.
3. Connect the cable connectors (see section 9.3).
4. Fix the hanger to the mounting location with four self-tapping screws (supplied as
installation material; 5x20).
5. Set the remote display to the hanger.
DISP
APP
TRUE
MENU
START
CLEAR
ENT
B
R
I
L
L
1
2
Insert
Pull down