
User's Manual


7
devices. DO NOT FORGET TO USE CAPS WHEN TYPING THE PASSWORD INTO YOUR iOS DEVICE!
(2) iOS Devices: Wi-Fi Setting
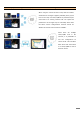
After the TZT9/14/BB is ready, connect an iOS device to it as follows.
1. Select the SSID of the TZT9/14. In this example,
[TZT14 No.1] is the SSID of the TZT14 to be connected.
2. Enter the password of the TZT9/14/BB. In this example,
the password for the TZT14 is set to [12345678]. If letters
are used in the password, ensure to enter them in upper
case.
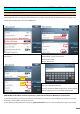
A check mark will appear when the wireless LAN connection is made. To confirm the connection, tap the SSID to verify
that an IP address between [192.168.123.1] and [192.168.123.254] and subnet mask [255.255.255.0] are shown
in the DHCP tab. In this example, the IP address of [192.168.123.6] is automatically assigned to the iOS device.
2-3 Setting for Connection to an Existing Wireless LAN
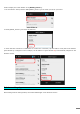
(1) TZT9/14/BB – Menu Steps to Connect to Existing Wireless LAN
The following settings allow the TZT9/14/BB to connect to an existing wireless LAN. The SSID and the password of the
existing wireless LAN router must be known for both the TZT9/14/BB and iOS devices. The menu steps are similar to the
previous procedure. The connection procedure is similar to setting the access point for the iOS devices with the following
setting.