
Owner's Manual
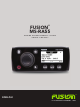

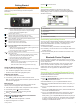
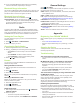

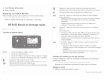
Table Of Contents

8
If your compatible Bluetooth device does not immediately
connect to the stereo, repeat steps 1 through 7.
Bluetooth Range Information
The stereo and Bluetooth wireless devices have a range of 10 m
(33 ft.). For optimal performance, the Bluetooth wireless device
should also have a clear line of sight to the stereo.
Bluetooth Source Settings
With the BLUETOOTH source selected, select .
DISCOVERABLE: Allows the stereo to be visible to Bluetooth
devices. This setting turns off automatically after two minutes
to prevent possible interruption to audio after pairing a
Bluetooth device to the stereo.
Radio
To listen to AM or FM radio, you must have a suitable marine
AM/FM antenna properly connected to the stereo and be within
range of a broadcasting station. For instructions on connecting
an AM/FM antenna, see the stereo installation instructions.
Setting the Tuner Region
You must select the region you are in to receive AM and FM
stations properly.
1
Select > SETTINGS > TUNER REGION.
2
Select the region you are in.
Changing the Radio Station
1
Select an applicable source, such as FM.
2
Select repeatedly to move through the tuning modes:
• Select AUTO to scan and stop on the next available
station.
• Select MANUAL to select a station manually.
• Select PRESETS to select a saved station preset.
3
Select or to tune to the station.
Presets
You can save your favorite AM stations and FM stations as
presets for easy access.
Saving a Station as a Preset
1
With an applicable source selected, tune the stereo to a
station.
2
Select > PRESETS.
3
Select SAVE CURRENT.
TIP: You can quickly save the selected station as a preset by
holding .
Selecting a Preset from a List
Before you can select a preset from a list, you must save at
least one station as a preset.
1
Select the applicable source.
2
Select > PRESETS.
3
Select a preset from the list.
Removing Presets
1
With an applicable source selected, select > PRESETS >
REMOVE PRESET.
2
Select an option:
• To remove one preset, select the preset.
• To remote all presets, select REMOVE ALL PRESETS.
General Settings
Select > SETTINGS.
NOTE: When an option button is filled, the option is on. When
the option button is clear, the option is off.
ZONE: Enables you to set the balance, volume limit, and names
of the speaker zones.
ZONE > TONE: Adjusts the bass and treble tones.
LCD: Adjusts the backlight brightness and contrast settings
(Adjusting the Backlight Brightness and Contrast, page 1).
LANGUAGE: Sets the language on the device.
POWER SAVE: Disables the LCD backlight after one minute of
inactivity to save battery power.
TUNER REGION: Sets the region used by FM and AM.
SET DEVICE NAME: Sets the name for this stereo (Entering
Text, page 1).
ABOUT: Shows the software version for the stereo.
Appendix
Registering Your FUSION
®
MS-RA55
Help us better support you by completing our online registration
today.
• Go to www.fusionentertainment.com.
• Keep the original sales receipt, or a photocopy, in a safe
place.
Cleaning the Device
1
Dampen a soft, clean, lint-free cloth with fresh water.
2
Gently wipe the device.
Troubleshooting
The stereo does not respond to key presses
• Turn off power to the stereo for two minutes to reset the
stereo.
My Bluetooth audio is interrupted by short breaks
• Ensure the media player is not covered or obstructed.
Bluetooth technology performs best with line-of-sight
operation.
• Bring the media player within 10 m (33 ft.) of the stereo.
• Turn off the DISCOVERABLE setting after pairing a
Bluetooth device to the stereo.
The stereo does not display all song information from
my Bluetooth source
The availability of song information, such as song title, artist
name, and track duration, depends on the capability of the
media player and music application.
Album cover artwork and shuffle and repeat status icons are not
supported by this stereo on Bluetooth technology.
Reducing Unexpected Noise
If the stereo is subject to strong electrical interference, this
interference might be heard through the speakers. You should
take appropriate action to suppress or reduce the noise.
• Add clip-on ferrite beads to the cables connected directly to
the product.
• Add clip-on ferrite beads to the device in the vessel that is
causing the interference.
• Disconnect the AUX input cable from the RCA connector
when it is not used.
2 Radio