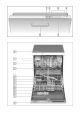
Operating instructions 9000 126 064 (8601) en Dishwasher DF 290 DF 291 DI 290 DI 291
en Index Safety instructions . . . . . . . . . . . . . . . . . . . . . . . . . Getting to know your appliance . . . . . . . . . . . . . . Before using your appliance for the first time . . Setting up the water softener . . . . . . . . . . . . . . . . Filling in the salt . . . . . . . . . . . . . . . . . . . . . . . . . . . Filling with rinse aid . . . . . . . . . . . . . . . . . . . . . . . . Not suitable for the dishwasher . . . . . . . . . . . . . . Arranging crockery, glasses, etc.
Safety instructions Delivery Immediately check the packaging and dishwasher for any damage which may have been caused in transit. Do not use a damaged appliance, but consult your supplier. Please dispose of packaging material properly. Installation Install and connect the appliance according to the installation and assembly instructions. The dishwasher must NOT be connected to the power supply during installation.
If a fault occurs Repairs or other work on the dishwasher should only be carried out by a qualified specialist. The dishwasher must be disconnected from the electricity supply before any repairs or other work are started. Pull the mains plug out of the wall socket or switch off at the fuse box. Grasp the plug to remove it from the socket; do not tug on the cable. Turn the water off at the tap.
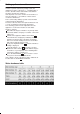
Before using your appliance for the first time Before you can use your appliance for the first time, you must select the language. When the appliance has been switched on, the following display is output: M OK – < DE EN FR NL IT EL The language abbreviation “DE” for “Deutsch” (German) is flashing. If you want to select a different language, press – or + 3 repeatedly until the abbreviation of your desired language flashes. Confirm the language selection by pressing M/OK 2 .
Setting up the water softener In order to provide satisfactory rinsing results, the dishwasher requires soft water, i.e., containing little or no lime, otherwise water stains will be left behind on the dishes and interior containers. If the tap water exceeds a certain level of hardness, it must be softened, i.e., decalcified, so that it can be used in the dishwasher. This is achieved by adding a special salt to the water softener inside the dishwasher.
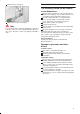
Filling in the salt Filling with rinse aid If the hardness of your mains water corresponds to the (see chapter “Setting up the device’s index value softening system”), you do not need to fill in the salt because the operation will not use any salt. If the set values to are displayed, salt must be added. Rinse aid is used in washing mode to ensure that glasses are sparkling and utensils are stain-free. When the appliance is switched on, low rinse aid level is indicated by ”Refill rinse aid”.
Fill when door is fully open. Not suitable for the dishwasher The following should not be cleaned in the dishwasher: Filling when the door is half open. Note Use only rinse aid for domestic dishwashers. Spilt rinse aid may result in excessive foam formation in the next rinse cycle. Therefore, remove any spilt rinse aid with a cloth. Wooden cutlery and utensils – these will leach out and become unsightly; even the utilised stickers are not suitable for the temperatures which occur.
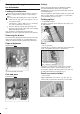
Arranging crockery, glasses, etc. in the dishwasher Loading the dishwasher Scrape off any large amounts of left-over food. It is not necessary to rinse the dishes under running water. Place objects in the dishwasher in such a way that D items such as cups, glasses, pots/pans, etc.
Adjusting the height of the basket * Baking sheet spray head * * some models If required, the height of the upper utensils basket can be adjusted to provide more space for tall utensils either in the upper or lower basket. * some models You can clean large baking sheets or grilles with the baking sheet spray head. To do this, remove the top basket and insert the spray head as illustrated in the diagram.
Detergents Notes on detergents You may use any brand of liquid or powder detergent, as well as tablets, that have been specifically designed for use in domestic dishwashers (do not use normal washing-up liquid!). Nowadays there are three types of dishwasher detergent available: 1. Those containing phosphates and chlorine. 2. Those containing phosphates but no chlorine. 3. Those containing neither phosphates nor chlorine.
Reduce costs! If your dishes are only moderately dirty, you may be able to use less detergent than recommended. If using washing tablets, please refer to the washing tablets box where to place the tablets in the appliance (e.g. in the cutlery basket, detergent dispenser). Close the detergent dispenser. Slide the dispenser cover completely over the detergent compartment (1) and then press down firmly (2) until the catch “clicks” into position.
Note Even if the rinse aid and/or salt refill indicator is lit, the rinse programme runs correctly when 3in1 products are used. If the rinse aid refill indicator or salt refill indicator is defective and you would like to switch it off, proceed as follows: Switching “Add rinse aid” off and on: Switch on the appliance with the main switch 1 . Keep pressing button M/OK 2 until the “rinse aid” setting is displayed. By pressing buttons – or + 3 , you can select a set value between 0 and 6.
Adjusting the appliance Switching on the appliance Turn on the tap fully. Switch on the appliance with the main switch 1 and, if required, top up with salt and rinse aid (see chapters “Filling with salt”, “Filling with rinse aid”). The main menu is then displayed. < Auto Wash > After switching on the Main Menu shows the programme “Auto Wash”.
Programme overview Type of utensil e.g. porcelain, pans, cutlery, glasses, etc. Type of food remains e.g.
Selecting options/ standard settings Operating principle Remote Options ** The dishwasher installs itself automatically during the first use within a serve@Home network. In some cases however, it might become necessary to start the enrolment process anew. If the option “Remote Options” is selected, the message “Enrol Device” will be displayed. By pressing the button + 3 you enrol the device again at the gateway. After successfully enrolling the device the message “Auto Wash” will be displayed.
Water Hardness Standard Programmes Before starting the appliance for the first time or in case of changes in the water hardness, the dishwasher’s softening system must be set to the hardness of your mains water supply. Follow the instructions set out in the chapter “Set-up of the Softening System”. In addition to the rinse programmes available in the Main Menu you can choose among the following standard programmes from the programme “Normal”: Extra, Eco 50, Eco 45, Normal 45.
Optical indicator during operation * * With some models During the rinse programme a light point appears on the floor below the device’s door. Only open the dishwasher door when the light point has disappeared. In the case of built-in dishwashers with flush front the light point will not be visible. Start programme Before starting check again whether the spray arms can move freely. Press the button “Start” 4 in the Main Menu.
Maintenance and care A regular inspection and maintenance of your machine will help to prevent faults. This saves time and prevents problems. Therefore you should occasionally have a careful look inside your dishwasher. Overall condition of the machine Check spray arm for grease and limescale deposits. If you find such deposits: Fill the detergent dispenser with detergent, start the appliance without utensils in the programme which has the highest wash temperature.
Pump * Fault finding * on applicable models Larger remnants of food that have not been trapped by the filters and have been left in the water can cause a blockage in the pump. The water is no longer pumped out of the dishwasher and it can be seen covering the filter. Proceed as follows: First, always disconnect the appliance from the power supply. Ladle out as much water as possible. Remove the filters 26 . Undo the screw in the cover (Torx T 20) and remove the cover.
Some time after the programme start a continuous acoustic signal sounds. The device does not draw water. When the door is opened the message “Check water supply” is displayed. Mains water tap is not opened. Open the tap fully and press the button M/OK 2 of the device. Then close the device’s door for the programme to resume. Filter of the water inlet hose is blocked. Switch off the device and disconnect it from the power supply. Close the mains water tap.
Dishes, cutlery, etc. have not been dried Selected programme did not include drying function. Amount of rinse-aid was set too low. Items were removed from dishwasher too soon. Glasses have a dull appearance Amount of rinse-aid was set too low. Tea stains or traces of lipstick have not been completely removed Detergent does not have a sufficient bleaching effect. Washing temperature was set too low. Traces of rust on cutlery Cutlery is not sufficiently rustproof. Salt content in washing water is too high.
Installation The dishwasher must be connected by a qualified technician to ensure correct operation. The specifications for supply, drainage and connected load must fulfil the required criteria as stated in the following paragraphs or in the installation instructions.
Waste disposal Disposal Old appliances are not worthless rubbish. Valuable raw materials can be reclaimed by recycling old appliances. Pull out the mains plug of the redundant appliance. Cut off the power cord and discard with mains plug. To prevent children from locking themselves in the appliance and suffocating, destroy the door lock and childproof lock (if fitted). You received your new appliance in a protective shipping carton. All packaging materials are environmentally friendly and recyclable.
en Subjekt to modification 26
AQUA-STOP Warranty. (not applicable to appliances without Aqua-Stop) In addition to warranty claims against the seller based on the sales agreement and in addition to our appliance warranty we shall replace the appliance under the following conditions: 1. If damage is caused by water due to a malfunction of our Aqua-Stop system, we shall make good the damage in the case of private consumers. 2. This liability warranty is valid for the service life of the appliance. 3.