Cod.15001993 Rev.00 del 15-01-10 Type SUP-038G GAGGIA S.p.A. Strada Prov. per Abbiategrasso 20087 Robecco Sul Naviglio Milano, ITALIA Tel: +39 02 949931 Fax: + 39 02 9470888 The manufacturer reserves the right to change the features of the product without prior notice. Le producteur se réserve le droit d“apporter toutes modifications sans préavis. © Gaggia S.p.A.
Ca Operation and maintenance manual Before using the machine, please read the attached operating instructions. Carefully read the safety rules. Mode d'emploi Veuillez lire attentivement le mode d'emploi (notamment les consignes de sécurité) avant d'utiliser l'appareil .
Carafe aSSemBlY ProCedUre - SCHema de montaGe de la Carafe For correct use of the carafe, refer to the instructions on page 12 . III A The maintenance instructions for the carafe circuits are described on page 36 . The disassembly and cleaning instructions for the components are described on page 41 . Pour l’utilisation correcte de la carafe, consulter les instructions à page 12. Pour l'entretien des circuits de la carafe, consulter la page 36.
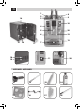
IV 1 2 3 14 8 9 10 4 15 16 17 5 29 6 12 13 7 18 19 11 20 aCCeSSorieS - aCCeSSoireS 21 22 23 24 25 26 27 28
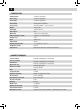
V teCHniCal data Nominal voltage Power rating Power supply Shell material Size (w x h x d) Weight Cord length Control panel Water tank Coffee bean hopper capacity Pump pressure Boiler Coffee grinder Quantity of ground coffee Dregdrawer capacity Safety devices See label on the appliance See label on the appliance See label on the appliance Thermoplastic material/Metal 282 x 385 x 428 mm - 11 .1 x 15 .2 x 16 .8 in 17 Kg - 37 .5 lbs 1200 mm - 47 .24 in Front 1 .6 liters - 54 .1 oz (removable) 350 grams - 12 .
VI
IMPORTANT SAFEGUARDS When using electrical appliances, basic safety precautions should always be followed, including the following: 1. Read all instructions. 2. Do not touch hot surfaces. Use handles or knobs. 3. To protect against fire, electric shock and injury to persons do not immerse cord, plugs, or appliance in water or other liquid. 4. Close supervision is necessary when the appliance is used by or near children. 5. Unplug from outlet when not in use and before cleaning.
Caution This appliance is for household use only. Any servicing, other than cleaning and user maintenance, should be performed by an authorized service center. Do not immerse machine in water. To reduce the risk of fire or electric shock, do not disassemble the machine. There are no parts inside the machine serviceable by the user. Repair should be done by authorized service personnel only. 1 Check voltage to be sure that the voltage indicated on the nameplate corresponds with your voltage.
index 1 GENERAL INFORMATION . . . . . . . . . . . . . . . . . . . . . . . . . . . . . . . . . . . . . . . . . . . . . . . . . . . . . . . . . . . . . . . . 2 MACHINE COMPONENTS & ACCESSORIES - CONTROL PANEL . . . . . . . . . . . . . . . . . . . . . . . . . . . . . . . . . . 3 INSTALLATION. . . . . . . . . . . . . . . . . . . . . . . . . . . . . . . . . . . . . . . . . . .
2 General Information General Information This coffee machine is suitable for preparing espresso coffee using coffee beans and is equipped with a device to dispense steam and hot water. The machine is designed for domestic use and not suitable for heavy or professional use. Warning: No liability is held for damage caused by: • Incorrect use not in accordance with the intended purposes. • Repairs not carried out by authorized service centers. • Tampering with the power cord.
MACHINE COMPONENTS AND ACCESSORIES - CONTROL PANEL 3 For a correct use of the manual, we recommend that you keep the cover page open; this allows you to better understand the text.
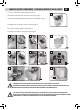
4 inStallation StartinG tHe maCHine Before turning on the machine, make sure that the power button is set to "0". 1 Lift the right outer lid and remove the inner lid . 4 Remove the water tank using the handle. 7 Press the power button to the "I" position to turn the machine on . 2 Slowly pour coffee beans into the hopper . Replace the inner lid and close the outer lid . 5 Fill the tank with fresh drinking water. Do not exceed the "max" level indicated on the water tank.
5 SettinG tHe lanGUaGe This setting allows you to choose the operating language of the machine. It also allows you to adjust the parameters of the beverages to the typical parameters of the country where the machine is used. This is why some languages are differentiated also by country. If no language is selected, you will be requested to select it the next time the machine is started.
6 inStallation firSt USe - USe after a Period of inaCtiVitY To improve the product quality, carry out this procedure at first use of the machine and after long periods of inactivity. A few simple operations are needed to ensure the quality of your favourite beverages over time. 15/01/10 10:38 1 2 Place a container of large size under the coffee dispensing spout . 3 Press the button once or more until the icon is displayed . 15/01/10 10:38 Select the product by pressing the button shown.
7 intenZa Water filter To improve the quality of the water you use and extend the life of your machine at the same time, it is recommended that you install the water filter. After installation, go to the water filter initialization programme (see the "MACHINE MENU", page 25). In this way, the machine informs the user when the water filter must be replaced.
8 adJUStmentS oPti-doSe (adJUStS tHe amoUnt of Coffee to Grind) The machine allows you to adjust the right quantity of ground coffee for each product. The standard adjustment for each product can be set in the "BEVERAGE MENU" (see page 22). You may temporarily change the amount of coffee ground as well. This change applies only to the brewing of the next coffee. Press the " " button on the control panel to temporarily change the quantity of ground coffee, or select the pre-ground function.
9 GaGGia adaPtinG SYStem Coffee is a natural product and its characteristics may change according to its origin, blend and roast . The Gaggia coffee machine is equipped with a self-adjusting system that allows the use of all types of coffee beans available on the market (not including flavored or carmelized) .
10 adJUStmentS diSPenSinG SPoUt HeiGHt adJUStment Before brewing a product, and according to the kind of cup, adjust the height of the dispensing spout. To adjust, manually move the dispensing spout as shown in the picture. 1 2 3 4 Note: In some cases the dispensing spout can be removed to allow the use of very large containers.
11 Stand-BY mode The machine is designed for energy saving . After 60 minutes of inactivity, the machine goes into stand-by mode, the boiler is no longer heated and all the devices turn off . Power consumption is reduced to a minimum. Press any button to turn the machine on again. The machine status can be manually changed to stand-by mode by holding the stand-by button pressed for 3 seconds . Note: 1 The stand-by mode cannot be activated if the service door is left open.
12 milK Carafe USe The machine is equipped with a carafe allowing for optimal milk frothing for the brewing of tasty cappuccinos, latte macchiatos and any milk-based beverage . I A B Note: Before using the carafe, make sure it is thoroughly clean and sanitary. If milk is left in the carafe, make sure it is still suitable for food consumption before using it. The container allows for an easy and practical steaming and frothing of milk.
13 7 8 C B A D B At this stage the carafe holes (A) are lower than the couplings (C). The carafe pins (B) are located at the same height of the guides (D) . Insert the carafe by turning it towards the base through a round movement (as shown in the figure), until it is hooked to the hole (E) located in the drip tray. 9 DO NOT FORCE THE INCLINATION OF THE CARAFE. E The carafe will be naturally back in place .
14 Coffee BreWinG eSPreSSo / lonG Coffee This procedure shows how to brew an espresso. To brew another type of coffee, press the appropriate button. Use proper coffee cups to prevent coffee from spilling . To brew 2 cups, press the button twice; the machine brews half of the entered quantity and briefly interrupts dispensing in order to grind the second coffee dose. Coffee brewing is then restarted and completed. 1 2 3 15/01/10 10:38 Position 1 or 2 cups to brew one or two espresso coffees .
15 BeVeraGe BreWinG WitH Pre-GroUnd Coffee The machine allows you to use pre-ground and decaffeinated coffee. Pre-ground coffee must be poured into the bypass doser positioned on the top of the machine . Only use ground coffee for espresso machines and never coffee beans or instant coffee (see the "beverage programming" section on page 22). 15/01/10 This example shows how to brew an espresso by using pre-ground10:38 coffee. 2 1 Place 1 cup under the dispensing spout .
16 CaPPUCCino / latte maCCHiato / milK ProdUCt BreWinG AT THE BEGINNING OF THE DISPENSING PHASE, THE MACHINE MAY PRODUCE SOME SPURTS OF MILK AND STEAM: RISK OF SCALDING! ALWAYS WAIT FOR THE CYCLE TO END BEFORE REMOVING THE CONTAINER. REFER TO THE SECTION "MILK CARAFE USE" (SEE PAGE 12). When brewing milk products, the machine dispenses the milk first and then brews the coffee. In this case, simultaneously brewing a double product is not possible .
CleaninG CYCle 7 8 CAPPUCCINO Once milk has been dispensed, the machine starts brewing the coffee. Coffee brewing can be interrupted at any time by pressing "STOP". At the end remove the cup with the cappuccino and place the handle back to the initial position . 17 9 Wait a few seconds. The machine starts the automatic cleaning process (if enabled - see page 31) . Upon completion of the cleaning cycle remove the milk carafe and put it in the refrigerator .
18 CleaninG CYCle The machine allows executing a quick cleaning cycle at any time. The cleaning cycle can be executed before and/or after the beverage brewing. This option allows you to manage the container cleaning process as desired. The cleaning process may be used also for circuit sanitization after a long period of inactivity . RISCIACQUO CARAFFA 1 2 Place the container as described on pages 12 and 13 .
Hot Water 19 Hot Water diSPenSinG Hot water can be used to prepare tea and infusions quickly. WARNING: DISPENSING MAY BE PRECEDED BY SHORT SPURTS OF HOT WATER AND SCALDING IS POSSIBLE. THE STEAM/HOT WATER WAND MAY REACH HIGH TEMPERATURES: DO NOT TOUCH WITH BARE HANDS. USE THE APPROPRIATE HANDLE ONLY. 1 15/01/10 10:38 2 3 15/01/10 10:38 SELECT HOT WATER OR STEAM Place a container under the hot water wand.
20 Steam Steam diSPenSinG Steam can be used to heat milk, water or other beverages. WARNING: DISPENSING MAY BE PRECEDED BY SHORT SPURTS OF HOT WATER AND SCALDING IS POSSIBLE. THE STEAM/HOT WATER WAND MAY REACH HIGH TEMPERATURES: DO NOT TOUCH WITH BARE HANDS. USE THE APPROPRIATE HANDLE ONLY. 1 15/01/10 10:38 2 15/01/10 3 10:38 SELECT HOT WATER OR STEAM Place a container under the steam wand. 4 Press the button to enter the page for dispensing steam .
BeVeraGe lenGtH QUiCK ProGramminG 21 BREWING MAY BE PRECEDED BY SHORT SPURTS OF MILK AND STEAM: RISK OF SCALDING! REFER TO THE SECTION "MILK CONTAINER USE". This section shows the programming procedure for the Cappuccino. This is meant as an example to introduce you to the steps necessary for a quick and easy programming of all the beverages . After a quick programming of the beverage, it is possible to carry out a finer and more detailed adjustment by means of the "BEVERAGE MENU" (see page 22).
22 BeVeraGe menU All beverage settings can be customized . 15/01/10 10:38 Button to select the beverage settings 1. BEVERAGE MENU EPRESSO COFFEE LONG COFFEE CAPPUCCINO LATTE MACCHIATO HOT MILK HOT WATER Exit button Scrolling/Selection button RESTORE DEFAULT VALUES Selection/confirmation button Scrolling/Selection button For each beverage it is possible to reset the original factory settings . After selection of this function, the customized settings are deleted .
23 In this case we look at how to programme a cappuccino. The milk managing options are not shown when a coffee brewing (espresso or long coffee) is being programmed . 1.4. CAPPUCCINO COFFEE AMOUNT PREBREWING COFFEE TEMPERATURE COFFEE LENGTH MILK LENGTH MILK FOAM RESTORE DEFAULT VALUES COFFEE AMOUNT PREBREWING COFFEE TEMPERATURE COFFEE LENGTH This section allows you to program the quantity of coffee to grind for the beverage brewing: this setting will affect the coffee aroma.
24 BeVeraGe menU 1.4. CAPPUCCINO COFFEE AMOUNT PREBREWING COFFEE TEMPERATURE COFFEE LENGTH MILK LENGTH MILK FOAM RESTORE DEFAULT VALUES MILK LENGTH MILK FOAM This section allows you to program the quantity of milk for each selected beverage. The strip allows you to determine exactly the quantity of milk to be dispensed. This section allows you to program the milk frothing method.
maCHine menU The machine allows you to customize the operation settings. 15/01/10 10:38 Button to select the machine settings 2.
26 MACHINE MENU GENERAL SETTINGS GENERAL SETTINGS To change the machine operation settings. This function allows you to set the operation of the cup-warming surface located on the upper part of the machine. cup WARMER OFF To keep the cup-warming surface always off. ON To keep the cup-warming surface always on. ECOMODE FUNCTION This function enables allows you to choose how the boilers on the machine are activated, to promote energy saving.
27 DISPLAY SETTINGS DISPLAY SETTINGS This menu allows you to set the menu language and the display contrast. This setting is of fundamental importance for correctly adjusting the parameters of the machine according to the country where the machine is used. LANGUAGE ENGLISH BRIGHTNESS The currently selected language is displayed. To set the correct display contrast according to the room illumination.
28 maCHine menU Calendar SettinGS CALENDAR SETTINGS This menu allows setting all the time and calendar functions and their related functions. This setting is fundamental for the correct operation of all those functions requiring precise time settings . TIME HOUR MINUTES To set the minutes for the current hour . FORMAT To set the display format for the time . This can be set either in the 24h or the AM/PM format.
29 CALENDAR SETTINGS This menu allows you to programme the machine power-on times, according to your needs. The machine performs this function only if the power button is switched to on. It is possible to set 3 different power-on times, which can be managed independently. For reasons of brevity, only the "TIMER 1" setting is described below. The same setting procedure applies for the other timers. Note: The switch-off is managed through the "STAND-BY" programming.
30 MACHINE MENU WATER SETTINGS WATER SETTINGS WATER HARDNESS ENABLE FILTER ACTIVATE FILTER This menu allows setting correct water parameters for coffee brewing. To change the machine water hardness setting. The "Water Hardness" function allows adjusting the machine to the level of hardness of the water used. The machine will then request descaling at the right moment. Measure water hardness as shown on page 5. To activate/deactivate the warning signal to replace the water filter.
31 MAINTENANCE SETTINGS This menu allows setting all the functions for correct machine maintenance MAINTENANCE SETTINGS PRODUCT COUNTERS This function shows how many products have been brewed for every single type of coffee since the last reset. DESCALING CYCLE This function enables the descaling cycle (the machine shows how many litres can be dispensed before descaling) (See page 33). BREW UNIT CLEANING CYCLE This function enables the wash cycle for the brew group (See page 32).
32 maintenanCe BREW GROUP CLEANING CYCLE To rinse the brew group, simply clean with water as shown on page 40. This wash cycle completes the maintenance process of the brew group. We recommend carrying out this cycle on a monthly basis or every 500 coffees using the Gaggia brew group cleaning tablets, which can be purchased from Gaggia Customer Service or an authorized retailer . WASH CYCLES CANNOT BE STOPPED. DO NOT LEAVE THE MACHINE UNATTENDED DURING THIS OPERATION.
33 BOILER DESCALING CYCLE MENU Descaling should be performed every 1-2 months or when the machine displays the relevant message. The machine must be on to perform this cycle; it automatically controls the distribution of the descaling solution. DO NOT LEAVE THE MACHINE UNATTENDED DURING THIS OPERATION. WARNING! NEVER USE VINEGAR AS A DESCALING SOLUTION.
34 4 maintenanCe DESCALING CYCLE 5 DESCALING CYCLE 6 DESCALING CYCLE EMPTY DRIP TRAY PLACED UNDER THE BREW GROUP FILL THE CARAFE HALFWAY WITH FRESH WATER AND INSERT IT IN BREWING POSITION PLACE A CONTAINER UNDER HOT WATER & CARAFE DISP. SPOUTS Empty the drip tray placed under the dispensing spout (page 38 - fig. 2) and then replace it on the machine . Then, press the "OK" button. Fill half the carafe with fresh water (page 36 - fig. 7). Insert the carafe and place it in the brewing position.
35 13 14 DESCALING CYCLE PLACE A CONTAINER UNDER HOT WATER & CARAFE DISP. SPOUTS 15 STEP 2/2 RINSING CYCLE... Place a container under the dispensing spout and a container under the hot water wand. Then, press the "OK" button. 16 CICLO DECALCIFICAZIONE The rinse cycle is activated . The bar shows the cycle progress. CICLO DECALCIFICAZIONE STEP 2/2 RINSING CYCLE...
36 maintenanCe MILK CIRCUIT MAINTENANCE It is possible to sanitize the milk circuits by carrying out a simple and quick cycle allowing for a thorough cleaning. This wash completes the maintenance process of the milk carafe. We recommend carrying out this cycle on a monthly basis using Gaggia cleaning solution, which can be purchased from Gaggia Customer Service or an authorized dealer . WASH CYCLES CANNOT BE STOPPED. DO NOT LEAVE THE MACHINE UNATTENDED DURING THIS OPERATION. 1 2.5.
37 10 B 11 C A D B At this stage the carafe holes (A) are lower than the couplings (C). The carafe pins (B) are located at the same height of the guides (D) . Insert the carafe by turning it towards the base through a round movement (as shown in the figure), until it is hooked to the hole (E) located in the drip tray. 12 13 14 CARAFE WASH CYCLE POUR THE DETERGENT INTO THE CARAFE AND FILL THE CARAFE WITH FRESH WATER E The carafe will be naturally back in place .
38 CleaninG maintenanCe dUrinG oPeration During normal operation, the following messages may appear: "Empty coffee grounds drawer" and/or "Empty drip tray". This operation must be performed when the machine is on. 1 Press the button and open the service door . 4 Empty and wash the drip tray and the cover with fresh water. 2 Remove the drip tray and used grounds drawer. 5 Correctly reinstall all the components . 3 Empty the used grounds drawer and wash it with fresh water.
39 General maCHine CleaninG The cleaning procedure described below must be carried out at least once a week. Note: If water remains in the tank for several days, do not use it. WARNING! Never immerse the machine in water. 1 Turn off the machine and unplug it . 4 Remove the support under the grill . Wash it, taking care of the seal area . Reinstall it only after having washed the other components . . 7 Remove the dispensing spout and wash it with water.
40 CleaninG BreW GroUP CleaninG Wash the brew group at least once a week. Before removing the group, remove the used grounds drawer as shown in fig. 2 on page 38. Wash the brew group with lukewarm water. Lubricate the brew group after approximately 500 brewing cycles. The brew group lubricant may be purchased from an authorized service center . WARNING! Do not wash the brew group with detergents that may compromise its correct operation. Do not wash it in the dishwasher.
41 milK Carafe CleaninG The carafe must be removed and properly washed at least once a week. This procedure guarantees the perfect sanitation of all components . Note: Pay attention to how the components are assembled. This little shrewdness will facilitate the subsequent reassembling. The inner side of the service door shows a quick guide on how to reassemble the carafe. 1 2 The carafe must be removed from the machine and emptied for its cleaning . 4 Disengage the handle by rotating it clockwise.
42 CleaninG milK Carafe aSSemBlY Pay attention during the assembly phase . In case the components do not smoothly enter in their positions, read the instructions more carefully and repeat the assembly procedure . Note: The inner side of the service door shows a quick guide on how to reassemble the carafe. 1 Insert the inner fitting in the hose and press until fully inserting it . 4 Insert the unit previously assembled in the cover base . Pay attention to the reference .
maCHine WarninGS Help Message Displayed CLOSE HOPPER DOOR ADD COFFEE INSERT BREW GROUP INSERT GROUNDS DRAWER AND DRIP TRAY EMPTY GROUNDS DRAWER AND DRIP TRAY CLOSE FRONT DOOR REFILL WATER TANK 43 How to Reset the Message Close or correctly place the coffee bean hopper inner cover to be able to prepare a beverage . Fill the coffee bean hopper with coffee beans. Insert the brew group back in place. Insert the used grounds drawer and the drip tray.
44 maCHine WarninGS Help Message Displayed How to Reset the Message A beverage with milk has been selected. The machine requires the carafe handle spout to be placed into dispensing position . ROTATE THE MILK CARAFE DISPENSING SPOUT INTO BREWING POSITION Press the button "ESC" to cancel the selection. The carafe rinse function has been selected . ROTATE THE MILK CARAFE DISPENSING SPOUT INTO RINSING POSITION Press the button "ESC" to cancel the selection.
SAFETY RULES SOS 45 IN CASE OF EMERGENCY IMMEDIATELY UNPLUG THE CORD FROM THE OUTLET. ONLY USE THE APPLIANCE • • • • Indoors. For preparing coffee, hot water and for frothing milk. For domestic use. This appliance is not intended for use by persons (including children) with reduced physical, sensory or mental capabilities, or lack of experience and knowledge, unless they have been given supervision or instruction concerning use of the appliance by a person responsible for their safety.
46 SAFETY RULES DANGERS • • • • • • • The appliance must not be used by children and persons who have not been informed of its operation. The appliance is dangerous to children. When left unattended, unplug from the electrical outlet. Keep the coffee machine packaging out of the reach of children. Never direct the jet of hot water and/or steam towards yourself or others. Danger of scalding. Do not insert objects through the appliance’s openings. (Danger! Electrical Current!).
47 EC DECLARATION OF CONFORMITY YEAR 09 EC 2006/95, EC 2004/108. GAGGIA S.P.A.
48
Important Lors de l’utilisation d’appareils électriques, il est indispensable de respecter toujours les précautions de sécurité principales, y compris les suivantes : 1. Lire toutes les instructions. 2. Ne pas toucher de surfaces chaudes. Utiliser les poignées ou les boutons. 3. Afin d’éviter tout incendie, choc électrique et blessure, ne pas plonger le cordon, la fiche ou l’appareil dans l’eau ou dans n’importe quel liquide. 4.
Précautions Machine est réservée à un usage domestique. Tout entretien, en dehors du nettoyage et de l’entretien usuel par l’usager, doit être fait par un service aprèsvente autorisé. Ne pas plonger la base dans l’eau. Pour éviter les courts-circuits et les décharges électriques, ne pas démonter la base. Elle ne contient aucune pièce qui demande un entretien de la part de l’usager. Toute réparation doit être effectuée par le personnel d’un service après-vente autorisé.
Table des matières 1 GÉNÉRALITÉS. . . . . . . . . . . . . . . . . . . . . . . . . . . . . . . . . . . . . . . . . . . . . . . . . . . . . . . . . . . . . . . . . . . . . . . . . . 2 APPAREIL - BANDEAU DE COMMANDE. . . . . . . . . . . . . . . . . . . . . . . . . . . . . . . . . . . . . . . . . . . . . . . . . . . . . 3 MONTAGE. . . . . . . . . . . . . . . . . . . . .
2 GÉNÉRALITÉS GÉNÉRALITÉS La machine à café est indiquée pour la préparation de café expresso avec du café en grains et est équipée d’un dispositif pour la distribution d’eau chaude et de vapeur. Au design élégant, cet appareil a été conçu exclusivement pour un usage domestique et n’est donc pas indiqué pour un fonctionnement continu de type professionnel.
APPAREIL - BANDEAU DE COMMANDE 3 Pour une utilisation correcte de ce manuel, il est conseillable de consulter le volet de couverture, qui permet une compréhension meilleure du texte.
4 mONTaGe mise eN marCHe de la maCHiNe Avant de mettre en marche la machine, s'assurer que l’interrupteur général est bien en position « 0 ». 1 Soulever le couvercle extérieur de droite et enlever le couvercle intérieur. 4 Retirer le réservoir à eau en utilisant la poignée. 7 Appuyer sur l'interrupteur général et le mettre sur la position « I ». 2 Remplir avec du café en grains. Remettre le couvercle intérieur et fermer le couvercle extérieur.
5 sÉleCTiONNer la laNGUe Cette fonction permet de choisir la langue de fonctionnement de la machine. De plus, elle permet d’adapter les paramètres des boissons sur la base des préférences du Pays d’utilisation. C’est pourquoi certaines langues sont différenciées aussi en fonction du pays. Si aucune langue n'est sélectionnée, la sélection sera proposée à la prochaine mise en marche de la machine.
6 mONTaGe Première UTilisaTiON - UsaGe aPrès UNe PÉriOde d'iNaCTiViTÉ Afin d'améliorer la qualité des produits, il faut effectuer cette procédure la première fois qu'on utilise la machine et chaque fois qu'elle reste inactive pendant une longue période. Ces quelques simples opérations vous permettent de savourer vos15/01/10 boissons préférées avec une qualité constante. 10:38 1 2 Placer un grand récipient sous la buse de distribution du café.
7 FilTre À eaU iNTeNZa Pour améliorer la qualité de l’eau utilisée et garantir en même temps une durée de vie accrue de l’appareil, il est conseillé d’installer le filtre à eau. Après l'installation, procéder avec le programme d'activation du filtre (voir « MENU MACHINE » à page 25), de manière à ce que la machine puisse prévenir l'utilisateur pour le remplacement du filtre. Enlever le filtre de son emballage, ensuite le plonger verticalement dans l'eau froide (l'ouverture vers le haut).
8 rÉGlaGes (OPTi-dOse) iNdiCaTiON de la QUaNTiTÉ de CaFÉ À mOUdre La machine permet de régler la bonne quantité de café moulu pour chaque produit. Il est possible de programmer le réglage standard pour chaque produit grâce au « MENU BOISSON » (voir page 22). De toute façon, la machine permet de changer temporairement ce réglage en sélectionnant sur le moment la quantité de café à moudre ; ce changement est valable uniquement pour la distribution du café individuel qui suit.
9 GaGGia adaPTiNG sYsTem Le café est un produit naturel et ses caractéristiques peuvent changer selon son origine, son mélange et sa torréfaction. La machine à café Gaggia est munie d’un système d’autoréglage permettant d’utiliser tout type de café en grains disponible dans le commerce (pas caramélisé).
10 rÉGlaGes rÉGlaGe de la HaUTeUr de la bUse de disTribUTiON Régler la hauteur de la buse de distribution avant de distribuer les boissons afin de pouvoir utiliser des types de tasse différents. Pour le réglage, faire défiler manuellement la buse de distribution comme montré dans la figure. 1 2 3 4 Remarque : dans certains cas la buse de distribution peut être enlevée pour pouvoir utiliser des récipients de grande contenance.
11 sTaNd-bY La machine a été conçue pour l'économie d'énergie. La machine se met en attente (stand-by) 60 minutes après la dernière utilisation, la chaudière n’est plus alimentée, tous les dispositifs s’éteignent. Les consommations sont réduites au minimum. Pour redémarrer la machine, il suffira d’appuyer sur une touche quelconque. Il est possible de mettre la machine volontairement en mode d'attente (stand-by) en gardant appuyée la touche pendant 3 secondes.
12 UTilisaTiON dU rÉserVOir À laiT La machine est équipée d'un réservoir qui permet de gérer de façon optimale le lait pour la préparation d'un cappuccino savoureux, d'un lait noisette et de toute boisson qui utilise du lait. I A B Remarque : avant chaque utilisation, s’assurer que la carafe est propre et hygiénisée. Si on a conservé du lait dans la carafe, vérifier avant chaque utilisation que ce lait est apte à la consommation alimentaire.
13 7 8 C B A D B Pendant cette phase les trous de la carafe (A) se trouvent au-dessous des embrayages (C). Les pivots de la carafe (B) se trouvent à la même hauteur des glissières (D). Introduire la carafe par une rotation vers le bas (comme le montre la figure), jusqu'à l'accrochage de l'insert (E) se trouvant dans le bac d'égouttement. 9 IL EST INTERDIT DE FORCER LA CARAFE AU-DELÀ DE SON INCLINAISON NATURELLE. E La carafe se retrouve naturellement dans son logement.
14 disTribUTiON de CaFÉ eXPressO / eXPressO allONGÉ Cette procédure montre comment préparer un expresso. Pour distribuer un autre type de café, le sélectionner en appuyant sur la touche correspondante. Utiliser des tasses appropriées pour éviter que le café ne déborde. Pour la préparation de 2 tasses, appuyer deux fois sur la touche ;la machine distribue la moitié de la quantité réglée et interrompt brièvement la distribution pour moudre la seconde dose de café.
15 disTribUTiON de la bOissON aVeC dU CaFÉ PrÉmOUlU La machine permet d’utiliser du café prémoulu ou décaféiné. Verser le café prémoulu dans le compartiment prévu à cet effet dans la partie centrale de la machine. Ne verser que du café moulu pour machines à café expresso mais jamais du café en grains ou soluble. (voir chapitre « MENU BOISSON » page 22). 15/01/10 Cet exemple montre la procédure de distribution d'un café expresso10:38 en utilisant du café prémoulu.
16 CaPPUCCiNO / laiT NOiseTTe / laiT disTribUTiON IL PEUT Y AVOIR QUELQUES ÉCLABOUSSURES DE LAIT ET VAPEUR AU DÉBUT DE LA DISTRIBUTION, AVEC LE DANGER DE BRÛLURES. AVANT DE PRÉLEVER LE RÉCIPIENT, ATTENDRE LA FIN DU CYCLE. CONSULTER LA SECTION « UTILISATION DU RÉSERVOIR À LAIT » (VOIR PAGE 12). Pour tous les produits à base de lait, la machine distribue le lait avant et le café ensuite. Dans ce cas, il n'est pas possible de distribuer un produit double à la fois.
CYCle de NeTTOYaGe : CleaN 7 CAPPUCCINO Une fois la distribution du lait terminée, la machine distribue le café. Pour arrêter la distribution, appuyer sur la touche « STOP ». 8 À la fin, prendre la tasse avec le cappuccino et remettre la poignée dans la position initiale. 17 9 Attendre pendant quelques instants. La machine fait démarrer le processus automatique de nettoyage de la carafe (si validé voir page 31) Enlever le récipient et le mettre au réfrigérateur après le cycle de nettoyage.
18 CYCle de NeTTOYaGe : CleaN La machine permet d'effectuer un cycle de nettoyage rapide à chaque fois qu'on le souhaite. Le Cycle de nettoyage peut être effectué avant la distribution et/ou tout de suite après la préparation d'une boisson. Cette option est fournie pour permettre de gérer le nettoyage du réservoir à lait selon vos préférences. Ce nettoyage peut être utilisé même pour l'hygiénisation des circuits après une longue période d'inactivité.
eaU CHaUde 19 disTribUTiON d’eaU CHaUde L'eau chaude peut être utilisée pour préparer rapidement du thé ou de la tisane. AU DÉBUT DE LA DISTRIBUTION, FAIRE ATTENTION AU RISQUE DE BRÛLURES CAR IL PEUT Y AVOIR DES ÉCLABOUSSURES D'EAU CHAUDE. LA BUSE POUR LA DISTRIBUTION DE L’EAU CHAUDE/ VAPEUR PEUT ATTEINDRE DES TEMPÉRATURES ÉLEVÉES : ÉVITER DE LA TOUCHER DIRECTEMENT AVEC LES MAINS, UTILISER UN CHIFFON POUR LA TOURNER.
20 VaPeUr disTribUTiON de VaPeUr La vapeur peut être utilisée pour le réchauffage du lait, de l'eau ou d'autres boissons. AU DÉBUT DE LA DISTRIBUTION, FAIRE ATTENTION AU RISQUE DE BRÛLURES CAR IL PEUT Y AVOIR DES ÉCLABOUSSURES D'EAU CHAUDE. LA BUSE POUR LA DISTRIBUTION DE L’EAU CHAUDE/ VAPEUR PEUT ATTEINDRE DES TEMPÉRATURES ÉLEVÉES : ÉVITER DE LA TOUCHER DIRECTEMENT AVEC LES MAINS, UTILISER UN CHIFFON POUR LA TOURNER.
PrOGrammaTiON raPide de la lONGUeUr des bOissONs 21 IL PEUT Y AVOIR QUELQUES ÉCLABOUSSURES DE LAIT ET VAPEUR AU DÉBUT DE LA DISTRIBUTION, AVEC LE DANGER DE BRÛLURES. CONSULTER LA SECTION « UTILISATION DU RÉSERVOIR À LAIT » Dans cette section, on traite de la programmation d'une boisson telle que le Cappuccino car on veut montrer toutes les phases nécessaires pour une programmation simple et rapide de la totalité de vos boissons.
22 meNU bOissON Il est possible de personnaliser les réglages de chaque boisson de la machine. 15/01/10 10:38 Touche pour la sélection des réglages des boissons 1.
23 Dans ce cas, examinons la programmation d'un cappuccino. Pour la programmation d'un café (expresso ou allongé), les options relatives au traitement du lait ne seront pas affichées. 1.4.
24 meNU bOissON 1.4. CAPPUCCINO QUANTITÉ CAFÉ PRÉINFUSION TEMPÉRATURE CAFÉ LONGUEUR CAFÉ LONGUEUR LAIT ÉMULSION LAIT RÉTABLIR VALEURS STANDARD LONGUEUR LAIT ÉMULSION LAIT Cette section permet de programmer la quantité de lait qui est distribuée à chaque fois que l'on sélectionne cette boisson. La bande permet de régler avec précision la quantité de lait à distribuer.
meNU maCHiNe La machine permet de personnaliser les réglages de fonctionnement. 15/01/10 10:38 Touche pour la sélection des réglages de la machine 2.
26 MENU MACHINE RÉGLAGES GÉNÉRAUX Cela permet de modifier les paramètres de fonctionnement de la machine. RÉGLAGES GÉNÉRAUX PLAQUE CHAUFFE-TASSES Cette fonction permet de régler le fonctionnement de la plaque chauffetasses située dans la partie supérieure de la machine. OFF Cela permet de garder la plaque chauffe-tasses toujours éteinte. ON Cela permet de garder la plaque chauffe-tasses toujours allumée.
27 RÉGLAGES DE L'AFFICHEUR RÉGLAGES DE L'AFFICHEUR Ce menu permet de sélectionner la langue des menus et de régler le contraste de l’afficheur. Le réglage est très important pour une bonne définition des paramètres de la machine en fonction du pays d’utilisation. LANGUE FRANÇAIS LUMINOSITÉ La langue sélectionnée est indiquée sur l'afficheur. Ce menu permet de régler le bon contraste de l’afficheur en fonction de l'éclairage ambiant.
28 meNU maCHiNe rÉGlaGes CaleNdrier Ce menu permet de régler toutes les fonctions pour la gestion de l'horloge, du calendrier et de toutes les fonctions associées. RÉGLAGES CALENDRIER Le réglage est très important pour le bon fonctionnement de toutes les fonctions qui utilisent l’heure. HORAIRE HEURE MINUTES FORMAT Pour régler l‘heure actuelle. Pour régler les minutes de l'heure actuelle. Pour régler le format d’affichage de l'heure. Le réglage peut avoir le format 24H ou le format anglo-saxon AM/PM.
29 RÉGLAGES CALENDRIER Ce menu permet de programmer les horaires de mise en marche de la machine selon vos exigences. La machine gère cette fonction uniquement si elle est allumée depuis l’interrupteur général. Il est possible de programmer 3 horaires de mise en marche différents étant gérés de façon indépendante ; par simplicité on décrira seulement la programmation de la « MINUTERIE 1 ». Les autres minuteries peuvent être programmées de la même façon.
30 MENU MACHINE RÉGLAGES EAU RÉGLAGES EAU DURETÉ DE L’EAU VALIDATION FILTRE ACTIVATION FILTRE Ce menu permet de régler les paramètres pour une gestion correcte de l'eau pour la distribution du café. Ce menu permet de modifier le réglage de la dureté de l’eau dans la machine. La fonction « Dureté de l'eau » permet d’adapter la machine au degré de dureté de l’eau utilisée, afin qu’elle puisse demander de faire un cycle de détartrage au moment voulu.
31 RÉGLAGES ENTRETIEN Ce menu permet de régler toutes les fonctions pour la gestion correcte de l'entretien de la machine. RÉGLAGES ENTRETIEN COMPTEURS PRODUIT Cette fonction permet d’afficher le nombre de produits qui ont été préparés pour chaque type de café, à partir de la dernière remise à zéro. CYCLE DE DÉTARTRAGE Cette fonction permet d'exécuter le cycle de détartrage (la machine indique combien de litres sont encore nécessaires pour le détartrage) (Voir page 33).
32 eNTreTieN MENU «CYCLE NETTOYAGE GROUPE» Il suffit de laver le Groupe de distribution avec de l’eau, comme indiqué à la page 40. Ce lavage complète l’entretien du Groupe de distribution. On conseille d'effectuer ce cycle tous les mois ou bien après 500 cafés au moyen des pastilles Gaggia, qui peuvent être achetées séparément auprès de votre revendeur. LE CYCLE DE LAVAGE NE PEUT PAS ÊTRE INTERROMPU. PENDANT CETTE OPÉRATION, LA PRÉSENCE D’UNE PERSONNE EST NÉCESSAIRE.
33 MENU «CYCLE DÉTARTRAGE CHAUDIÈRE» Le détartrage doit être effectué tous les 1 à 2 mois ou lorsque la machine le signale. La machine doit être allumée et elle gère automatiquement la distribution du détartrant. PENDANT CETTE OPÉRATION, LA PRÉSENCE D’UNE PERSONNE EST NÉCESSAIRE. ATTENTION ! NE JAMAIS UTILISER DE VINAIGRE POUR DÉTARTRER LA MACHINE.
34 4 eNTreTieN CYCLE DÉTARTRAGE 5 VIDER LE BAC SITUÉ AU-DESSOUS DU GROUPE DE DISTRIBUTION Vider le bac d’égouttement qui se trouve sous le groupe (page 38 - fig. 2) et le remettre. Appuyer ensuite sur la touche « OK ». 7 CYCLE DÉTARTRAGE Remplir la carafe jusqu'à moitié avec de l'eau fraîche (page 36 - fig. 7). Introduire la carafe et la positionner en position de distribution. Appuyer ensuite sur la touche « OK ». 8 6 CYCLE DÉTARTRAGE S'il faut vider les récipients, appuyer sur la touche « II ».
35 13 14 CYCLE DÉTARTRAGE METTRE UN RÉCIPIENT SOUS LES BUSES DE DISTRIBUTION EAU CHAUDE ET CARAFE 15 CYCLE DÉTARTRAGE PHASE 2/2 RINÇAGE… Placer un récipient au-dessous de la buse de distribution du café et un récipient sous la buse de distribution de l'eau chaude. Appuyer ensuite sur la touche « OK ». 16 CYCLE DÉTARTRAGE Le cycle de rinçage commence. La barre permet de vérifier l'état d'avancement. PHASE 2/2 RINÇAGE… S'il faut vider les récipients, appuyer sur la touche « II ».
36 eNTreTieN ENTRETIEN CIRCUITS LAIT Les circuits du lait peuvent être hygiénisés en effectuant un cycle simple et rapide qui assure un nettoyage soigné. Ce lavage complète l’entretien du conteneur du lait. Nous conseillons d'effectuer ce cycle une fois par mois en utilisant le détergent Gaggia, disponibles chez votre revendeur habituel. LE CYCLE DE LAVAGE NE PEUT PAS ÊTRE INTERROMPU. PENDANT CETTE OPÉRATION, LA PRÉSENCE D’UNE PERSONNE EST NÉCESSAIRE. 1 2.5.
37 10 B 11 C A D B Pendant cette phase les trous de la carafe (A) se trouvent au-dessous des embrayages (C). Les pivots de la carafe (B) se trouvent à la même hauteur des glissières (D). Introduire la carafe par une rotation vers le bas (comme le montre la figure), jusqu'à l'accrochage de l'insert (E) se trouvant dans le bac d'égouttement.
38 NeTTOYaGe eNTreTieN PeNdaNT le FONCTiONNemeNT Le message « Vider le réservoir à marc » et/ou « Vider le bac d'égouttement » pourrait s'afficher lors du fonctionnement normal. Cette opération doit être effectuée avec la machine en marche. 1 Appuyez sur la touche et ouvrir la porte de service. 4 Vider et laver le bac d'égouttement et le couvercle avec de l'eau fraîche. 2 Retirer le bac d'égouttement et le tiroir à marc. 5 Replacer correctement les composants.
39 NeTTOYaGe GÉNÉral de la maCHiNe Le nettoyage décrit ci-dessous doit être fait au moins une fois par semaine. Remarque : ne pas utiliser de l’eau qui n’a pas été remplacée depuis plusieurs jours. ATTENTION ! Ne pas plonger la machine dans l’eau. 1 Éteindre la machine et débrancher la fiche. 4 Retirer le support positionné sous la grille. Le laver en faisant attention à la zone du joint. Le replacer seulement après avoir lavé les autres composants.
40 NeTTOYaGe NeTTOYaGe GrOUPe de disTribUTiON Le groupe de distribution doit être nettoyé au moins une fois par semaine. Avant de retirer le groupe, il faut retirer le tiroir à marc comme indiqué à la fig. 2 page 38. Laver le groupe de distribution à l’eau tiède. Lubrifier le Groupe de distribution après 500 distributions environ. Il est possible d’acheter de la graisse pour lubrifier le Groupe de distribution auprès des centres d’assistance agréés.
41 NeTTOYaGe CaraFe laiT Il faut démonter et laver soigneusement la carafe une fois par semaine minimum. Cette opération assure une hygiène parfaite de tous les composants. Remarque : faire attention à la position de chaque composant : de cette façon, il sera plus simple de les remonter. Un guide bref se trouve dans la partie interne de la porte de service pour le remontage de la carafe. 1 2 Pour le nettoyage de la carafe, il faut l'enlever de la machine et la vider.
42 NeTTOYaGe mONTaGe CaraFe laiT Le remontage doit être effectué soigneusement. Si les composants se montent difficilement, consulter les instructions dans le détail et essayer à nouveau la procédure. Remarque : Un guide bref se trouve dans la partie interne de la porte de service pour le remontage de la carafe. 1 Insérer le raccord interne dans le tuyau et le pousser jusqu'au fond. 4 Introduire le groupe à peine monté dans la base du couvercle. Faire attention au point de repère.
siGNalisaTiON de la maCHiNe Message affiché FERMER LA PORTE GRAINS AJOUTER DU CAFÉ INSÉRER GROUPE INTRODUIRE TIROIR À MARC ET BAC D'ÉGOUTTEMENT VIDER BAC D'ÉGOUTTEMENT ET TIROIR À MARC FERMER LA PORTE AVANT REMPLIR RÉSERVOIR À EAU 43 Comment rétablir le message Fermer ou placer correctement le couvercle interne du réservoir à café en grains pour pouvoir distribuer une boisson quelconque. Remplir le réservoir à café avec du café en grains Insérer le Groupe de distribution dans son logement.
44 siGNalisaTiON de la maCHiNe Message affiché Comment rétablir le message Une boisson avec du lait a été sélectionnée. La machine demande de positionner la buse de la carafe dans la position de distribution. PLACER LE DISTRIBUTEUR DE LA CARAFE EN POSITION DE DISTRIBUTION Appuyer sur la touche « ESC »pour annuler la sélection. La fonction de rinçage de la carafe a été sélectionnée. PLACER LE DISTRIBUTEUR DE LA CARAFE EN POSITION DE RINÇAGE Appuyer sur la touche « ESC »pour annuler la sélection.
CONSIGNES DE SÉCURITÉ SOS 45 EN CAS D’URGENCE Retirer immediatement la fiche de la prise electrique.
46 CONSIGNES DE SÉCURITÉ • Ne pas placer la machine sur d’autres appareils. DANGERS • Ne pas laisser les enfants se servir de l’appareil. Cette consigne vaut également pour les personnes qui ne connaissent pas le fonctionnement de l’appareil. • L’appareil peut représenter un danger pour les enfants. Si l’appareil est laissé sans surveillance, débrancher la fiche. • Ne pas conserver les matériaux d’emballage à la portée des enfants.
47 DÉCLARATION CE DE CONFORMITÉ AN 09 2006/95/CE, 2004/108/CE. GAGGIA S.P.A.
48