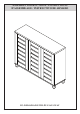
ASSEMBLY INSTRUCTIONS / INSTRUCTIONS D'ASSEMBLAGE / INSTRUCTIVO DE ARMADO FG-DI/KO/DA/DU/WH-PU-19-631-WAY Update 7 Mar 2023
NOTES ON ASSEMBLY / NOTES POUR L’ASSEMBLAGE / NOTAS SOBRE EL ENSAMBLE • • • • To ensure ease of assembly read all instructions before assembly and follow step by step illustrations. Keep instructions for future use. Adult assembly required. 2 person required. Due to the presence of small parts during assembly, keep out of reach of children until assembly is complete.
WARNING AVERTISSEMENT / ADVERTENCIA Please use your furniture correctly and safely. Improper use can cause safety hazards, or damage to your furniture or household items. Serious or fatal crushing injuries can occur from furniture tip-over. To help prevent tip-over: • Place heaviest items in the lowest drawers. • Do not set TVs or other heavy objects on the top of this product. Never allow children to climb or hang on drawers, doors, or shelves. • Never open more than one drawer at a time.
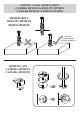
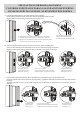
MINIFIX CAM & MINIFIX BOLT CAMÉRA MINIFIX & BOULON MINIFIX CÁMARA MINIFIX & PERNO MINIFIX MINIFIX BOLT BOULON MINIFIX PERNO MINIFIX NO GAP PAS D'ÉCART NINGÚN ESPACIO MINIFIX CAM CAMÉRA MINIFIX CÁMARA MINIFIX
SPECIAL TIPS FOR DOOR ALIGNMENT CONSEJOS ESPECIALES PARA LA ALINEACIÓN DE PUERTAS CONSEILS SPÉCIAUX POUR L'ALIGNEMENT DES PORTES A.
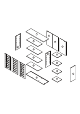
A K E G J B E I H E F H E F F H C D H
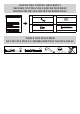
HARDWARE QUINCAILLERIE / HERRAJE (A) Minifix Bolt EU 24 (B) Minifix Cam 15/12 (C) Shelf Support (D) 6 units Dowel M8 x 30mm (E) 6 units Unita M6.3 x 50mm (F) 32 units Backply Stopper (G) 12 units Door Stopper (H) 6 units Outside Hinge 5/8” (I) 16 + 2 units Centre Hinge 1/4” (J) 2 units Octon Leg (K) 4 units Screw #8 x 25mm (L) 2 units Screw M3.
FURNITURE TIPPING RESTRAINT SEGURO CONTRA VOLCADO DE MUEBLES DISPOSITIF DÉ SÉCURITÉ POUR MEUBLES (AA) Mounting L Bracket (CC) 2 units Screw #10 x 16mm 2 units (BB) Washer M6 x 16mm (DD) 2 units Screw M4 x 38mm 2 units TOOLS NOT INCLUDED OUTILS PAS INCLUS / HERRAMIENTAS NO INCLUIDAS
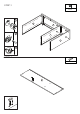
STEP 1 Gx1 Ax6 CC x 2 BB x 2 AA x 2 A STEP 2 Dx6 A B I C
STEP 3 Bx6 B A I C STEP 4 Gx1 D
STEP 5 B I K C G J STEP 6 Dx6 Ex6 B I D C
STEP 7 Jx5 K x 10 F x 16 L x 16 D STEP 8 A C J G K D B
FURNITURE TIPPING RESTRAINT SEGURO CONTRA VOLCADO DE MUEBLES DISPOSITIF DÉ SÉCURITÉ POUR MEUBLES STEP 9 1 Locate a wall stud: – Move the furniture unit to its final position to the wall – Locate a wall stud behind the furniture unit 2 Position Mark: – Adjust the safety bracket (AA) to be flush to the wall – Use the Pencil to mark the positioning hole on a wall stud
DD x 1 3 4 Screw the safety bracket to the wall stud: – Screw the safety bracket (AA) to the wall stud with Screw (DD) Adjust the furniture: – Tighten back the screw (CC) to secure the furniture to be locked to the wall K J
STEP 10 C x 32 B I C STEP 11 E E H E E H H H
STEP 12 Hx4 Mx8 F F STEP 13 Mx8 A F C F 1 A A.Lateral adjustment by screw adjusting B B.Vertical adjustment via slot in the mounting plate C C.
STEP 14 Ix2 Mx4 F STEP 15 Mx4 A F
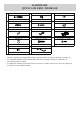
MAXIMUM LOADS CHARGES MAXIMALES / CARGA MAXIMA 42 lbs 19 kg 6.6 lbs 3 kg 11 lbs 5 kg This unit has been designed to support the maximum loads shown. Exceeding these load limits could cause sagging, instability, product collapse, and/or serious injury. Ce meuble a été conç pour supporter les charges maximales indiquées. En excédant ces limites de charge, le meuble pourrait devenir instable, s'effondrer, et/ou causer des blessures graves. Esta unidad ha sido diseñada para soportar la carga máxima anotada.