
Installation Guide


10
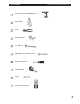
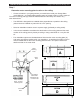
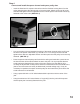
Step 4
Connect and install the spacer channel and spacer pulley bars
motor plate tab above the cable spools on the motor hoist. Attach a 6mm nut (Q) to the
fastened to the motor hoist. (SEE FIG. 4)
FIG. 4
FIG. 5
the hole in the spacer channel bar (C). Thread a 1/4” x 1/2” bolt (P) into the hole and
tighten with a ratchet or adjustable wrench until the spacer channel pulley bar is securely
fastened. (SEE FIG. 5)
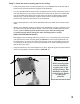
the wood screws will be used to attach the bar to the joist. It is very important that the
wood screws are fastened to the center of the joist. Use the hole saw drill bit (U) or
cut away the drywall with a utility knife to obtain an unobstructed view of the width of the
joist so the exact center can easily be determined (covered ceilings only). It may be
necessary to reposition the spacer channel pulley bar and mark with a pencil where the
wood screws are to be fastened.
joist.
channel pulley bar is securely fastened to the joist.