
Installation Guide


11
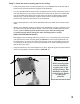
Cotter Pin
FIG. 7B FIG. 7C
FIG. 7D
Clevis Pin
Pulle
y
FIG. 7A
Be sure to bend the
two legs of the cotter
pin to ensure that the
clevis pin does not
slip out.
!
WARNING
Cable
Step 5
Install the cable over the channel bar pulley
power outlet.
cables until 9 feet of cable is visible.
spacer channel pulley bar (D) (use pliers to remove
the cotter pin then remove the clevis pin to release
the pulley) (SEE FIG. 7A & 7D)
over the op of the pulley at the end of the spacer
channel pulley bar. (SEE FIG 7B & 7C)
CAUTION: Use care when handling the cables - frayed or rough spots on the cable
could cause injury.
insert the clevis pin and refasten the cotter pin. (SEE FIG 7D)
To reduce the risk of electrical
shock, this equipment has a
grounded type plug that
includes a third (grounding)
pin. This plug will only fit a
grounded type outlet. If you
do not have a grounded
outlet, contact a qualified
electrician to install one. DO
NOT alter the plug in any way.
!
WARNING