
Installation Guide


12
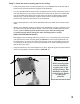
Step 6
Assemble the hook bar
of the hook bar connectors (F). (SEE FIG. 8A)
(SEE FIG. 8B & 8C)
holes from the hook bar end to the holes of the hook bar connectors. (SEE FIG 8D)
Be sure the spring
clips are fully
inserted into the
connector bars.
!
WARNING
FIG. 8A
FIG. 8B FIG. 8C
FIG. 8D
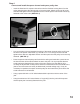
FIG. 9
Step 7
Attach the hook bar to the cables
by pressing in the spring clip and inserting the hook into
the opening on the hook bar. (SEE FIG. 9). Insert each
hook so the spring clip on the hook is pointing toward the
center.
NOTE: You may wish to slide a hook or bike cable to the
hook bar end sections - the area on the far side
of the hook - before attaching the hook to the bar.