
operation manual


GB
- 24 -
hand and then follow the instructions for ad-
justing the chain tension as described in the
section ADJUSTING THE CHAIN TENSION.
5.3 Saw chain tension adjustment
Proper tension of saw chain is extremely impor-
tant and must be checked before starting, as well
as during any cutting operation.
Taking the time to make needed adjustments to
the saw chain will result in improved cutting per-
formance and prolonged chain life.
Caution: Always wear heavy duty gloves when
handling saw chain or making saw chain adjust-
ments.
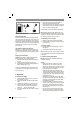
1. Hold nose of guide bar up and turn adjust-
ment screw (D) CLOCKWISE to increase
chain tension. Turning screw COUNTER-
CLOCKWISE will decrease amount of tensi-
on on chain. Ensure the chain fi ts snugly all
the way around the guide bar (Fig. 5).
2. After making adjustment, and while still hol-
ding nose of bar in the uppermost position,
tighten the bar retaining nuts securely. Chain
has proper tension when it has a snug fi t all
around and can be pulled around by gloved
hand.
NOTE: If chain is diffi cult to rotate on guide bar
or if it binds, too much tension has been applied.
This requires minor adjustment as follows:
A. Loosen the bar retaining nut so they are fi n-
ger tight. Decrease tension by turning the bar
adjustment screw COUNTERCLOCKWISE
slowly. Move chain back and forth on bar.
Continue to adjust until chain rotates freely,
but fi ts snugly. Increase tension by turning bar
adjustment screw CLOCKWISE.
B. When saw chain has proper tension, hold
nose of bar in the uppermost position and
tighten the bar retaining nut securely.
Note: A new saw chain stretches, requiring ad-
justment after as few as 5 cuts. This is normal
with a new chain, and the interval between future
adjustments will lengthen quickly.
Note: If the saw chain is TOO LOOSE or TOO
TAUT, the drive wheel, chain bar, chain and crank
shaft bearing will suff er premature wear. Fig. 6
shows the correct tension A (when cold) and ten-
sion B (when warm). Fig. C shows a chain that is
too loose.
5.4 Chain break mechanical test
Your chain saw is equipped with a Chain brake
that reduces possibility of injury due to kickback.
The brake is activated if pressure is applied
against brake lever when, as in the event of kick-
back, operator’s hand strikes the lever. When the
brake is actuated, chain movement stops abruptly.
Danger: The purpose of the chain brake is to
reduce the possibility of injury due to kickback;
however, it cannot provide the intended measure
of protection if the saw is operated carelessly.
Always test the chain brake before using your saw
and periodically while on the job.
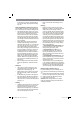
To test chain brake
1. The Chain brake is DISENGAGED (chain
can move) when BRAKE LEVER IS PULLED
BACK AND LOCKED (Fig. 7A).
2. The chain brake is ENGAGED (the chain is
locked) when the brake lever is pulled forward
and the mechanism (Fig. 7B/Item A) can be
seen. It should not be possible to move the
chain (Fig. 7B).
Danger: The brake lever should snap into both
positions. If strong resistance is felt, or lever does
not move into either position, do not use your
saw. Take it immediately to a professional Service
Center for repair.
5.5 Fuel and lubrication
Fuel
Use regular grade unleaded gasoline mixed with
40:1 custom 2-cycle engine oil for best results.
Mixing fuel
Mix fuel with 2 cycle oil in an approved container.
Shake container to ensure thorough mix.
Note: Never use straight gasoline in your unit.
This will cause permanent engine damage and
void the manufacturer’s warranty for that product.
Never use a fuel mixture that has been stored for
over 90 days.
Note: If 2-cycle lubricant is to be used, it must be
a premium grade oil for 2-cycle air cooled engi-
nes mixed at a 40:1 ratio. Do not use any 2-cycle
oil product with a recommended mixing ratio of
100:1. If insuffi cient lubrication is the cause of en-
gine damage, it voids the manufacturer’s engine
warranty for that occurrence.
Anl_GMSE_1535_SPK7_Teil1.indb 24Anl_GMSE_1535_SPK7_Teil1.indb 24 09.05.14 08:2909.05.14 08:29