TREAD - OVERLAND EDITION TREAD XL - OVERLAND EDITION ® Owner’s Manual
© 2021 Garmin Ltd. or its subsidiaries All rights reserved. Under the copyright laws, this manual may not be copied, in whole or in part, without the written consent of Garmin. Garmin reserves the right to change or improve its products and to make changes in the content of this manual without obligation to notify any person or organization of such changes or improvements. Go to www.garmin.com for current updates and supplemental information concerning the use of this product.
Table of Contents Getting Started................................. 1 Device Overview...................................... 2 Mounting and Powering the Device in Your Vehicle............................................. 3 Turning the Device On or Off.................. 5 Acquiring GPS Signals............................ 5 Status Bar Icons...................................... 6 Using the Touchscreen........................... 6 Using the On-Screen Buttons................. 6 Adjusting the Screen Brightness....
Viewing Upcoming Cities and Exit Services.............................................. 21 Trip Information.................................... 21 Viewing Trip Data from the Map...... 21 Customizing the Trip Data Fields.............................................. 21 Resetting Trip Information................ 21 Viewing Upcoming Elevation Changes................................................. 22 Viewing Upcoming Traffic.................... 22 Viewing Traffic on the Map..............
Using In-Call Options......................... 39 Saving a Phone Number as a Preset................................................. 39 Enabling or Disabling Bluetooth Features................................................. 39 Showing or Hiding App Notifications (Android™).......................................... 39 Showing or Hiding Notification Categories for Your Apple® Device................................................. 39 Enabling or Disabling Bluetooth Features for Your Headset.................
Getting Directions to Your Current Location............................................. 52 Adding a Shortcut................................. 52 Removing a Shortcut......................... 53 Saving Locations................................... 53 Saving a Location.............................. 53 Saving a Waypoint on the Map......... 53 Saving Your Current Location........... 53 Editing a Saved Location.................. 53 Assigning Categories to a Saved Location..........................................
Speaker and LED Wiring Harness Wire and Connector Identification.............................. 71 RCA Wiring Harness Wire and Connector Identification............ 73 Connecting the Device to Vehicle Power..........................................74 Using the Heat-Shrink Crimp Connectors................................. 75 Complete System Wiring........... 75 Speaker Zones........................... 77 Single-Zone System Wiring Example......................................
Getting Started WARNING See the Important Safety and Product Information guide in the product box for product warnings and other important information. • Update the maps and software on your device (Updating Maps and Software Using a Wi‑Fi Network, page 59). • Mount the device in your vehicle and connect it to power (Mounting and Powering the Device in Your Vehicle, page 3).
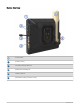
Device Overview Power button Volume control microSD memory card slot ® USB power and data port Iridium antenna ® SOS button (under protective cover) 2 Getting Started
Mounting and Powering the Device in Your Vehicle WARNING This product contains a lithium-ion battery. To prevent the possibility of personal injury or product damage caused by battery exposure to extreme heat, store the device out of direct sunlight. Both the device and its mount contain magnets. Under certain circumstances, magnets may cause interference with some internal medical devices and electronic devices, including pacemakers, insulin pumps, or hard drives in laptop computers.
5 Connect the vehicle power cable to the cable on the mount. 6 Tighten the collar around the connected power cables. 7 Plug the other end of the vehicle power cable into a power outlet in your vehicle. 8 Place the device onto the magnetic mount. 9 Push down the lock 4 to secure the device to the mount.
Turning the Device On or Off • To turn the device on, press the power key , or connect the device to power. • To put the device in power saving mode, press the power key while the device is on. While in power saving mode, the screen is off and the device uses very little power, but it can wake instantly for use. TIP: You can charge your device faster by putting it in power saving mode while charging the battery.
Status Bar Icons The status bar is located at the top of the main menu. The status bar icons display information about features on the device. You can select some icons to change settings or view additional information. Location services status. Indicates your location has been established. Bluetooth technology status. ® Wi‑Fi signal strength. ® Active vehicle profile. Current time. Battery charge level. Tread app connection status (Pairing with Your Smartphone, page 36).
Vehicle Profiles WARNING Entering your vehicle profile characteristics does not guarantee that your vehicle’s characteristics will be accounted for in all route suggestions. Limitations may exist in map data for some route suggestions. Always defer to all posted road signs and conditions during vehicle operation. Failure to do so could lead to an accident involving personal injury or death. Vehicle profiles allow you to choose different settings based on each vehicle you use with the device.
Editing a Vehicle Profile You can change basic vehicle profile information or add detailed information to a vehicle profile, such as maximum speed. 1 Select > Navigation > Vehicle Profile. 2 Select the vehicle profile to edit. 3 Select an option: • To edit the vehicle profile information, select , and select a field to edit. • To rename the vehicle profile, select > > Rename Profile. • To delete the vehicle profile, select > > Delete.
Adventure Roads and Trails WARNING Entering your vehicle profile characteristics does not guarantee that your vehicle's characteristics will be accounted for in all route suggestions. Limitations may exist in map data for some route suggestions. Always defer to all posted road signs and conditions during vehicle operation. Failure to do so could lead to an accident involving personal injury or death. This device can navigate off-highway roads and trails based on your vehicle profile.
Straight Line Routes For areas without defined roads or trails, the device guides you to your destination using a straight line route. You can set multiple waypoints to navigate a route through areas without roads. Distance to the destination. Route highlighted on the map. Vehicle speed. Map tools. Provides tools to show you more information about your route and surroundings. Map layers. Allows you to change the map orientation and add topographic and BirdsEye imagery to your map view.
Recording Tracks Tracking records your path. When you start tracking, your device logs your location and updates the track line. If your device is paired with a Garmin Explore™ account, your device periodically synchronizes recorded tracks with the app. 1 From the main menu, swipe to the left and select Track Recorder. 2 Select Start. Navigating a Track You can navigate a saved track using the Garmin Explore app on your device. 1 Select > Adventure > Explore > Tracks. 2 Select a track. 3 Select Go!.
Adjusting Warning Angles You can adjust the angles at which the device activates a pitch or roll alert. You are responsible for knowing and setting the correct pitch and roll angle for your vehicle. 1 From the main menu, swipe to the left and select Pitch and Roll > > Warning Angles. 2 Swipe up or down to adjust the pitch or roll warning angles. 3 Select Accept. Enabling or Disabling Warning Angle Alerts 1 From the main menu, swipe to the left and select Pitch and Roll > .
Joining a Group Ride You can join a nearby group ride that was created by another rider. NOTE: For some product models, the Group Ride app is located in the apps menu. 1 From the main menu, select Group Ride > Nearby Group Rides. 2 Select a nearby group ride, and select Join. Rejoining a Recent Group Ride You can rejoin any of your ten most-recent group rides. 1 From the main menu, select Group Ride > Recent Group Rides. 2 Select a recent group ride, and select Join.
Viewing a Group Ride Notification WARNING Do not read or reply to any notifications while driving. If you do so, you could become distracted by the display, which could lead to an accident causing serious personal injury or death. From most pages, a notification appears when the device receives a broadcasted group ride location or message. You can also view group ride notifications in the Group Ride app. NOTE: When you are viewing the map, new notifications appear in a map tool at the edge of the screen..
Adjusting the Squelch You can adjust the squelch and change between CTCSS, DCS, and Open squelch modes to improve audio quality and avoid radio interference in your area. 1 From the main menu, select Radio. 2 Select an option: • To choose a squelch code within the current mode, select or . • To adjust the squelch mode, select Open. Adding a Custom Radio Preset 1 Select Radio > Preset > . 2 Select or to select a channel and squelch code. 3 Select Save.
Radio Settings From the main menu, select Radio > . Push to Talk with Headset: Enables you to transmit your voice using the push-to-talk button on your compatible headset. Roger Tone: Sets the roger tone the device plays when you operate your radio. Reset Default Settings: Resets all radio settings and presets to factory default values. inReach Features ® WARNING Messaging, tracking, and SOS functions require an active satellite subscription. Always test your device before you use it outdoors.
Checking for Messages When you send a message, your device listens for replies for 10 minutes. The device also checks for new messages every hour. When you are using the inReach tracking feature, your device automatically checks for messages at your tracking interval. NOTE: To receive messages, your device must have a clear view of the sky and be in view of a satellite when it checks for the messages.
SOS During an emergency, you can use your Tread - Overland Edition device to contact the Garmin International Emergency Response Coordination Center (IERCC) to request help. Pressing the SOS button sends a message to the Garmin IERCC, and they notify the appropriate emergency responders of your situation. You can communicate with the Garmin IERCC during your emergency while you wait for help to arrive. You should only use the SOS function in a real emergency situation.
Syncing inReach Data You can sync data from your explore.garmin.com account to your device using the Garmin Explore app. After you make edits to your data, such as plan changes, contacts, preset messages, or quick text messages, you must sync them to your device using the mobile app. Open the Garmin Explore app. Changes made to data such as collections, waypoints, routes, and tracks update automatically. You can now sync your data to your Tread - Overland Edition device.
Map Tools Map tools provide quick access to information and device functions while you view the map. When you activate a map tool, it appears in a panel at the edge of the map. Stop: Stops navigation of the active route. Edit Route: Allows you to take a detour or skip locations in your route (Changing Your Active Route, page 43). Mute: Mutes the device audio. Cities Ahead: Shows upcoming cities and services along your active route or along a highway (Cities Ahead, page 21).
Customizing the Up Ahead Categories You can change the location categories that appear in the Up Ahead tool. 1 From the map, select > Up Ahead. 2 Select a category. 3 Select . 4 Select an option: • To move a category up or down in the list, select and drag the arrow next to the category name. • To change a category, select the category. • To create a custom category, select a category, select Custom Search, and enter the name of a business or category. 5 Select Save.
Viewing Upcoming Elevation Changes You can view upcoming elevation changes along your route. This can help you avoid or plan for steep uphill or downhill grades. 1 From the map, select > Elevation. 2 Select the chart to expand it to the full screen. The device displays your current elevation, and a chart of elevation over distance. 3 Select an option: • Select or to change the distance range of the chart. • Select the arrows to scroll the chart.
Enabling Adventure Roads and Trails Map Layers You can enable or disable map layers that display accessible or inaccessible roads for different types of motor vehicles. 1 Select > Map Display > Map Layers > > Adventure Roads & Trails. 2 Select a road or trail type. Changing the Map Data Field 1 From the map, select a data field. NOTE: You cannot customize Speed. 2 Select a type of data to display. Changing the Map Buttons 1 From the map, hold a map button.
Dog Status Icons Icons indicate the status and location of your dogs. Sitting Running On point Treed Unknown* Collar battery low Collar connection lost Collar GPS reception lost *The unknown status icon indicates the collar has not acquired a satellite signal and the handheld device cannot determine the location of the dog. Viewing Your Dogs on the Map 1 While viewing the map, select anywhere on the map. 2 Select . The device zooms to show all of your dogs on the screen.
Music Player The media player allows your device to control the media currently playing from a media app on your paired phone. You can open the media player at any time by selecting > Tools > Music from the main menu. Information about the currently playing media, such as title, artist, album, station, or channel. Progress through the current media item. Playback controls. The controls change based on the service providing the media. Select to hide or shrink the media player.
Downloading BirdsEye Imagery Before you can download BirdsEye imagery directly to your device, you must connect to a wireless network (Connecting to a Wireless Network, page 56). 1 Select > Adventure > BirdsEye Direct. 2 Select . 3 Select an option: • To download BirdsEye imagery files for a specific location or area, select Location, and select a category. NOTE: The location defaults to your current location. • To select an image quality option, select Detail.
Changing Routing Options for a Route You can customize how the device calculates your route. 1 Select Route Planner. 2 Select a saved route. 3 Select . 4 Select an option: • To add shaping points to your route, select Shaping, and select at least one location. • To change the calculation mode for the route, touch a route segment, and select a calculation mode. Navigating to a Saved Route 1 2 3 4 Select Route Planner. Select a saved route. Select Go!.
Viewing the Weather Forecast NOTICE Garmin is not responsible for the accuracy or timeliness of the weather data. Before you can use this feature, your device must be receiving weather data. You can connect your device to the Tread app to receive weather data (Pairing with Your Smartphone, page 36). NOTE: Weather forecasts are not available in all areas. 1 Select > Navigation > Weather. The device shows the current weather conditions and a forecast for the next several days. 2 Select a day.
Creating a Round-Trip Route The device can create a round-trip route using a specified starting location and a distance, duration, or destination. 1 From the main menu, select > Navigation > Round Trip. 2 Select Start Location. 3 Select a location, and select Select. 4 Select Trip Attributes. 5 Select an option: • Select Choose a Distance to plan your route by distance. • Select Choose a Duration to plan your route based on time.
Garmin PowerSwitch™ App Opens the app settings menu Enters editing mode to customize the app layout and functions Turns off all outputs Power buttons Activates each connected output Displays input voltage Displays the total amperage of the selected Garmin PowerSwitch device Displays the device name Displays Garmin PowerSwitch device tabs and custom layout tabs Activating a Power Switch Before you can use the Garmin PowerSwitch app to activate a switch, you must install your Garmin PowerSwitch device in y
Customizing a Button 1 From the Garmin PowerSwitch app screen, select . The app enters editing mode. 2 Select on the button you want to customize. 3 Select an option: • To change the name of the button, select the Button Label field, and enter a name. • To add an icon to the button, select the Icon field, and select an icon. • To change the button color, select a color. • To change the button mode, select a button mode. • To adjust the intensity of the switch, use the slider.
Adding a Button to a Custom Layout 1 From the Garmin PowerSwitch app, select a custom layout tab. 2 Select . The app enters editing mode. 3 Select Add Button. 4 On the new button, select . 5 Select an option: • To change the name of the button, select the Button Label field, and enter a name. • To add an icon to the button, select the Icon field, and select an icon. • To change the button color, select a color. 6 Select Add Action. 7 If necessary, select a Garmin PowerSwitch device and a switch.
Adding a Routine 1 2 3 4 5 6 7 8 From the Garmin PowerSwitch app, select > Routines. If necessary, select Add Routine. Select When. Select a trigger: • To set a switch to trigger when your vehicle reaches a specific speed, select Speed > Next, and follow the on-screen instructions to enter speed thresholds. • To set a switch to trigger at a specific time each day, select Time > Next, and enter a time. • To set a switch to trigger at sunrise, select Sunrise.
Tread Audio App Before you can use the controls in the Tread Audio app, you must install your Tread Audio Box and Tread 6.5" XS-LED Tower Speakers in your vehicle and pair the Tread Audio Box with the Tread Audio app. Displays information about the currently playing media, such as title, artist, album, station, or channel. Displays progress through the current media item. Displays playback controls. The controls change based on the service providing the media. Displays the current audio source.
Enabling LED Groups By default, the controls for LED groups RGB 1 and RGB 2 are enabled. Enabling an LED group allows you to use the LED lighting controls for that group. You can enable the LED group for the Tread 6.5" XS-LED Tower Speakers or any additional speakers or addressable LEDs after you set up and pair them with your Tread Audio Box. 1 Select . 2 Select the LED group. Changing the Media Source You can change the source from which media is played on your device. 1 Select the current media source .
Live Services, Traffic, and Smartphone Features WARNING Do not read or interact with notifications while driving, because doing so can cause distraction which could lead to an accident resulting in serious personal injury or death. NOTICE Garmin is not responsible for the accuracy or timeliness of the traffic information. The Tread app allows your device to receive smart notifications and live information, such as live traffic data and weather information.
Tips After Pairing the Devices • • • • After the initial pairing, the two devices can connect automatically each time you turn them on. When you turn on the device, it tries to connect to the last phone to which it was connected. You might need to set your phone to connect to the device automatically when the device is turned on. You should verify the Bluetooth features you want to use are enabled (Enabling or Disabling Bluetooth Features, page 39).
Receiving Notifications while Viewing the Map WARNING Do not read or interact with notifications while driving, because doing so can cause distraction that could lead to an accident resulting in serious personal injury or death. Before you can use this feature, your device must be connected to a supported phone running the Tread app (Pairing with Your Smartphone, page 36). When you are viewing the map, new notifications appear in a map tool at the edge of the screen.
Using In-Call Options In-call options appear when you answer a call. Some options may not be compatible with your phone. TIP: If you close the in-call options page, you can open it again by selecting from any screen. • To set up a conference call, select Add Call. • To transfer audio to your phone, select Call in Progress on Navigator. TIP: You can use this feature if you want to disconnect the Bluetooth connection and remain on the call, or if you need privacy. • To use the dial pad, select Keypad.
Enabling or Disabling Bluetooth Features for Your Headset By default, all compatible Bluetooth features are enabled when you pair your headset. You can enable or disable certain features. 1 Select > Wireless Networks > Bluetooth. 2 Select the headset name, and select . 3 Select an option: • To disconnect the headset, select Disconnect. • To disable audio from phone calls, select Phone calls. • To disable audio from streaming media, select Media Audio.
Your Route on the Map As you travel, the device guides you to your destination using voice prompts and information on the map. Instructions for your next turn or exit, or other actions appear across the top of the map. Next action in the route. Indicates the next turn, exit, or other action and the lane in which you should travel, if available. Distance to the next action. Name of the street or exit associated with the next action. Route highlighted on the map. Next action in the route.
Active Lane Guidance As you approach some turns, exits, or interchanges in your route, a detailed simulation of the road appears beside the map, if available. A colored line indicates the proper lane for the turn. Viewing Turns and Directions While navigating a route, you can view upcoming turns, lane changes, or other directions for your route. 1 From the map, select an option: • To view upcoming turns and directions as you navigate, select > Turns.
Changing Your Active Route Adding a Location to Your Route Before you can add a location to your route, you must be navigating a route (Starting a Route, page 40). You can add locations to the middle or end of your route. For example, you can add a fuel station as the next destination in your route. TIP: To create complex routes with multiple destinations or scheduled stops, you can use the route planner to plan, schedule, and save a route (Planning a Route, page 26). 1 From the map, select > Where To.
Avoiding Toll Stickers If the map data on your device contains detailed toll sticker information, you can avoid or allow roads that require toll stickers for each country. NOTE: This feature is not available in all areas. 1 Select > Navigation > Tolls and Fees > Toll Stickers. 2 Select a country. 3 Select an option: • To be asked each time before routing through an area that requires toll stickers, select Always Ask. • To always avoid roads that require toll stickers, select Avoid.
Arriving at Your Destination When you approach your destination, the device provides information to help you complete your route. • indicates the location of your destination on the map, and a voice prompt announces you are approaching your destination. • When you approach some destinations, the device automatically suggests parking areas. You can select More to view a full list of suggested parking areas (Parking Near Your Destination, page 46).
Parking Near Your Destination Your device can help you find a parking spot near your destination. When you approach some destinations, the device automatically prompts you to search for parking. 1 Select an option: • When the device prompts you, select Yes to search for nearby parking. • If the device does not prompt you, select Where To > Categories > Parking, and select > My Destination. 2 Select a parking location, and select Go! > Add as Next Stop. The device guides you to the parking area.
Finding and Saving Locations The maps loaded in your device contain locations, such as restaurants, hotels, auto services, and detailed street information. The Where To menu helps you find your destination by providing several methods to browse, search, and save this information. From the main menu, select Where To. • To quickly search all locations on your device, select Search (Finding a Location Using the Search Bar, page 47). • To find an address, select Address.
Location Search Results The location search results appear in a list, with the nearest location at the top. Each numbered location also appears on the map. You can scroll down to view more results. Select a location to view the option menu. Select to view detailed information about the location. Select to find parking areas near the location. Select to view alternate routes to the location. Go! Select to start navigating to the location using the recommended route.
Finding a Location by Category 1 2 3 4 Select Where To. Select a category, or select Categories. If necessary, select a subcategory. Select a location. Navigating to Points of Interest Within a Venue NOTE: This feature may not be available in all areas or for all product models. You can create a route to a point of interest (POI) within a larger venue, such as a store in a shopping mall or a specific terminal in an airport. 1 Select Where To > Search. 2 Enter the name of the venue, and select .
Finding Campgrounds Select Where To > Ultimate Public Campgrounds. Finding Ultimate Campgrounds Points of Interest NOTE: This feature is not available in all areas. Your device includes Ultimate Campgrounds points of interest, which allow you to find public campgrounds near your location. 1 Select Where To > Ultimate Public Campgrounds. 2 If necessary, select Search Filters, select one or more search filters, and select Search. 3 Select a location.
Finding Tripadvisor Points of Interest 1 Select Where To > Tripadvisor. 2 Select a category. 3 If necessary, select a subcategory. A list of nearby Tripadvisor points of interest for the category appears. 4 Select Sort Results to filter the displayed points of interest by distance or popularity (optional). 5 Select , and enter a search term (optional). Finding Parking Near Your Current Location 1 Select Where To > Categories > Parking. 2 Select a parking location. 3 Select Go!.
Finding Fuel Stations and Prices Before you can use this feature, your device must be connected to a supported phone running the Tread app (Pairing with Your Smartphone, page 36). You can find nearby fuel stations and compare fuel prices. 1 Select Where To > Fuel Prices. 2 If necessary, select > Fuel Type, select a fuel type, and select Save. 3 Select a fuel station. Viewing Recently Found Locations Your device stores a history of the last 50 locations you have found. Select Where To > Recent.
Removing a Shortcut 1 2 3 4 Select Where To > > Remove Shortcut(s). Select a shortcut to remove. Select the shortcut again to confirm. Select Done. Saving Locations Saving a Location 1 2 3 4 5 Search for a location (Finding a Location by Category, page 49). From the search results, select a location. Select > Save. If necessary, enter a name, and select Done. Select Save. Saving a Waypoint on the Map 1 Select View Map. 2 Drag and zoom the map to display the area to search.
Assigning Categories to a Saved Location You can add custom categories to organize your saved locations. NOTE: Categories appear in the saved locations menu after you have saved at least 12 locations. 1 Select Where To > Waypoints. 2 Select a location. 3 Select . 4 Select > Edit > Categories. 5 Enter one or more category names, separated by commas. 6 If necessary, select a suggested category. 7 Select Done. Deleting a Saved Location NOTE: Deleted locations cannot be recovered.
State and country borders: The device plays a tone and displays a message when you approach the border of a state or country. Shut off propane: The device plays a tone and displays a message when you approach an area where propane should be turned off. Enabling or Disabling Driver Alerts You can enable or disable several types of driver alerts. 1 Select > Driver Assistance > Driver Alerts. 2 Select or clear the check box next to each alert. Settings Navigation Settings Select > Navigation.
Connecting to a Wireless Network 1 Select > Wireless Networks > Wi-Fi. 2 If necessary, select the toggle switch to turn on wireless network technology. 3 Select a wireless network. 4 If necessary, enter the encryption key. The device connects to the wireless network. The device remembers the network information and connects automatically when you return to this location in the future. Enabling Bluetooth Wireless Technology Select > Wireless Networks > Bluetooth.
Date and Time Settings Select > System > Date & Time. Use network-provided time: Automatically sets the time zone based on information from the connected network. Use network-provided time zone: Sets the time zone on your device when Use network-provided time is disabled. Use 24-hour format: Enables or disables the 24-hour time format. Device Settings Select > About Device. Legal Information: Allows you to view the end-user license agreement (EULA) and software license information.
Charging the Device NOTE: This Class III product shall be powered by an LPS power supply. You can charge the battery in the device using any of these methods. • Install the device in the mount, and connect the mount to vehicle power. • Connect the device to an optional power adapter accessory, such as a wall power adapter. You can purchase an approved Garmin AC-DC adapter suitable for home or office use from a Garmin dealer or www.garmin.com.
Updating Maps and Software Using a Wi‑Fi Network NOTICE Map and software updates may require the device to download large files. Regular data limits or charges from your internet service provider apply. Contact your internet service provider for more information about data limits or charges. You can update the maps and software by connecting your device to a Wi‑Fi network that provides access to the internet. This allows you to keep your device up to date without connecting it to a computer.
Updating Maps and Software with Garmin Express You can use the Garmin Express application to download and install the latest map and software updates for your device. 1 If you do not have the Garmin Express application installed on your computer, go to garmin.com/express and follow the on-screen instructions to install it. 2 Open the Garmin Express application. 3 Connect your device to your computer using a USB cable.
7 Select an option: • To install all available updates, click Install All. • To install a specific update, click View Details, and click Install next to the update you want. The Garmin Express application downloads and installs the updates onto your device. Map updates are very large, and this process may take a long time on slower internet connections.
Troubleshooting My device is not acquiring satellite signals • Verify the location services feature is enabled (Enabling or Disabling Location Services, page 57). • Take your device out of parking garages and away from tall buildings and trees. • Remain stationary for several minutes. My battery does not stay charged for very long • • • • • • • Decrease the screen brightness (Display Settings, page 56). Shorten the display timeout (Display Settings, page 56).
Mounting the Device Before you can mount the device, you must select a mounting location and purchase the appropriate hardware for your mounting surface. NOTICE Avoid wires, gauges, air bags, air bag covers, HVAC, and other items when drilling pilot holes and attaching the mount to the vehicle. Garmin is not responsible for any damages or consequences arising from the installation. 1 Place the mount on the selected location. 2 Using the mount as a template, mark the two screw locations .
Opening the Front Cover You must open the front cover to make electrical connections. 1 Lift the front cover latch and rotate it counter-clockwise. 2 Pull the front cover off of the device.
Connecting Accessories NOTICE Do not use the device to control or power a winch. Failure to follow this notice could cause damage to your vehicle or your device. Do not connect a power source to an accessory output terminal. Failure to follow this notice could cause damage to your vehicle or your device. Accessory requirements: • Verify the amperage rating of each accessory before wiring it to the Garmin PowerSwitch device.
NOTICE Do not connect the accessory ground wires to the ground terminal (GND) on the Garmin PowerSwitch device. Failure to heed this notice could result in personal or property damage, or negatively impact device functionality. 3 Verify that all electrical connections are tight and will not come loose during use. Connecting a Control Input You can connect to the control terminals to enable the Garmin PowerSwitch device to turn on customizable outputs.
3 Connect the small ring end of the included 12V cable to the +12V terminal on the device. 3 4 Tighten the /8 in. nut on the +12V terminal to a maximum torque specification of 4.52 N-m (40 lbf-in.). You should confirm the nut cannot be loosened by hand. NOTICE Do not overtighten the +12V terminal to prevent damage to the terminal. 5 Connect the large ring end of the 12V cable to the positive terminal on the vehicle battery.
My accessories are not receiving power • Verify the Garmin PowerSwitch device is receiving power from the vehicle battery. • Verify that your vehicle's battery is supplying at least 12 V of power. The Garmin PowerSwitch device turns off all outputs automatically to preserve your vehicle's battery if it is receiving less than 11 V of power. Outputs turn back on when the device detects more than 12 V of power.
Tread Audio Box Mounting Considerations CAUTION In high ambient temperatures and after extended use, the device enclosure may reach temperatures deemed dangerous to touch. Therefore, you must install the device in a location where it is not touched during operation. NOTICE The storage and operating temperature ranges for this device are listed in the product specifications.
Port Identification Item Description FUSE Contains the 15 A fuse for the LED outputs. Not used. Connects the device to the auxiliary in and line/subwoofer out wiring harness. Connects the device to the ground terminal wire (GND). Connects the device to the +12V terminal wire. Connects the device to the AM/FM antenna. Connects the device to the speaker wiring harness. Connects the device to the LED wiring harness. Connects the device to an optional USB accessory.
Speaker and LED Wiring Harness Wire and Connector Identification Wire Group Wire Color and Description Ignition Red: Connects to the vehicle accessory line. If the ignition wire is unused, ground the ignition wire or leave it disconnected. Amplifier on Blue: Connects to an optional external amplifier to turn it on when the stereo turns on. White: Left (+), Connects to the included speaker. White with a black stripe: Left (-), Connects to the included speaker.
Wire Group Wire Color and Description Green: Green LED Blue: Blue LED Addressable LED Wiring Considerations You can wire addressable LED lights to your Tread Audio Box. For more information, see the manual for your addressable LED lights.
RCA Wiring Harness Wire and Connector Identification Wire Number Wire Function Auxiliary in left: Provides a red and white RCA stereo line input for audio sources, such as a CD or MP3 player. Auxiliary in right: Provides a red and white RCA stereo line input for audio sources, such as a CD or MP3 player. Line out left: Provides a full-range output to an external amplifier, and is associated with the volume control.
Connecting the Device to Vehicle Power You should always confirm all electrical connections are secure and will not come loose while operating the device. NOTICE If the ignition wire is not used, do not tie the ignition to the positive terminal on the vehicle battery. Ground the ignition wire or leave it disconnected. Failure to ground or disconnect the ignition wire when the ignition is not used could prevent the device from powering on. 1 Remove the terminal cover using a Phillips screwdriver.
4 Connect the small ring end of the ground wire to the GND terminal on the device. 5 Tighten the screw on the GND terminal. You should confirm the screws cannot be loosened by hand. 6 Connect the small ring end of the included 12V cable to the +12V terminal on the device. 7 Tighten the screw on the +12V terminal. You should confirm the screws cannot be loosened by hand. NOTICE Do not overtighten the screw on the +12V terminal to prevent damage to the terminal.
Item Description Zone 2 speakers Water-tight connection Zone 1 speakers Amplifier-on signal wire Powered amplifier Line out and subwoofer out Subwoofer 76 Appendix
Speaker Zones You can group speakers in one area into speaker zones. This enables you to control the audio level of the each zone individually. Zones 1 and 2 are powered by the on-board amplifier. To use the RCA line output, you must connect an external amplifier. You can set the balance, tone, and name for each zone, and the fade between zones.
Mounting the Wireless Remote 1 Select an appropriate location for the remote control (Wireless Remote Mounting Considerations, page 77). 2 Test the range at the selected location by holding the wireless remote at the location, pressing a few buttons, and confirming the correct operation. 3 Thoroughly clean and dry the mounting surface using a mixture of water and isopropyl alcohol. The mounting surface must be free of dirt, debris, wax, or coatings.
6 Connect the speaker and LED wires (Wiring, page 80). 7 Place the connected wires in the channel on the base of the bracket bar. , and route the wires along the roll 8 Place the top of the bracket over the roll bar, and hold it against the base of the bracket. 9 Using a 5 mm hex driver or hex key, attach the top of the bracket to the base of the bracket using the two longer screws and washers , but do not fully tighten them.
Wiring When connecting the speakers and LED lights to your stereo or amplifier, observe these considerations. • You should use the included wire to connect the speakers to the stereo or amplifier. If necessary, you can use a larger gauge of wire (Wire Gauge Guide, page 80). • You should make all of the wiring connections using the included heat-shrink crimp connectors. You should plan and select the best connection type for your installation needs.
Radio sources: Press to tune to the previous station. AUX sources: Press to decrease gain. Other sources: Press to skip to the beginning of the track or to the previous track. Radio sources: Press to tune to the next station. AUX sources: Press to increase gain. Other sources: Press to skip to the next track. Press to decrease the volume. Hold to quickly decrease the volume. Press to increase the volume. Hold to quickly increase the volume. Press to cycle through the available sources.
Pairing with a Garmin Navigation Device You can pair your Tread Audio device with a compatible Garmin navigation device. 1 Turn on power to your Tread Audio device, and place your compatible Garmin navigation device within 1 m (3.3 ft.) of it. 2 On your compatible navigation device, open the Tread Audio app. 3 On your Tread Audio device, press . 4 Follow the on-screen instructions to complete the pairing and setup process. The main app dashboard appears.
Tread 6.5" XS-LED Tower Speakers Specifications Max.
Dimensions 223 mm (813/16 in.) Ø 176 mm (615/16 in.) 180 mm (71/8 in.) Bracket Specifications Material Aluminum alloy with silicone pads Supported roll bar sizes From 33.4 mm (1.31 in.) to 50.8 mm (2.00 in.
Bracket Side Dimensions 85 mm (33/8 in.) From 74 mm (27/8 in.) to 94 mm (311/16 in.) Bracket Top Dimensions 37 mm (17/16 in.) 48 mm (2 in.) Data Management The device has a memory card slot for additional data storage. NOTE: The device is compatible with Windows 7 and newer, and Mac OS 10.7 and newer.Apple computers may require additional third-party software to read and write files.
About Memory Cards You can purchase memory cards from an electronics supplier, or purchase pre-loaded Garmin mapping software (www.garmin.com). Memory cards can be used to store files such as maps and POIs. Installing a Memory Card for Maps and Data You can install a memory card to increase the storage space for maps and other data on your device. You can purchase memory cards from an electronics supplier. The device supports microSD memory cards from 4 to 256 GB.
Transferring Data From Your Computer 1 Connect the device to your computer (Connecting the Device to Your Computer, page 86). Depending on your computer operating system, the device appears as either a portable device, a removable drive, or a removable volume. 2 On your computer, open the file browser. 3 Select a file. 4 Select Edit > Copy. 5 Browse to a folder on the device. NOTE: For a removable drive or volume, you should not place files in the Garmin folder. 6 Select Edit > Paste.
Importing Data to Garmin Explore 1 2 3 4 Go to explore.garmin.com and log in to your account. Select the Map tab. Select . Follow the on-screen instructions. Purchasing Additional Maps 1 Go to your device product page at garmin.com. 2 Click the Maps tab. 3 Follow the on-screen instructions.
support.garmin.
GARMIN 1 FORERUNNER®955
© 2022 Garmin Ltd. or its subsidiaries Garmin ·, the Garmin logo, and Forerunner' are trademarks of Garmin Ltd. or its subsidiaries, registered in the USA and other countries. Connect IQ"', Firstbeat Analytics"', Garmin Connect"', Garmin Express ·", and Garmin Pay™are trademarks of Garmin Ltd. or its subsidiaries. These trademarks may not be used without the express permission of Garmin. Apple•, iPhone·, iTunes·, and Mac· are trademarks of Apple Inc., registered in the U.S. and other countries.
Forerunner· 955 Quick Start Manual Overview cf f} Introduction m &. WARNING See the Important Safety and Product Information guide in the product box for product warnings and other important information. Always consult your physician before you begin or modify any exercise program. - CD Touchscreen • • • 4 0 m 9 ----- - - - - - -- 0 ~, Tap to choose an option in a menu. Tap to open the glance to view more data. Swipe up or down to scroll through the glance loop and menus.
@ LIGHT6 • Press to turn the watch on. • Press to turn the backlight on and off. • Hold to view the controls menu for quick access to frequently used functions. @ UP :: • • Press to scroll through the glances, data screens, options, and settings. Hold to view the menu. Quick Start Manual • Hold to manually change sports during an activity. @ DOWN f.J • Press to scroll through the glances, data screens, options, and settings. • Hold to open the music controls (page 17).
@ BACK0 • Press to return to the previous screen. • Press to record a lap, rest, or transition during an activity. Enabling and Disabling the Touchscreen You can customize the touchscreen for general watch use and for each activity profile. NOTE: The touchscreen is not available during swim activities. The touchscreen setting for each activity profile (such as run or bike) applies to the corresponding leg of a multisport activity.
1 Press UP or DOWN. The watch scrolls through the glance loop and displays summary data for each glance. • Viewing the Controls Menu The controls menu contains options, such as the stopwatch, locating your connected phone, and turning the watch off. You can also open the Garmin Pay· wallet. 1 TIP: You can also swipe 2 Press START to view additional options and functions for a glance. From any screen, hold LIGHT. -. to scroll or tap to select options.
2 GPS Status and Status Icons For outdoor activities, the status ring turns green when GPS is ready. A flashing icon means the watch is searching for a signal. A solid icon means the signal was found or the sensor is connected . GPS GPS stat~s - _ ~ _ _ ~~ CJ Battery status · - -- ---- 8 - Press UP or DOWN to scroll through the options. TIP: You can also drag the touchscreen to rotate the options.
• • • Set up safety features (page 15). Set up music (page 17). Set up your Garmin Pay wallet (page 14). Pairing Your Phone To use the connected features on your watch, you must pair it directly through the Garmin Connect app, instead of from the Bluetooth · settings on your phone. 1 2 From the app store on your phone, install and open the Garmin Connect app. During the initial setup, select ✓ when you are Quick Start Manual 3 prompted to pair with your phone.
before starting the activity (page 22). 1 2 3 4 5 6 10 Press START, and select an activity. Go outside, and wait while the watch locates sate IIites. Press START. Go for a run . After you complete your run, press STOP. Select an option: • Select Resume to restart the activity timer. • Select Save to save the run and reset the activity timer. You can select the run to view a summary.
Training for a Race Event Your watch can suggest daily workouts to help you train for a running event, if you have a VO2 max. estimate. See the owner's manual for more information. 1 2 3 On your phone or computer, go to your Garmin Connect calendar, and add your race event. You can search for an event in your area or create your own event. Sync your watch with your Garmin Connect account.
Smart Features Physiological Measurements These performance measurements are estimates that can help you track and understand your training activities and race performances. These estimates are provided and supported by Firstbeat Analytics··.
go to www.garmin.com /performance-data/running/. Running Power Garmin· running power is calculated using measured running dynamics information, user mass, environmental data, and other sensor data. The power measurement estimates the amount of power a runner applies to the road surface, and it is displayed in watts. Using running power as a gauge • of effort may suit some runners better than using either pace or heart rate.
Ground contact time • Ground contact time balance • Stride length • Vertical ratio NOTE: For more information, go to www.garmin.com /performance-data/running/. • Bluetooth Connected Features • • The Forerunner watch has several Bluetooth connected features for your compatible phone using the Garmin Connect app.
to pay for purchases in participating stores. You can add one or more participating credit or debit cards to your Garmin Pay wallet. Go to garmin.com/garminpay/ banks to find participating financial institutions. 1 = From the Garmin Connect app, select or•••. 2 Select Garmin Pay > Get Started. 3 Follow the on-screen instructions. You can open your Garmin Pay wallet from the controls menu on your watch. See the owner's manual for more Quick Start Manual information on using the Garmin Pay feature.
NOTICE To use these features, the Forerunner watch must be connected to the Garmin Connect app using Bluetooth technology. You can enter emergency contacts in your Garmin Connect account. Assistance: Allows you to send a message with your name, LiveTrack link, and GPS location (if available) to your emergency contacts.
a compatible Android~ phone. GroupTrack: Allows you to keep track of your connections using LiveTrack directly on screen and in real time. Adding Emergency Contacts Emergency contact phone numbers are used for the satety and tracking features. 1 2 3 = From the Garmin Connect app, select or•••. Select Safety & Tracking > Safety Features > Emergency Contacts > Add Emergency Contacts. Follow the on-screen instructions.
content to your watch from your computer or from a thirdparty provider, so you can listen when your phone is not nearby. To listen to audio content stored on your watch, you can connect headphones with Bluetooth technology. Connecting to a Third-Party Provider Before you can download music or other audio files to your watch from a supported third-party provider, you must connect the provider to your watch. For more options, you can download the Connect IQ app on your phone (garmin.com /connectiqapp).
1 2 3 Connect the watch to your computer using the included USB cable. On your computer, open the Garmin Express application, select your watch, and select Music. TIP: For Windows.. computers, you can select lt2 and browse to the folder with your audio files . For Appleqp computers, the Garmin Express application uses your iTunese library. In the My Music or iTunes Library list, select an audio file category, such as songs or playlists.
2 3 4 5 Enable pairing mode on the headphones. Hold:. Select Music > Headphones > Add New. Select your headphones to complete the pairing process. Listening to Music 1 2 3 4 20 Hold DOWN from any screen to open the music controls. If necessary, connect your headphones with Bluetooth technology. Hold::. Select Music Providers, and select an option: • • • To listen to music downloaded to the watch from your computer, select My Music. To control music playback on your phone, select Control Phone.
NOTE: The watch should be snug but comfortable. For more accurate heart rate readings, the watch should not shift while running or exercising. For pulse oximeter readings, you should remain motionless. Device Information Wearing the Watch & CAUTION Some users may experience skin irritation after prolonged use of the watch, especially if the user has sensitive skin or allergies. If you notice any skin irritation, remove the watch and give your skin time to heal.
Plug the small end of the USB cable into the charging port on your watch. This device contains a lithiumion battery. See the Important Safety and Product Information guide in the product box for product warnings and other important information. NOTICE To prevent corrosion, thoroughly clean and dry the contacts and the surrounding area before charging or connecting to a computer. Refer to the cleaning instructions in the owner's manual. 2 Plug the large end of the USB cable into a USB charging port.
features and accessing regulatory information. • Go to www.garmin.com /manuals/forerunner955. • Getting More Information • Go to support.garmin.com for additional manuals, articles, and software updates. --Quick Start Manual Go to buy.garmin.com, or contact your Garmin dealer for information about optional accessories and replacement parts. Go to www.garmin.com /ataccuracy. This is not a medical device. The pulse oximeter feature is not available in all countries.
Wireless frequency: 2.4 GHz @ 17.98 dBm maximum EU SAR:: 0.96 W/kg torso, 0.96 W/kg limb Forerunner· 955 Manuel de demarrage rapide Consultez toujours votre medecin avant de commencer ou de modifier tout programme d'exercice physique. Presentation Introduction Consultez le guide Informations importantes sur le produit et la securite inclus dans l'emballage du produit pour prendre connaissance des avertissements et autres informations importantes sur le produit.
IMPORTANT SAFETY AND PRODUCT INFORMATION October 2021 © 2021 Garmin Ltd.
Important Safety and Product Information WARNING Failure to heed the following warnings could result in death, serious injury, or property damage. Usage Requirements • Messaging, tracking, and SOS functions require an active satellite subscription. Always test your device before you use it outdoors. • Ensure that you have a clear view of the sky when using the messaging, tracking, and SOS functions of the device, as these features require satellite access to operate properly.
Battery Warnings A lithium-ion battery is used in this device. If these guidelines are not followed, batteries may experience a shortened life span or may present a risk of damage to the device, fire, chemical burn, electrolyte leak, and/or injury. • Do not disassemble, modify, remanufacture, puncture or damage the device or batteries. • Do not remove or attempt to remove the non-userreplaceable battery. • Do not expose the device or batteries to fire, explosion, or other hazard.
Radio Frequency Radiation Exposure This device is a transmitter and receiver that uses an internal antenna to send and receive low levels of radio frequency (RF) energy for data communications. The device emits RF energy below the published limits when operating in its maximum output power mode and when used with Garmin authorized accessories. To comply with RF exposure compliance requirements, the device should be used as described in the manual. The device should not be used in other configurations.
COUNTRY TO COUNTRY. IF IMPLIED WARRANTIES CANNOT BE DISCLAIMED UNDER THE LAWS OF YOUR STATE OR COUNTRY, THEN SUCH WARRANTIES ARE LIMITED IN DURATION TO THE DURATION OF THIS LIMITED WARRANTY. SOME STATES (AND COUNTRIES AND PROVINCES) DO NOT ALLOW LIMITATIONS ON HOW LONG AN IMPLIED WARRANTY LASTS, SO THE ABOVE LIMITATION MAY NOT APPLY TO YOU.
M PAP Printed in Taiwan ~-~ March 2022 190-02927-90_0A