Alpha 100 with TT™ 15/TT 15 mini ® Owner’s Manual July 2015 Printed in Taiwan 190-01786-00_0B
All rights reserved. Under the copyright laws, this manual may not be copied, in whole or in part, without the written consent of Garmin. Garmin reserves the right to change or improve its products and to make changes in the content of this manual without obligation to notify any person or organization of such changes or improvements. Go to www.garmin.com for current updates and supplemental information concerning the use of this product.
Table of Contents Getting Started............................................................... 1 Setting Up the Alpha System ...................................................... 1 Device Overviews ....................................................................... 1 Alpha 100 Handheld Device .................................................. 1 Dog Collar Device .................................................................. 1 Getting More Information ..............................................
Satellite Page ............................................................................12 Changing the Satellite View ................................................. 12 Turning Off GPS .................................................................. 12 Simulating a Location ........................................................... 12 VIRB® Remote ......................................................................... 12 Controlling a VIRB Action Camera with Your Handheld Device .................
Getting Started WARNING See the Important Safety and Product Information guide in the product box for product warnings and other important information. Setting Up the Alpha System NOTICE Avoid using a high-powered radio (greater than 5 watts) in close proximity to the device. It may cause irreversible damage to the device. Before you can use the Alpha handheld device and the TT 15 dog collar device, you must set up the devices.
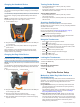
Charging the Handheld Device NOTICE To prevent corrosion, thoroughly dry the USB port, the weather cap, and the surrounding area before charging or connecting to a computer. You should fully charge the battery before you use the device for the first time. Charging a fully depleted battery takes about 2 hours. NOTE: The device does not charge when it is outside the temperature range of 0° to 40°C (32° to 104°F). 1 Lift the weather cap À.
This method is helpful when you would like to add a dog collar device during a hunt, but you are not near the dog. For example, you are adding another member of your hunting party's dog collar device to your handheld device, but you do not own the dog collar device (Adding a Dog Using the Track and Train Codes, page 3). NOTE: This feature varies based on dog collar device type and feature availability in your area. You may see track codes only or track and train codes.
Changing the Dog ID Before you can change the dog ID, the collar must be turned on and within range of the handheld device. If you are experiencing interference from other collars or handheld devices in the area, you might need to change the ID for the dog. 1 Select Dog List. 2 Select a dog. 3 Select Show Info. 4 Select > Change ID. 5 Select an available ID.
Exit Sleep Mode You can turn off sleep mode on the TT 15 mini dog collar device while you are not actively tracking your dog. 1 Select Dog List. 2 Select a dog. 3 Select Show Info > > Collar Sleep Mode > Wake. On the Dog Info page, the Sleep Mode switches to Update Rate mode. Dog Tracking The handheld device allows you to track your dog, using the tracking compass or map. The map displays your location and your dog's location and tracks.
A geofence is an invisible boundary around an area and is created using points on the map. The virtual boundaries of a geofence are accurate up to approximately 10 ft. (3 m). Geofences perform best when sized to cover an area encompassing an average sized backyard (approximately ¼ acre). Setting a Geofence Alert You can set up an invisible boundary around an area and receive an alert when a dog or contact enters and exits that area. 1 Select Setup > Location Alerts > Add Alert > Geofence.
3 Select or to choose the intensity level for each of the stimulation keys. 4 If you are using traditional stimulation mode, select LOW, MED, or HI. 5 Select . In this mode, the left key provides momentary simulation. The center key provides continuous stimulations. The right key provides a tone or vibration. Customizing the Training Keys Before you can assign the training keys to a dog, you must add a dog to the handheld device (Adding a Dog Using Wireless Pairing, page 3).
Sending a Message to Your Contacts You can send and receive automated messages. There are 18 messages choose from, such as "Help" and "I'm Coming." > Contacts > Message. 1 Select Select a message. 2 The message is sent to your contacts with your name before the message. Anyone tracking your handheld device receives the message. Tracking a Contact You can keep track of contacts' locations using the map. Select . Finding Your Contact ID Select Setup > Contacts > Pairing Setup.
Repositioning a Waypoint to Your Current Location You can change the position of a waypoint. For example, if you move your vehicle, you can change the location to your current position. > Waypoint Manager. 1 Select Select a waypoint. 2 3 Select > Reposition Here. The waypoint location changes to your current location. Moving a Waypoint on the Map > Waypoint Manager. 1 Select Select a waypoint. 2 3 Select > Move Waypoint. 4 Select the new location on the map. 5 Select Move.
NOTE: Using the Most Often interval provides the most track detail, but fills up the device memory quicker. • If you selected Distance or Time for the Record Method, enter a value, and select . As you move with the device turned on, a track log is created. Viewing Details about the Track > Track Manager. 1 Select 2 Select a track. 3 Select View Map. The beginning and the end of the track are marked by flags. 4 Select the information bar along the top of the screen. Information about the track is listed.
2 Select an individual point on the plot. Course Pointer The course pointer is most useful if you are navigating on water or where there are no major obstacles in your path. It also helps you avoid hazards to either side of the course, such as shoals or submerged rocks. To enable the course pointer, from the compass, select > Setup Heading > Go To Line/Pointer > Course (CDI). 3 4 5 6 Details about the point appear in the upper-left corner of the plot. Select > View Map.
• To view the predicted best times for hunting and fishing, select Hunt and Fish. 3 If necessary, select or to view a different day. Setting an Alarm 1 2 3 4 Select > Alarm Clock. Select and to set the time. Select Turn Alarm On. Select an option. The alarm sounds at the selected time. If the device is off at the alarm time, the device turns on and sounds the alarm. Opening the Stopwatch Select > Stopwatch.
Battery Save: Saves the battery power and prolongs the battery life by turning off the screen when the backlight times out (Turning On the Handheld Battery Save Mode, page 15). Calibrate Screen: Aligns the screen to properly respond to touches (Calibrating the Touchscreen, page 13). Calibrating the Touchscreen You can calibrate the screen, if it does not seem to be responding properly. 1 Select Setup > Display > Calibrate Screen. 2 Follow the on-screen instructions.
destination. Course (CDI) shows your relationship to the course line leading to the destination. Compass: Automatically switches from an electronic compass to a GPS compass when you are traveling at a higher rate of speed for a period of time. Calibrate Compass: Calibrates the compass (Calibrating the Compass, page 10). Altimeter Settings Select Setup > Altimeter. Auto Calibration: Automatically calibrates the altimeter each time the device is turned on.
TT 15 Dog Collar Device Specifications Battery type Rechargeable, replaceable lithium-ion Battery life 20 to 40 hr. Battery life is determined by the handheld device in use. Operating temperature range From -20° to 60°C (from -4° to 140°F) Charging temperature range From 0° to 40°C (from 32° to 104°F ) ANT wireless range Up to 10 m (32.8 ft.) VHF radio range Up to 14.48 km (9 mi.) Water rating 1 ATM* ® *The device withstands pressure equivalent to a depth of 10 m.
When the transmitter is off, you cannot send your location or messages to contacts. Saving Energy While Charging the Device You can turn off the device display and all other features while charging. 1 Connect your device to an external power source. The remaining battery capacity appears. 2 Hold the power key for 4 to 5 seconds. The display turns off, and the device goes into a low power, battery charging mode. 3 Charge the device completely. Data Management You can store files on your device.
• For Mac computers, drag the volume icon to the trash. 2 Disconnect the cable from your computer. TT 15 Battery Replacement Instructions TT 15 Components Appendix Accessories and Replacement Parts Purchasing Accessories Go to http://buy.garmin.com. Optional Maps You can use additional maps with the device, such as BirdsEye satellite imagery, BlueChart g2, and City Navigator detailed maps. Detailed maps may contain additional points of interest, such as restaurants or marine services.
5 Select the power key to test the connections. Replacing the Collar Strap When properly connected, a tone is emitted and the status LED blinks green. 6 Turn off the device. 7 Verify the gasket located inside the bottom cover is fully seated. 8 Replace the back plate. 9 Replace the six screws to secure the back plate. After you install the new battery, charge the collar completely.
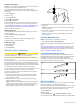
1 Rotate the end piece À 90 degrees counter clockwise to unlock it. 2 3 4 5 TIP: You may need to use a coin to remove the end piece. Remove the end piece, the silver tip Á, and the fuse Â. Insert a new fast-blow fuse that has the same current, such as 1 A or 2 A. Place the silver tip in the end piece. Push in the end piece and rotate it 90 degrees clockwise to lock it back into the vehicle power cable Ã. Data Field Options Accuracy of GPS: The margin of error for your exact location.
Index navigating to 5 settings 12 statistics 3 track and train codes 3 tracking 5 tracks 3, 16 training 6, 7 training basics 6, 7 training intensity levels 6 type 3 update rate 15 A accessories 1, 17 alarms clock 12 marine 14 proximity 11 tones 13 alerts 7 dog 4 location 5, 6 almanac 11 altimeter 14 calibrating 11 ANT+ sensors 17 pairing 17 area calculation 11 B backlight 12, 15 bark detection 4 BaseCamp 5, 12, 16 battery 15 charging 2, 16 installing 1 life 13 maximizing 8, 12, 15 replacing 17, 18 storag
www.garmin.