GPSMAP 172/172C chartplotting receivers owner’s manual GPSMAP172C Cover.
© Copyright 2004 Garmin Ltd. or its subsidiaries Garmin International, Inc. 1200 East 151st Street, Olathe, Kansas 66062, U.S.A. Tel. 913/397.8200 or 800/800.1020 Fax 913/397.8282 Garmin (Europe) Ltd. Unit 5, The Quadrangle, Abbey Park Industrial Estate, Romsey, SO51 9DL, U.K. Tel. 44/0870.8501241 Fax 44/0870.8501251 Garmin Corporation No. 68, Jangshu 2nd Road, Shijr, Taipei County, Taiwan Tel. 886/2.2642.9199 Fax 886/2.2642.9099 All rights reserved.
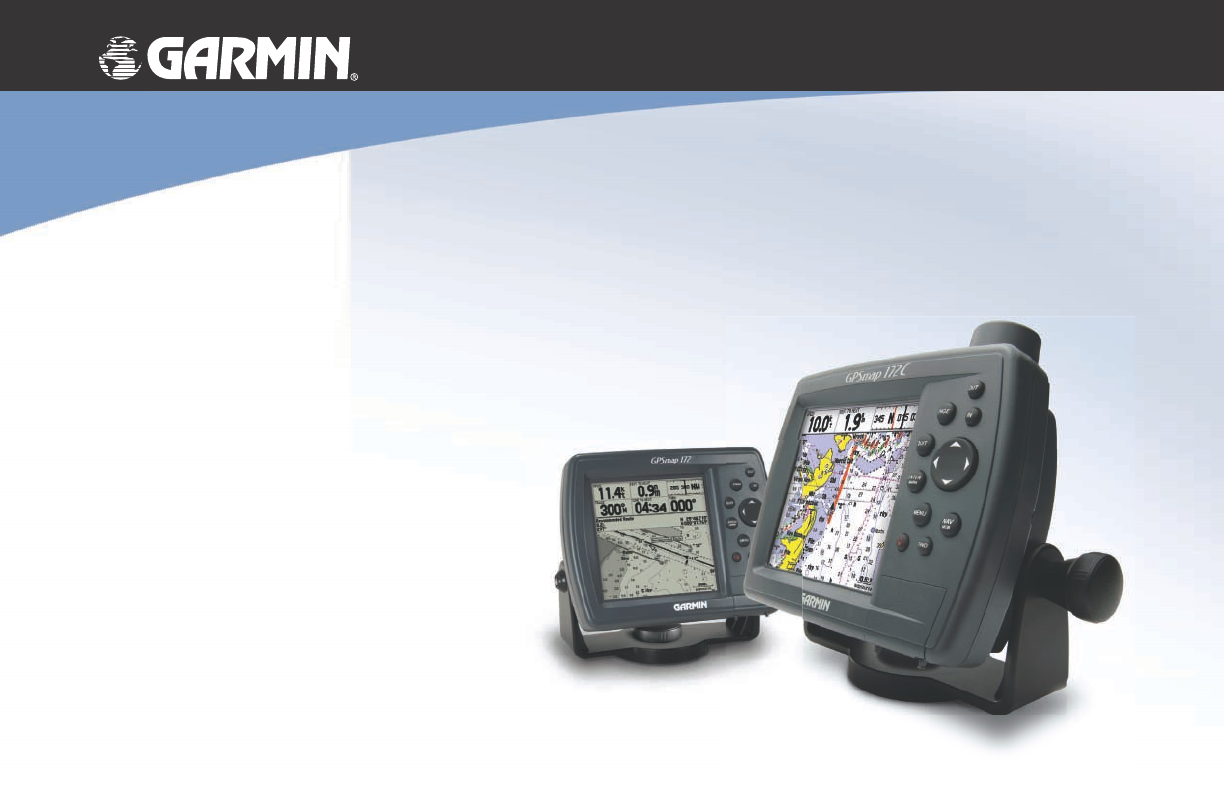
Preface Congratulations on choosing one of the most advanced marine navigation systems available! The Garmin GPSMAP 172/172C models utilize the proven performance of Garmin GPS and full-featured mapping to create an unsurpassed marine navigation chartplotter. This manual covers instructions for the GPSMAP 172 and GPSMAP 172C (color). Unit operation and specifications will be the same on both models unless otheriwse specified.
Introduction FCC Compliance FCC Compliance The GPSMAP 172/172C complies with Part 15 of the FCC interference limits for Class B digital devices FOR HOME OR OFFICE USE. These limits are designed to provide more reasonable protection against harmful interference in a residential installation, and are more stringent than “outdoor” requirements.
The GPS system is operated by the United States government, which is solely responsible for its accuracy and maintenance. The system is subject to changes which could affect the accuracy and performance of all GPS equipment. Although the Garmin GPSMAP 172/172C is a precision electronic NAVigation AID (NAVAID), any NAVAID can be misused or misinterpreted and, therefore, become unsafe.
Introduction Warranty and Serial Number Serial Number Use this area to record the serial number (8-digit number located on the back of the unit) in case it is lost, stolen, or needs service. Be sure to keep your original sales receipt in a safe place or attach a photocopy inside the manual. Serial Number: * * The Garmin GPSMAP 172/172C has no user-serviceable parts. and is fastened shut with screws.
Designed for detailed electronic charting capability, the Garmin GPSMAP 172/172C is a powerful navigation device that can give you the information you need: Precision Performance • (172) 10 level grayscale FSTN display with backlighting • (172C) 256-color CSTN display with backlighting • 12-channel parallel receiver tracks and uses up to 12 satellites for fast, accurate positioning • WAAS Capable — receive signals from the additional set of WAAS (Wide Area Augmentation System) satellites to give you better
Introduction Packing List Before installing and getting started with your unit, please check to see that your package includes the following items. If any parts are missing, please contact your Garmin dealer immediately.
Introduction . . . . . . . . . . . . . . . . . . . . . . . . . . . . . i Preface/Registration . . . . . . . . . . . . . . . . . . . . . . i Software License Agreement . . . . . . . . . . . . . . . i FCC Compliance. . . . . . . . . . . . . . . . . . . . . . . .ii Warnings and Precautions . . . . . . . . . . . . . . . . iii Warranty andSerial Number . . . . . . . . . . . . . . iv Capabilities . . . . . . . . . . . . . . . . . . . . . . . . . . . . v Packing List. . . . . . . . . . . . . . . . . . . . . . . .
Introduction “How To” Index The list to the right is provided to help you quickly find some of the more important procedures you may use on your new GPSMAP 172/172C. viii TO DO THIS: SEE PAGE(S): Turn the unit on or off . . . . . . . . . . . . . . . . . . . . . . . . . . . . . . . . . . . . . . . . . . 6 Adjust screen backlighting . . . . . . . . . . . . . . . . . . . . . . . . . . . . . . . . . . . . . . . 6 Enter data and select options . . . . . . . . . . . . . . . . . . . . . . . . . . . . . . . . .
(ZOOM) OUT Key The OUT key adjusts the map scale to display a larger area with less detail. (Zooms out) Getting Started (ZOOM) IN Key The IN key adjusts the map scale to display a smaller area with more detail. (Zooms in) Keypad Usage PAGE Key The PAGE key selects the main pages in sequence and returns display from a submenu page. OUT PAGE QUIT Key The QUIT key returns the display to the previous page and, when entering data, it restores the previous value (cancels data entry).
Getting Started Selecting Options The GPSMAP 172/172C’s advanced keypad system is designed to allow for fast, convenient selection of navigation options and data entry. The Getting Started Tour introduces you to the keypad and provides a ‘hands-on’ lesson in using the GPSMAP 172/172C. We strongly encourage you to take the Getting Started tour before using your unit for actual navigation.
Naming a waypoint or placing any sort of data that has not been predefined requires the use of both the ARROW KEYPAD and the ENTER/MARK key. To enter a name or number in a data field: Getting Started Entering Data 1. Once you have accessed a page with programmable data fields (e.g. ‘ Waypoint Edit’) you can use the ARROW KEYPAD to move the cursor (Highlight) to fields on the page. Use the UP/DOWN arrows to move up or down and the LEFT/RIGHT arrows to move sideways. 2.
Getting Started Initializing the Receiver Initializing the Receiver The first time you power up your new GPSMAP 172/172C, the receiver must be given an opportunity to collect satellite data and establish its present position. To ensure proper initialization, the GPSMAP 172/172C is shipped from the factory in AutoLocate mode, which allows the receiver to “find itself” anywhere in the world.
To graphically initialize the GPSMAP 172/172C: 1. Press the MENU key twice for the Main Menu. Press Up or Down on the ARROW KEYPAD until the ‘GPS’ tab is highlighted, then press the MENU key once. Getting Started Initializing the Receiver 2. Using the ARROW KEYPAD, highlight ‘Initialize Position’ and press ENTER to initialize the receiver from the map. The Initialize Position Page appears, prompting you to select your approximate location with the map cursor. 3.
Getting Started Power On/Screen Backlighting GPSMAP 172/172C Getting Started Tour The Garmin GPSMAP 172/172C is a powerful electronic navigation system that provides detailed map coverage and convenient control of many advanced features right from the screen display. This tour is designed to take you through the basic pages and functions of the system using the simulator mode.
Each page of the GPSMAP 172/172C’s system also features an options page, which gives you access to other functions and features that relate to the specific page you are viewing. To get a feel for how the options pages work, let’s put the GPSMAP 172/172C into simulator mode. Getting Started Simulator Mode To place the GPSMAP 172/172C in simulator mode: 1. Press the MENU key twice for the Main Menu. Press Up or Down on the ARROW KEYPAD until the ‘GPS’ tab is highlighted, then press the MENU key once. 2.
Getting Started Main Pages/ Map Page The Map Page is one of six main pages used in the GPSMAP 172/172C’s system. The six main pages are the Map Page, Map/Sonar Split Page*, Sonar Page* , Compass Page, Highway Page, and Active Route Page. All pages are linked together in a simple chain, which allows you to scroll through the pages in either direction using the PAGE and QUIT keys. (* If equipped with GSD 20.
Using the Map Cursor Working from the Map Page is a simple process that centers around the use of the cursor. Controlled by the ARROW KEYPAD, the cursor is an important tool that can be used to pan to other map locations, mark and edit waypoints and routes, and review position data of on-screen map items and waypoints. Getting Started Map Cursor To get a feel for using the Map Page and using the cursor, try the following exercise: 1. Use the IN/OUT keys to set the map scale to the 50 nm setting.
Getting Started Marking Waypoints To mark your present position: 1. Hold down the ENTER/MARK key until the ‘New Waypoint’ window appears then release the key. The window shows a default three-digit waypoint name/number (001), symbol (dot), and position. You can leave the name as the auto-assigned number, but for this exercise, lets change the name to ‘DOCK’. 2. Use the ARROW KEYPAD to highlight the waypoint name field (001) and press ENTER. You see that just the first ‘0’ is now highlighted. 3.
Going to a Destination GPS is all about marking positions as waypoints and navigating to them using the receiver’s steering guidance and map displays. We’ve already seen how to use the ENTER/MARK key to store our present position, so it’s time to move on to the fun part—going to a destination. Getting Started Using the NAV Key The NAV/MOB key, located on the keypad above the QUIT key, is the primary tool used to select a destination waypoint, TracBack, or a route to navigate.
Getting Started Simulated Tour To activate the practice route stored in memory for navigation: 1. Press NAV. The option list page appears. (If you were selecting a single waypoint to navigate to rather than a route, you could highlight the waypoint on the map, press NAV and then press ENTER.) 2. Use the ARROW KEYPAD to highlight the ‘Follow Route’ option. Press ENTER to confirm. 3. The Select Route page appears, with the ‘GPSMAP TOUR’ route highlighted. 4.
You’ll now have a clearer picture of the route you are navigating. Keep in mind that whenever you do exceed the usable range of the built-in database or the optional MapSource or BlueChart data in use, the range field displays ‘OVERZOOM’ to indicate that you should exercise extreme caution using the map data. Press the IN key to zoom into the 2 nm scale.
Getting Started Compass Navigation Page Data Fields Compass Ring Current Destination Pointer Arrow Compass Page Now that we’re navigating to an actual destination, let’s move on to the GPSMAP 172/172C navigation pages by pressing the PAGE key three times.
Getting Started Highway Page The GPSMAP 172/172C’s Highway Page also provides graphic steering guidance to a destination waypoint, placing greater emphasis on the straight-line desired course and the distance and direction you are off course. As you head toward your destination, the middle of the screen provides visual guidance to your waypoint on a moving graphic “highway.” Your present position is at the bottom center of the highway display.
Getting Started Active Route Page/ Main Menu Page The main pages’ data fields may also be configured to display several different information categories (see pages 25-26 for the complete list). On the Highway Page, let’s change the ‘TIME TO NEXT’ field to ‘TIME OF DAY’. To change a data field: 1. Press the MENU key to display the Highway Page options. 2. With ‘Change Numbers’ highlighted, press ENTER. 3. Use the ARROW KEYPAD to highlight ‘TIME TO NEXT’, then press ENTER. 4.
To get a basic feel for how the Main Menu page works, let’s delete the two waypoints you created during the simulated tour. This ensures that you have a clean slate once you start navigating in your home waters. Getting Started Deleting Waypoints/ Powering Off Unit To select the Points (Waypoint) submenu tab: 1. Use the ARROW KEYPAD to highlight the ‘Points’ menu tab. You see a list of stored waypoints appear to the right of the Main Menu list. 2.
Map Page Reference Map Page Data Fields Land User Waypoint Map Item Boat Icon Water Navaids Geographic Name Map Page shown using optional MapSource data. Map Scale The GPSMAP 172/172C’s Map Page provides a comprehensive display of electronic cartography, plotting and navigational data. When using the unit with the optional BlueChart data or MapSource software, the map display shows your boat on a digital chart, complete with geographic names, map items, navaids and a host of other chart features.
• Whenever you zoom in cursor mode, the cursor is centered on screen. • To return to position mode, press the QUIT key. When the cursor reaches the edge of the map, the unit may pause as it loads new map data. Reference Map Page: Cursor Using the Cursor The cursor allows you to pan away from your present position and scroll to other map areas around the world (even outside of your current detail coverage).
Reference Map Page: Cursor and Zooming To eliminate the cursor and re-center your position on-screen: 1. Press the QUIT key. The cursor may also be used to create new waypoints directly from the map. To create a waypoint with the cursor: 1. Use the ARROW KEYPAD to move the cursor to the desired map position. 2. Press the ENTER/MARK key and the ‘New Map Waypoint’ window appears. If the cursor is on a map item, you get a new window with details about the item when ENTER/MARK is pressed.
Map Page Options Many features of the GPSMAP 172/172C are menu driven. Each of the main pages have an options menu, allowing you to custom tailor the corresponding page to your preferences and/or select special features that specifically relate to that page. The data window, located at the top of the main pages provides a user-selectable layout of various types of useful data. Each data field may be configured to display any one of several data options.
• Measure Distance— allows you to measure the bearing and distance between any two points on the map display. Reference Map Page: Options Cursor Coordinates Distance and Bearing Map Cursor Full screen map shown To measure the Bearing/distance between two points: 1. Highlight the ‘Measure Distance’ option and press ENTER. An on-screen pointer appears on the map display at your present position with ‘ENT REF’ below it. 2.
General Tab Detail— Most, More, Normal, Less, Least: controls how much map detail displays. Those features which have a specified scale or turned “Off” are unaffected by this setting. Orientation— North Up— fixes the top of the map display to a north heading; Track Up Below— fixes the top of the map display to the current track heading and centers your position on the lower portion of the screen. Set to ‘Off; for constant Track Up.The numeric value is the range the unit switches to North Up when zooming out.
Reference Map Page Options Waypoints Tab Points Tab Navaids Tab Nav Line Tab Track Tab 24 Waypoints Tab— Waypoints/Active Route Text— None, Small, Medium, and Large: controls the screen size of the name. Zoom— Auto, Off, 20 ft.-800 mi.: sets the maximum scale at which the feature should appear on the screen. Some types of data only shows up to certain zoom scales. Points Tab— Spot Soundings/Tide Stations/Services Text— None (except Spot Snd.
Other Tab— Accuracy Circle— On/Off: toggles the circle “On” and “Off”. The circle represents the approximate accuracy of the unit based on EPE, DOP, and basemap quality. Your position is within the circle. Lat/Lon Grid— Text— None, Small, Medium, and Large: controls the screen size of the name. Zoom— Auto, Off, 20 ft.-800 mi.: sets the maximum scale at which the feature should appear. Map Outlines— On/Off: toggles the coverage boxes for BlueChart/MapSource data “On” and “Off”.
Reference Map Page Options Choose the type of data you wish to display.
Compass Page The GPSMAP 172/172C features two different navigation pages: Compass and Highway. Whenever a NAV goto, Follow Track (TracBack), or Follow Route have been activated, the GPSMAP 172/172C’s Compass Page guides you to your destination with digital readouts and a graphic compass display, which includes a bearing pointer. Use this page (instead of the Highway Page) when your desired path may be varied in direction.
Reference Highway Page Whenever a Go To, TracBack or route has been activated, the GPSMAP 172/172C’s Highway Page provides digital and graphic steering guidance to the destination with the Navigation Page. The top half of the Highway Page features user-selectable data fields that display useful navigation data. The bottom section of the screen provides visual guidance to the waypoint on a graphic highway display. The line down the center of the highway represents your desired track line.
To select a menu option: 1. Using the ARROW KEYPAD, highlight the desired option and press ENTER. The following options are available from the Highway Page menu: • Set Up Highway— allows you to select what waypoints and tracks are shown on the Highway display. Use the ARROW KEYPAD and ENTER key to select/deselect the desired options.
Reference Creating Waypoints Creating and Using Waypoints The Garmin GPSMAP 172/172C stores up to 3000 alphanumeric waypoints with a user-defined icon, comments, depth, and water temperature available for each waypoint. Waypoints can be created using three basic methods: • ENTER/MARK key– used primarily for marking your present position, the ENTER/MARK key also provides options that allow you to select a map position or map item from the map display.
6. To manually enter a set of coordinates, highlight the coordinates and press ENTER, then use the ARROW KEYPAD to enter the new coordinates and press ENTER when done. 7. When done, use the ARROW KEYPAD to highlight the ‘OK’ prompt and press ENTER to save the waypoint into memory. Reference Creating Waypoints Creating Waypoints Graphically Waypoints may also be quickly created with the Map Page cursor, which allows you to ‘point and shoot’ at any map position or map feature to create a new waypoint.
Reference Creating Waypoints Additional Options For Creating Waypoints Waypoints may also be created by manually entering position coordinates through the Points tab of the Main Menu. This method can be useful for creating a waypoint at a specific latitude/longitude position from a chart. To create a new waypoint by entering location coordinates: 1. Press MENU twice to display the Main Menu. Highlight the ‘Points’ tab and press MENU. 2. Highlight ‘Create Waypoint’ and press ENTER.
3. To select another location from which to project a waypoint, highlight the field next to ‘From’ and press ENTER. The ‘Find’ screen appears. Highlight the desired type of location (waypoints, cities, etc.) and press ENTER. Use the submenus to narrow down your search (for more information see ‘Find’ on pages 51-52). Highlight the desired location and press ENTER. With ‘OK’ highlighted, press ENTER again. Reference Creating Waypoints 4.
Reference Reviewing/Editing Waypoints Reviewing and Editing Waypoints Once you have created and stored a waypoint, it may be modified, reviewed, renamed, moved, or deleted at any time through the Waypoint Review and Waypoint Edit pages. To access the Waypoint Review page: 1. Use the ARROW KEYPAD to highlight the desired waypoint on the Map Page. 2. Press ENTER to display the Waypoint Review page.
Reference To change the comment/position coordinates/depth/water temperature: 1. Highlight the desired field and press ENTER. Editing Waypoints 2. Use the ARROW KEYPAD to edit/enter the data. To drop to the next line, press to the right on the ARROW KEYPAD. Press ENTER when done. On the Waypoint Review and Waypoint Edit pages, you may also delete the selected waypoint, view the waypoint on the map, and move the waypoint on the map. To delete a waypoint: 1.
Reference Waypoint Lists Submenu Tabs Waypoint Lists The GPSMAP 172/172C’s Main Menu Page features two waypoint submenu tabs, ‘User’ and ‘Proximity’, that let you manage a large number of waypoints quickly and efficiently. The submenu tabs also provide a continuously updated proximity waypoint alarm function that can be used to define an alarm circle around submerged hazards, shallow waters, etc. To access the waypoint submenus of the Main Menu: 1.
Once a waypoint is deleted from the list, it cannot be recovered from the unit. It is advisable to backup important waypoints to a computer using an optional PC cable and interface software, save them to a data card, or write them down by hand. To delete an individual waypoint from the ‘User’ list: Reference Waypoint Lists 1. Use the ARROW KEYPAD to highlight the waypoint to be deleted. 2. Press MENU, highlight ‘Delete Waypoint’ and press ENTER. OR, press ENTER, highlight ‘Delete’ and press ENTER. 3.
Reference To add a proximity waypoint: 1. Use the ARROW KEYPAD to highlight an empty space on the Proximity list and press ENTER. The ‘Find’ screen appears. Highlight ‘Waypoints’ and press ENTER. Waypoint Lists 2. Use the ARROW KEYPAD to highlight the desired waypoint from the ‘By Name’ or ‘Nearest’ tab lists. The Waypoint Review page appears for the selected waypoint. 3. With ‘OK’ highlighted, press ENTER to confirm. The distance field is now highlighted. 4.
Going to a Destination Using the NAV key, the GPSMAP 172/172C provides three ways to navigate to a destination: Go To Point, Follow Route, and Follow Track (TracBack). Once you are actively navigating, you see a straight line that always runs from your current location to the destination on the Map Page. The easiest method for selecting a destination is the ‘Go To’ function, which lets you select a destination point, then quickly sets a direct course from your present position.
Reference Going to a Destination/ TracBack Navigation To activate an existing waypoint or map item as a ‘Go To’ from the map display: 1. Use the ARROW KEYPAD to highlight the waypoint or map item on the screen and press NAV. 2. With ‘Go To ’, press ENTER. To activate a new map point (non-map item) as a ‘Go To’ from the map display: 1. Use the ARROW KEYPAD to move the arrow cursor to the desired position and press NAV. 2. With ‘Go To MAP Point’ highlighted, press ENTER.
2. Use the ARROW KEYPAD to select ‘Save’ and press ENTER. 3. On the ‘Save Back Through’ window, highlight the desired time, date, or ‘Entire Log’ and press ENTER. 4. Next, the track begins saving and then display the ‘Saved Track’ window when done. The default name, distance, and number of points (700 maximum) are displayed. Reference TracBack Navigation To change the name of the saved track, highlight the name field and press ENTER, make your changes and press ENTER again.
Reference • If the track log interval is set to the ‘Time’ option, the route may not follow your exact path (keep the interval set to ‘resolution’ for best performance). TracBack Navigation/ MOB: Man OverBoard • If the receiver is turned off or satellite coverage is lost during your trip, the TracBack draws a straight line between any point where coverage was lost and where it resumed. • If your track log’s changes in distance and direction are too complex, 50 waypoints may not mark your path accurately.
Routes The last way to navigate to a destination is to create a user-defined route. The Garmin GPSMAP 172/172C system lets you create and store up to 50 reversible routes (numbered 1-50), with up to 50 waypoints each. Routes can be created and modified in two ways. The first way is to ‘Edit on Map’ from the Route Edit map page, allowing you to see each route graphically on-screen as you create, review, or modify the route.
Reference Creating a Route/ Following a Route To create a route using text from the Route Review page: 1. Press the MENU key twice to display the Main Menu page. Use the ARROW KEYPAD to highlight the ‘Route’ tab. 2. Press the MENU key to display the route options page. Select the ‘New Route’ option and press ENTER. Or, highlight the first available blank route slot and press ENTER. 3. Press MENU, select ‘Edit as text’ and press ENTER. 4.
2. Highlight the route you wish to navigate and press ENTER. 3. Choose ‘Activate’ or ‘Invert and Activate’ and press ENTER. (‘Activate’ uses the route as is, ‘Invert and Activate’ reverses the route then activate it.) Reference Route List Page To deactivate (stop navigation) of a route: 1. Press the NAV key, highlight ‘Stop Navigation’ and press ENTER.
Reference Route Review Page Route Review Page Once you have created a route, the Route Review page allows you to edit a selected route. To access the Route Review page: 1. Press MENU twice and highlight the ‘Route’ tab. Route Name Data Fields 2. Highlight the name of the route you wish to review and press ENTER. The Route Review page also allows you to enter a 15-character name for any listed route. By default the name includes the first and last waypoints in the route.
• Edit on Map — review and modify the route displayed for each point (waypoint or map item) on a map page. You may also use the cursor to insert a new route point on a route leg, review the waypoint or map item. To edit a route on the map: Reference Editing Routes 1. From the Route Review page, press MENU, highlight ‘Edit on Map’ and press ENTER. To review a route point: 1. Highlight the point and press ENTER. The Review page appears.
Reference Editing Routes The GPSMAP 172/172C’s route edit mode also allows you to insert a new route point in any route leg using the map cursor. To insert a new point between two existing route waypoints: 1. Use the ARROW KEYPAD to select the leg in which you want to insert the new waypoint (the route line highlights and changes to a dotted line when the leg is selected) and press ENTER. 2.
• Trip Planning — The Route Review and Active Route pages also display trip-planning information for each leg or the entire route. Available information includes Course, ETA, Fuel (to point), Leg Distance, Leg Fuel, Leg Time, Sunrise and Sunset (at point location) and Time To (point). Reference Editing Routes To use the trip planning feature: 1. Highlight the desired route from the Route List and press ENTER to display the Route Review page. 2.
Reference Active Route Page Active Route Page Whenever you have activated a route in the GPSMAP 172/172C, the Active Route page shows each point (waypoint or map item) of the active route, with the point name, distance and choice of Course, ETA, Fuel to point, Leg Distance, Leg Fuel, Leg Time, Sunrise and Sunset at point location, or Time To point for each point from your present position. The current destination point, the ‘active’ point, is marked with an arrow icon.
Find Key The FIND key allows you to search the unit for user waypoints, map items, and any optional BlueChart or MapSource information loaded on a data card. Press the FIND key to search for items from your current location by default. You may also search from other locations. When you press FIND, a list of available items to search for appears. The default items are Waypoints, Cities, Tide Stations, and Transportation.
Reference To view details about an item: 1. With the desired item highlighted in the search results list, press ENTER. Find Options Additional Information Tabs Distance, Bearing, Coordinates of item Additional Option Buttons Additional Information Window 2. An Information page appears with details about the item organized in a tabbed format.
Main Menu Page Reference The GPSMAP 172/172C’s Main Menu Page provides access to various waypoint, system, navigation and interface management, and setup menus in an easy to use “tab” format. The Main Menu page is available from any page in the GPSMAP 172/172C’s system, and is accessed through the MENU key. See pages 2-3 for additional instructions changing settings and entering data. Main Menu Tabs To access the Main Menu Page: 1. Press MENU twice.
Reference • Temp* – sets up and shows the water temperature log. (if equipped with GSD 20 or NMEA compatible device) • Sonar* – sets up Sonar Page features, speeds and calibrations. (if equipped with GSD 20) • Setup – defines System, Units, and Time settings. • Comm – interface settings for use with a PC or second device. • Alarm – sets up alarms for anchor drag, arrival, off course, and clock.
WAAS Capability The GPSMAP 172/172C is capable of receiving WAAS (Wide Area Augmentation System) satellite signals. WAAS is an FAA (Federal Aviation Administration) funded project to improve the overall accuracy and integrity of the GPS signal for aviation use, but land/sea based users may also benefit from this system. At this time, the system is still in the development stage and is not fully operational. There are currently two WAAS satellites that can be received in the U.S.A.
Reference Main Menu: GPS Tab When the GPSMAP 172/172C is using a differential correction signal (either WAAS or DGPS), a “D” is displayed at the bottom of the signal strength indicator bars for the satellites that are corrected. 56 The status field shows one of the following conditions: • Looking For Satellites – the receiver is looking for any satellites. • AutoLocate – the receiver is looking for any satellite whose almanac has been collected. This process can take up to five minutes.
The Differential SNR (Signal to Noise Ratio) indicates, on a scale to 0-30db with 30db being the best, the strength of the DGPS signal being received. The SNR depends upon the mounting of your DGPS receiver and the distance from the DGPS transmitting station. The GPS Info tab features an options menu that provides access to functions and features relating to the GPS Info display.
Reference Main Menu: Tide Tab Station Name Date Tide Tab— shows a graphical chart which displays tide station information in a 24 hour span starting at midnight. You can choose from different dates and over 3000 tide stations around the USA coastline, Alaska, Hawaii, western Canada and several of the Caribbean islands. The top of the page displays the tide station being referenced, and the date. The bottom of the chart shows a 24-hour block of local time for your position.
To select the nearest tide station from your current location: 1. From the “Tide” tab, highlight the ‘At’ field and press ENTER/MARK. 2. Highlight the desired station on the list and press ENTER/MARK twice. If you are not within this range, you will see a message “None Found”. Use the ‘Nearest To Other’ Find option and select a location closer to a tide station. Reference Main Menu: Tide Tab To select a tide station from the map: 1. Press FIND, select ‘Tide Stations’ and press ENTER/MARK. 2.
Reference Trip Tab— displays data for Trip Odometer, Moving Average speed, Total Average speed, Maximum Speed, Stopped Time, Moving Time, Total Time, and Odometer. You may reset the data by choosing from ‘Reset Trip’, ‘Reset Odometer’, ‘Reset Max Speed’, or ‘Reset All’ and pressing ENTER. Celes (Celestial) Tab— displays celestial data for sun and moon rise/set, moon phase, and approximate skyview location of the sun and moon. The moon phase displays the current visible portion of the moon as a light color.
Track Tab— lets you specify whether or not to record a track log (an electronic ‘breadcrumb trail’ recording of your path), define how it is recorded, or save track log data for future use. The Track Tab also provides an indicator of the memory used for the active track log and options to clear the track memory or start a TracBack route. See page 40 for TracBack information. The Track submenu is divided in two tabs: ‘Active’ tab and the ‘Saved’ tab.
Reference Main Menu: Track Tab Saved Submenu Tab— manages a list of any saved track logs, allows TracBack activation, map display of saved logs. The active log stores up to approximately 10,000 track log points, based upon the criteria specified in the Track settings. Up to 15 track logs may be saved in memory, with up to 700 track log points in each saved log.
DSC Tab— allows to control and set up DSC (Digital Selective Calling) features on the unit. What is Digital selective calling (DSC)? Digital Selective Calling (DSC) uses marine VHF radio and Global Positioning System (GPS) technologies to transmit and receive location information. DSC is used by mariners to assist them in two major areas: Distress Calls and Position Reporting.
Reference Main Menu: DSC Tab HOW ARE MMSI ASSIGNMENTS OBTAINED? Non-commercial users (e.g. recreational users who remain in domestic waters and only carry VHF, EPIRB (Emergency Position Indicating Radio Beacons), and Radar) are not required to have a FCC ship station license. The FCC and Coast Guard have authorized some second and third party vendors to assign MMSI numbers. This service is limited to registering recreational vessels only.
MMSI number attached to the call (if you have DSC support). Any DSC-equipped mariner (on sea or land) within range can receive the call. When the Garmin GPSMAP 172/172C is connected to a VHF with DSC support, the GPS unit displays a Call List, Log, and a Directory available to store incoming information received from another user’s DSC capable VHF/GPS combination. Basic wiring is required for the Garmin unit and VHF radio to send and receive NMEA data from each other (pg. 92).
Reference Main Menu: DSC Tab DSC Call List The DSC Call List displays the current calls received. The GPS can manage up to 50 calls. When ‘calls’ are received, they are updated constantly to give the most current information, even if the unit is left unattended. Any entry from the Call List can be selected to show an Entry Review. DSC Log When DSC calls are received, they are automatically stored in the Log, with the latest call at the top. The unit may store up to 100 logs.
There are two ways to add a new entry into the directory. To add a new Directory entry: 1. Press Menu, then highlight ‘New Item’ and press ENTER. Reference Main Menu: DSC Tab 2. Or, with the Directory Tab highlighted press the Arrow Keypad DOWN, highlight an empty field and press ENTER to access the New Directory Item window. The New Directory Item window allows you to input information of a known contact. To add the MMSI number, Name, or Comment: 1.
Reference Main Menu: DSC/Card Tabs A user also has the ability to simulate a Distress Call or a Position Report on this page. This is helpful for practice before connecting to the real system. The Distress Call simulator also helps to check if alarms are working properly. To run a simulation: 1. Place the chartplotter into simulation (see pg. 7). 2. From the Main Menu, select the DSC tab, then highlight the Setup tab. 3. Highlight which simulation you wish to run and press ENTER.
Temp (Temperature) Tab— displays the water temperature log (if equipped with a temperature transducer/sensor). The chart reads from right to left, so that the most recent temperature measured is displayed on the far right side of the chart. The dotted lines within the chart indicate intervals in the temperature scale and the duration of time. The following settings are available: Reference Main Menu: Temp Tab/ Setup Tab • Temperature Scale – sets the temperature range (in degrees) for displaying the log.
Reference Main Menu: System Tab/ Units Tab Track Control* – ‘Auto Track’ steers to the current navigation point. ‘User Track’ allows you to enter a heading in the ‘Track’ field. Track* – lets you enter a heading. Speed* – lets you enter a speed. Transducer* – lets you simulate using a Depth Only, Temp Only, or Temp/Speed transducer. * These fields only appear when the unit is in Simulator Mode. • System Information – displays the unit’s software, basemap version, and electronic serial number.
For additional information on Loran TD setup, see page 78. • Map Datum – allows you to manually select the datum reference used to determine a given position. The default setting is ‘WGS 84’. The unit automatically chooses the best datum depending upon your chosen position format. Datums are used to describe geographic positions for surveying, mapping, and navigation and are not actual maps built in the unit.
Reference Time Submenu Tab— displays the current time and date, allows you to adjust the 12 or 24-hour time format, enter a time zone, and adjust for daylight savings to show correct local time. Main Menu: Time/ Comm Tab The following options are available: • Time Format – 12 hour, 24-hour (military) or UTC time (also called Greenwich Time). • Time Zone – choose your time zone to show correct local time or choose ‘Other’ and enter a UTC Offset.
• None – provides no interfacing capabilities. Port 2: • Garmin DGPS – used to connect the GPSMAP 172/172C with a Garmin DGPS beacon receiver. • Other DGPS – allows DGPS input using a standard RTCM format, without any output capabilities. • NMEA In/NMEA Out – supports the input/output of standard NMEA 0183 data, DSC, and sonar NMEA input support for the DPT, MTW and VHW sentences. You may also adjust the NMEA output.
Reference Main Menu: Comm Tab If ‘Garmin DGPS’ or ‘RTCM In/NMEA Out’ format is selected, additional fields are provided to control a Garmin differential beacon receiver directly from your GPSMAP 172/172C. You may have the unit automatically scan for the DGPS beacon signal or you can enter the beacon frequency and bit rate on the unit and the information is used to tune the beacon receiver. To have the unit automatically scan for a frequency: 1.
NMEA Interface If you are going to interface the GPSMAP 172/172C with another piece of equipment (such as a radio or autopilot), the unit needs to be set to output NMEA data. More information on wiring and NMEA data may be found on page 92. Reference Main Menu: Comm Tab To activate the NMEA data: 1. On either port of the Comm Tab, highlight the ‘Serial Data Format’ field and press ENTER. 2. Select ‘NMEA In/NMEA Out’ and press ENTER.
Reference Main Menu: Comm Tab/ Alarm Tab GPSMAP 172/172C NMEA Sentence Output (NMEA version 3.01 compliant) Always transmitted: GPRMC, GPGGA, GPGLL, GPBWC, GPVTG, GPXTE, GPRMB, GPBOD Switchable sentences: GPGSA, GPGSV, GPWPL, GPRTE Garmin proprietary: PGRME, PGRMZ, PGRMM Alarm Tab— contains setting for the unit’s alarms. The Alarm tab is divided into three submenus: System alarms, Nav alarms, and Sonar alarms. System Submenu Tab Advanced NMEA Setup Page Clock – provides an alarm for the system clock.
Sonar Submenu Tab* Shallow Water/Deep Water – set alarms to sound when you enter an area of specified depth that is too shallow and/or too deep. You must be receiving sonar data for this function to work. Water Temperature – sets an alarm to sound when the transducer reports a temperature either above, below, inside or outside the specified values. Fish – sets an alarm to sound when the unit detects a fish of the specified size symbol(s). Reference Main Menu: Alarm Tab To set an alarm: 1.
Appendix A Loran TD Loran TD System LORAN-C is a radio navigation aid operated and maintained in the United States by the United States Coast Guard. The name LORAN is an acronym for “LOng RAnge Navigation”. The LORAN system covers the entire United States and the U.S. Coastal Confluence Zone. From the perspective of a mariner, the system is used for ocean and coastal navigation.
The LORAN Position Format field is located under the Units tab in the Main Menu. The ‘LORAN TD Setup’ window contains the fields to select the Loran GRI-Chain Number, Primary and Secondary Stations, and TD Offsets. Appendix A Loran TD Setup To setup Loran TD from the Main Menu: 1. Using the ARROW KEYPAD, highlight the ‘Setup tab, then press RIGHT to highlight the ‘Units’ submenu tab. Highlight the “Position Format” field and press ENTER.
Appendix B Time Offsets A simple way to determine your local time offset is how many hours you are behind or ahead of UTC (also called ‘Greenwich’ or ‘zulu’ time). Example: EST (Eastern Standard Time) is 5 hours behind UTC, so your offset would be -5. Adding one hour for daylight savings would make EDT (Eastern Daylight Time) - 4. Subtract an hour for each time zone as you travel west. Offsets for Continental U.S.
The GPSMAP 172/172C uses an on-screen pop-up message system to alert you to unit operating characteristics. Press the ENTER key to acknowledge and return to the page you were viewing. Alarm Clock— The alarm clock has sounded. Alarm Voltage Set Too High— Voltage range must be between 10.0 and 35.0 volts for the GPSMAP 172/172C. Alarm Voltage Set Too Low — Voltage range must be between 10.0 and 35.0 volts for the GPSMAP 172/172C. Anchor Drag Alarm— You have drifted out of the specified distance range.
Appendix C Messages Proximity Alarm List is Full— You have used all ten proximity waypoints. Proximity Alarm Waypoint— You have entered the alarm radius for the proximity waypoint indicated. Proximity Overlaps Another Proximity Waypoint—The alarm radius specified overlaps the area specified for another proximity waypoint. Adjust the distance. Route Already Exists: — You have entered a route name that already exists in memory. Modify the route name or delete the previous route name.
Adindan Adindan- Ethiopia, Mali, Senegal, Sudan Chua Astro Chua Astro- Paraguay Afgooye Afgooye- Somalia Croatia Croatia AIN EL ABD ‘70 Corrego Alegr Corrego Alegre- Brazil AIN EL ANBD 1970- Bahrain Island, Saudi Arabia Djakarta Djakarta (Batavia)- Sumatra Island (Indonesia) Anna 1 Ast ‘65 Anna 1 Astro ‘65- Cocos I.
Appendix D NAD27 Central Map Datums NAD27 CONUS North Am. 1927- Mean Value (CONUS) NAD27 Cuba North American 1927- Cuba NAD27 Grnland North American 1927- Greenland (Hayes Peninsula) Johnston Island Johnston Island Kandawala Kandawala- Sri Lanka Kerguelen Islnd Kerguelen Island Kertau 1948 West Malaysia, Singapore L. C. 5 Astro Cayman Brac Island Liberia 1964 Liberia 1964- Liberia NAD27 Mexico N.
Avg Speed— The average of all second-by-second speed readings since last reset. Bearing (BRG)— The compass direction from your present position to a destination waypoint. Course— The desired course between the active ‘from’ and ‘to’ waypoints. Distance (Dist)— The ‘great circle’ distance from present position to a destination waypoint. Distance to Destination— The ‘great circle’ distance from present position to a GOTO destination, or the final waypoint in a route.
Appendix E Navigation Terms BRG TRK F OF S UR CO SP EE D E DES IR TRA ED CK 'FROM' WAYPOINT 86 DIS NORTH NORTH TAN CE TO DES TINA TIO N DESTINATION WAYPOINT Odometer— A running tally of distance travelled, based upon the distance between second-by-second position readings. Off Course— The distance you are off a desired course in either direction, left or right. Also referred to as ‘cross-track error’ or ‘course error’.
Physical Specifications Size: 4.9" H x 6.3" W x 3.7" D (122.5mm x 157.5mm x 92.5mm) Weight: 1.0 lb 1oz.(.481Kg) Display: (172C) 3.2” W x 3.2” H (81.28mm) CSTN (Color Super Twist Nematic) with adjustable CCFL (Cold Cathode Fluorescent Lamp) backlighting; (320x320 pixels) (172) . 3.2” W x 3.2” H (81.6 mm) 10 level grayscale FSTN (Film Super Twist Nematic) with adjustable CCFL (cold cathode) backlighting; (320x320 pixels) Case: Fully gasketed, high-impact plastic alloy, waterproof to IEC 60529-IPX-7 Temp.
Appendix G Antenna Installation Installing the GPSMAP 172/172C The GPSMAP 172/172C must be properly installed according to the following instructions to get the best possible performance. If you have the GPSMAP 172/172C with the built-in internal antenna, you may skip this section and proceed to the next page. For units purchased with the remote GA 29 antenna, follow the instructions below.
Mounting the GPSMAP 172/172C Unit The GPSMAP 172/172C’s compact, waterproof case is suitable for mounting in exposed locations or at the nav station. The unit comes with a single-knob tilt & swivel bracket that can be used for surface or overhead mounting.
Appendix G Unit Installation Installing the Unit on the Mounting Bracket 1. Align the slot on the back of the unit with the long mounting knob and slide in place. It may be necessary to adjust the long mounting knob to spread the bracket arms apart. (Turn counter-clockwise to widen the bracket arms, clockwise to tighten.) 2. Adjust the unit angle and tighten the long mounting knob until snug. 3. To tilt the unit, loosen the long mounting knob on the right side of the bracket assembly. 4.
Flush Mounting the GPSMAP 172/172C External Antenna Unit The GPSMAP 172/172C External Antenna only can be flush mounted on a flat panel. When flush mounting the GPSMAP 172/172C, be sure to choose an appropriately sized location for the unit. Check that all cables reach the unit mounting location before beginning installation. Use the Flush Mount Template provided in the box to determine a location. Always wear safety goggles, ear protection, and a dust mask when drilling, cutting or sanding.
Appendix G Wiring and Interfacing You can download a copy of Garmin's proprietary communication protocol from the Help and Support section of our web site at www.garmin.com. Documentation concerning NMEA &RTCM formats and sentences are available for purchase from: Connecting the Power/Data The power/data cable connects the GPSMAP 172/172C to a DC system and provides interface capabilities for connecting external devices. The color code in the diagram below indicates the appropriate harness connections.
Installing and Removing Data Cards The GPSMAP 172/172C uses optional Garmin marine BlueChart and MapSource data cards to display digital charts and maps on-screen. Data cards are installed in the card slot located at the bottom right of the unit. Data cards may be installed or removed at any time, whether the unit is on or off. To install a data card: Appendix G Installing and Removing Data Cards 1.
Appendix H A Index Accuracy 55 Accuracy Alarm 76 Accuracy Circle 25 Active Route Page 16, 29, 50 Active Route Page Options 50 Active Track Log 61 Alarm Tab 76, 77 Anchor Drag Alarm 76 Append to Route 33 Arrival Alarm 76 ARROW KEYPAD 1 AutoLocate 57 AutoZoom 23 B Backlight 1, 6 Basemap 23 Battery Alarm 76 Bearing Line 24 Bearing Pointer 27 Beeper 69 BlueChart 23, 24, 93 94 C Capabilities v Card Tab 68 Celes Tab 60 Change Numbers 16, 25, 29 Cleaning 87 Clock Alarm 76 Color Mode 23 Communications Tab 72-7
F I FCC Compliance ii Find 51, 52 FIND Key 1, 51 Find Options 52 Fish Alarm 77 Follow Routes 11, 44, 45 Follow Track 11, 40 Full Screen Map 21 Initialize Position 57 Initializing 4, 5 Installation 88-92 Interfacing 92 Invert Route 50 IN Key 1, 18, 20 G Keypad Usage 1, 2 General Tab 23 Going to a Destination 11, 39, 40 Go To 39 Go To Point 11, 39 GPS Information Page 5, 6 GPS Status 5, 6 GPS Tab 5, 54-57 GPS Tab Options 57 Grids 70 H Heading 71 Heading Line 24 Highway Page 15, 28 Highway Page options
Appendix H Index Navigation Terms 85, 86 NAV Key 1, 39-42, 68 Nav Line Tab 24 Nearest To Boat 52 Nearest To Destination 52 Nearest To Next 52 Nearest To Other 52 NMEA 72, 73, 75, 76, 92 NMEA Interface 75 NMEA Output Setup 75 North Reference 71 North Up 23 Numbers, Changing 25 O Off Course Alarm 76 Orientation, Map 23 Other Tab 25 OUT Key 1, 18, 20 Overzoom 20 P Packing List vi 96 Q Routes 43 Routes, Copying 45 Routes, Creating 43, 44 Routes, Deleting 45 Routes, Editing 46-49 Routes, Following 44, 45 Rou
Show Data 21 Signal Strength Bars 54 Simulated Tour 12 Simulator 57, 69 Simulator Mode 7, 11, 15 Simulator Set Position 69 Simulator Speed 70 Simulator Track 70 Simulator Track Control 70 Simulator Transducer 70 Skyview Orientation 60 Software License i Software Version 70 Source Tab 23 Specifications 87 Speed Filter 69 Speed Units 71 Stop Navigation 11 Storage 87 Sun Rise/Set 60 Symbol Set 24 System Information 70 System Mode 69 System Tab 70 Temperature Units 71 Tides 58, 59 Tide Tab 58, 59 Time Format 72
GPSMAP172C Cover.
For the latest free software updates (excluding map data) throughout the life of your Garmin products, visit the Garmin Web site at www.garmin.com. © Copyright 2004 Garmin Ltd. or its subsidiaries Garmin International, Inc. 1200 East 151st Street, Olathe, Kansas 66062, U.S.A. Garmin (Europe) Ltd. Unit 5, The Quadrangle, Abbey Park Industrial Estate, Romsey, SO51 9DL, U.K. Garmin Corporation No. 68, Jangshu 2nd Road, Shijr, Taipei County, Taiwan www.garmin.com Part Number 190-00321-00 Rev.