GASTROBACK ® Instructions for Use and Recipes DESIGN JUICER Pro Art.-Nr.
Carefully read all provided instructions before you start running the appliance and pay attention to the warnings mentioned in these instructions. Table of Contents Knowing your Design Juicer Pro............................................................................ 35 Important safeguards........................................................................................... 36 Safeguards for daily operation.........................................................................
Knowing Your Design juicer PRO 1. Food pusher with cannelure: for pushing whole fruit and vegetables down the feed chute 1. 2. Patented extra wide feed chute: You can fill in whole fruit such as apples, carrots, tomatoes and peeled oranges. For quick and easy juicing of fruit and vegetables. 2. 3. Juicer cover (dishwasher safe) with inter locking safety arm: stops the juicing without the juicer cover locked in place. 3. 4. 4. Stainless steel micro mesh filter basket (dishwasher safe) 5.
The current interest in fresh and unprocessed food is the reason for fresh fruit and vegetable juices to become a favourite component of our daily food and well balanced diet. The Design Juicer Pro has a special designed large feed chute, a 3 litre pulp container, a big juice jug and a stainless steel titanium reinforced micro mesh filter. It operates with a high performance 950 watt motor which makes the juice production easy and efficient.
• The blades on the base of the stainless steel micro mesh filter and inside the feed chute are very sharp. Pay attention when handling the parts. Only touch the stainless steel micro mesh filter on the edge and handle with care when cleaning with the nylon bristle brush. • ATTENTION: Ensure that the filter basket is clean before starting to operate the appliance. • Do not leave food leftovers dehumidify on the appliance or parts of the appliance.
• Always make sure the appliance is properly and completely assembled before connecting to power outlet and operating. The unit will not turn ›on‹ unless properly assembled. • Do not let the motor run permanently for longer then 7 minutes to avoid overheating. • While proceeding Do not push the food pusher too hard down. Empty the pulp container and juice jug in time to avoid run-over and splatter which might causes damages to the appliance.
• Never pull, rip, bend, clamp, squish or knot the line cord. Pay attention to the power cord not hanging of the table. Attend to nobody getting caught in loops of the power cord or pulling the appliance of the work space. When pulling the plug always catch hold of the enclosure of the plug. • Do not immerse the motor housing or power cord in water or any other liquid. Do not pour or drip any liquids on the motor housing or power cord.
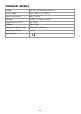
Technical details Model: Art.-No. 40126 Design Juicer Pro Power Supply: 230 - 240 V / 50 - 60 Hz Power consumption: 800 - 950 W Rotations: 6,500 - 13,000 per minute Length of power cord: ca. 90 cm Weight: ca. 4.
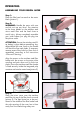
operating Assembling your Design Juicer Step 1: Place the filter bowl surround on the motor block (picture 1). Step 2: WARNING: Handle the parts with care and do not use any force. Pay attention to the sharp blades on the stainless steel micro mesh filter and the feed chute to avoid injury. Always completely assemble your juicer before you plug the plug into the power outlet. ATTENTION: Ensure the stainless steel filter basket is clean before assembling.
Step 4: Raise the safety locking arm straight up and lock into the two grooves on both sides of the juicer cover. The safety locking arm should now be in a vertical position and locked into place on top of the juicer cover (picture 4). IMPORTANT: If the safety locking arm is not in the right position the motor will not start moving. 4 Secure the safety arm by lifting it into the two grooves of the cover (picture 4a).
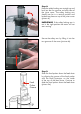
Slide the food pusher all the way down the feed chute (picture 5b). 5b Step 6: Place the pulp container into position by tilting the motor base slightly to the right. Insert the container under the juicer cover on the left-hand side ensuring it is supported by the container support extending from under the motor base (picture 6). NOTE: To minimise cleaning, line the pulp container with a plastic bag to collect the pulp. Pulp can then be used in other dishes, or as compost for the garden or discarded.
Operating your Design Juicer pro WARNING: Make sure the appliance is completely assembled and that there are nor foreign objects in the feed chute before putting the plug into the power outlet. Never put fingers, wooden spoons or other foreign substances (such as hair, clothing, brushes, cloth) into the feed chute. Always turn the appliance off and wait for the motor to stop moving before removing the lid of the juicer. Keep the working place clean and dry.
Step 4: With the motor running, place food into the feed chute. Using the food pusher, gently guide food down the feed chute. To extract the maximum amount of juice, always push the food pusher down slowly. Step 5: Juice will flow into the jug and the separated pulp will accumulate in the integrated pulp container. ATTENTION: Do not allow the pulp container to overfill as this may affect the operation of the appliance (refer to disassembling instructions). Reassemble machine to continue juicing.
Disassembling your Design Juicer WARNING: Always turn the appliance off and pull the plug when the appliance is not in use or when disassembling, moving or cleaning the appliance. Never let water or other liquids run into the motor block. Never clean the power cord or the motor block in the dishwasher, pour liquids over the appliance or douse or dip it in water or other liquids. 1 Step 1: Push the ›ON/OFF‹ button on the juicer to ›OFF‹ and then switch off at the power outlet and unplug.
Step 5: Remove the filter bowl surround with the stainless steel filter basket still in place. To remove the filter bowl turn the spout to the left side. The filter bowl surround will automatically get loose (picture 5). 5 Step 6: WARNING: The stainless steel filter basket contains small sharp blades to cut and process fruit and vegetables. Do not touch blades when handling the filter basket. Only touch the filter basket on the sides.
Care and Cleaning WARNING: Always ensure that the juicer is switched off at the power outlet. Then remove the plug from the power outlet before cleaning, dissembling and storing the appliance. Do not immerse the motor base in water or any other liquid. Do not use water jet to clean the motor base. Do not clean the motor base in the dishwasher. The centre of the filter basket and feed chute contain small sharp blades to process fruit and vegetables during the juicing function.
Allow parts to air dry or thoroughly dry them with a clean cloth. Always assemble the appliance completely before storing (regard ›Assembling the appliance‹). The parts are protected this way and can not get lost. Keep all parts out of reach of children. ATTENTION: Occasionally clean the drive coupling (see picture) with a damp cloth. Ensure the stainless steel balls of the basket adjustment are clean and free from dried on juice or pulp residue.
To clear blockage When juicing hard or stringily fruit or vegetables, or if you push down the food pusher too fast or with too much pressure or the juicing is too vigorous, wet pulp can build up under the juicer cover or the motor appears to stall when juicing. Wet pulp would block the fine mashes of the filter basket. Try slower juicing by pushing the food pusher down more slowly.
Tips on juicing The inside information on juicing Although juice drinks are usually developed with flavour, texture and aroma at the forefront, the health benefits certainly add to the pleasurable taste experience. 95% of the nutrient content of fruit and vegetables is found in the juice. Liquids extracted from fresh fruit and vegetables form an important part of a well balanced diet. Fresh fruit and vegetable juices are an easy source of vitamins and minerals.
• If juicing herbs or leafy green vegetables on their own, the juice yield will be low due to the nature of centrifugal juicing, it is advised to juice them as with a combination of other fruit and vegetables. • All fruit and vegetables produce different amounts of liquids. This varies within the same group i.e. one batch of tomatoes can produce more juice than another batch. Since juice recipes are not exact, the precise quantities of any juice are not crucial to the success of a particular mixture.
Fruit and vegetable facts Fruit and vegetables Best season to buy Storage Nutritional value Kilojoule/calorie count Apples Autumn/Winter Vented plastic bags in refrigerator High in Dietary Fibre and Vitamin C 100 g Apple = 218 kj (52 kcals) Apricots Summer Unwrapped in crisper of refrigerator High in Dietary Fibre, Potassium 100 g Apricot = 226 kj (54 kcals) Banana Spring Cool, dry place Dietary Fibre, Potassium, Vitamin C, B6 100 g Bananas = 377 kj (90kcals) Beetroot Winter Cut off to
Fruit and vegetables Best season to buy Melons (including Watermelon) Storage Nutritional value Kilojoule/calorie count Summer/Autumn Crisper in refrigerator Vitamin C, A, Folate, Dietary Fibre 100 g Melon = 109 kj (26 kcals) Nectarines Summer Crisper in refrigerator Vitamin C, B3, Potassium, Dietary Fibre 100 g Nectarines = 293 kj (70 kcals) Oranges Winter/Autumn/ Spring Cool, dry place for 1 week, transfer to refrigerator to keep longer Vitamin C 35mg / 100g 100 g Orange = 206 kj (49 kca
Storage Always clean the appliance before storing. Operate according to the instructions ›Care and cleaning‹. Please store the juicer in a frost-free, clean and dry location where it is out of reach of children and is protected against excessive loads (such as down-fall, voltage, heat, humidity). Never lay heavy or hard objects on top of the appliance.
Recipe ideas 56
Fresh Starts Pineapple-Peach-Pear-Juice Makes 3 cups ½ small pineapple, peeled and halved 2 peaches, halved and seeds removed 2 small ripe pears Apple-Carrot-Celery-Juice You may alter the amounts of either the carrots or apple to make the juice sweeter or savoury to suit your taste buds: Process pineapple, peaches and pears through the Design Juicer Pro. Serve immediately.
Kumera-Celery-Ginger-OrangeJuice Beetroot-Apple-Celery-Juice Makes 2 cups: 4 medium sized beetroot, trimmed 2 medium Granny Smith apples 4 sticks celery Makes 3 cups: 4 sticks celery, trimmed 1 small kumera (sweet potato), peeled and halved 2.5 cm piece fresh ginger 4 oranges, peeled Process beetroot, apples and celery through the Design Juicer Pro. Serve immediately. Cucumber-Celery-Fennel-Bean Sprout-Juice Process celery, kumera, ginger and oranges through the Design Juicer Pro. Serve immediately.
Fresh vegetable soup with noodles Pasta with provencal style sauce Serves 4 1 small tomato 1 small onion, peeled and trimmed 2 carrots 1 green capsicum, base removed and seeded 1 tablespoon butter 1 tablespoon wholemeal flour 375 ml vegetable stock 425 g canned baked beans 1 packet 2 Minute Noodles Freshly ground black pepper Serves 4: 4 tomatoes 2 sprigs fresh parsley 1 stick celery 2 large cloves garlic 1 small onion, peeled and trimmed 1 red capsicum, base removed and seeded 1 tablespoon tomato paste
Pear, radish and celery crush Process rockmelon and strawberries through the Design Juicer Pro. Stir in passion fruit pulp. Scoop ice into 4 glasses, pour over juice, mix well to combine. Serve immediately. Makes 4 cups: 3 medium pears 4 radishes, trimmed 3 sticks celery 1 cup crushed ice Tropical blend Process pears, radishes and celery through the Design Juicer Pro. Scoop ice into 4 glasses, pour over juice, mix well to combine. Serve immediately.
Honeydew dream Beetroot, carrot and orange quencher Makes 4 cups: 1 honeydew melon, peeled, seeded and quartered 3 tablespoons Midori liqueur 500 ml soda water 1 cup crushed ice 8 carrots 2 small beetroot, trimmed 1/4 cup fresh mint leaves 4 oranges, peeled Process carrots, beetroot, mint leaves and oranges through the Design Juicer Pro. Serve immediately. Process honeydew melon through the Design Juicer Pro. Stir in liqueur and soda water.
rind and parsley. Pour into pastry case and bake at 180 °C for 25 - 30 minutes or until golden and set. celery pulp, cottage cheese, mint and egg in a bowl. Mix well. Cut filo sheets in half, place 3 sheets on bench, cover remaining pastry with greaseproof paper, then a damp cloth to prevent drying. Brush 1 sheet of pastry with extra butter, sprinkle with Parmesan cheese, top with another sheet of pastry, brush with butter, sprinkle with more cheese. Repeat with last sheet of pastry.
½ cup peanuts, chopped ½ cup sultana ½ cup brown sugar, firmly packed 1½ cups carrot pulp ½ cup oil 2 eggs, lightly beaten ¼ cup sour cream Grease and line a 25 cm x 15 cm loaf pan. Sift flour and baking powder into a large mixing bowl, add nutmeg, cinnamon, cardamom, peanuts, sultana, brown sugar and carrot pulp, stir to combine. Add eggs, oil and sour cream. Beat with electric mixer, using medium speed until all ingredients are well blended. Pour into loaf pan.
. 21279 Hollenstedt / Germany Telefon +49 (0)41 65/22 25-0 . Telefax +49 (0)41 65/22 25-29 info@gastroback.de . www.gastroback.