
Design Rice Cooker Pro


Note: You can use a bowl or the provided inner steamer for washing the rice.
5. Open the appliance lid with the opening button, remove the inner pot and fill in the rice.
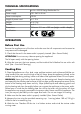
6. Fill in the required amount of water into the inner pot. Refer to the according level marks
on the inside of the inner pot.
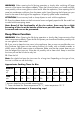
The numbers to the right of the level marks identifies the
number of servings of rice (›Cup‹ scale).
The numbers on the left are in liters.
The liter refers to the amount of rice and does not match
the volume of liquid.
Example:
For 6 measuring cups of rice, fill the inner pot up to the
level mark 6 Cup with water.
10
8
6
4
2
1.8
1.4
1.0
0.6
L MAX CUP
Note: You may need for different types of rice and the desired texture, more or less water.
(See: ›Tips for cooking rice‹)
WARNING: Make sure that no foreign objects (eg rice grains) are the heating tank or stick
to the outside of the inner pot. The heating tank and the outside of the inner pot must be
clean and dry. Otherwise this will cause unusual noise during cooking, temperature control
will not work properly and the appliance may overheat. Please keep in mind that the heating
plate can be hot even with the power off when the appliance was recently connected to the
power outlet.
7. Remove any adhering grains and dry the inner pot outside thoroughly. Also make sure
that the top edge of the inner pot and insert the rubber gasket on the lid of the appliance are
clean. Otherwise, the lid does not close properly.
8. Put the inner pot carefully into the heating tank and close the lid. The lid snaps into place
when it is closed properly.
WARNING: Use only the provided power cord. Do not use extension cords or multiple
sockets. Always plug the coupling into the appliance and then insert the power plug into
the outlet.
9. Insert the coupling of the power cord into the power connector on the appliance. Then
insert the power cord into an outlet. The power connector is located below in the gray plastic
base on the right rear of the appliance.
Note: Once you connect the appliance to the power outlet, the indicator light for the warm
function turns on and the heating of the appliance begins to operate. Connect the appliance
always only shortly before turning on the power.
10. Turn the appliance on, by pressing the on/off switch at the front of the appliance until it
clicks into place. The indicator light for the cooking function will light up. Once the rice is
done, the appliance automatically switches to the keep warm mode: The indicator light of
the cooking function turns off and the on/off switch moves to the off position. The rice can
now be served.
22