Operating Instructions Design Coffee Grinder Advanced Pro Art.-Nr.
Carefully read all provided instructions before you start running the appliance and pay regard to the warnings mentioned in these instructions. Table of Contents Knowing Your Design Coffee Grinder Advanced Pro................................................ 28 Important Safeguards........................................................................................... 30 General Safety Instructions................................................................................
Dear Customer! Congratulations! A series of new possibilities come with your new Gastroback Design Coffee Grinder Advanced Pro. This new Coffee Grinder will prove itself by its outstanding adaptability and smart modes of operation. Your Coffee Grinder provides always freshly ground coffee for your special coffee delight by automatically adapting the amount to your pre-selections. Forget all calculations of amounts; the Design Coffee Grinder Advanced Pro will provide the exact amount at the push of a button.
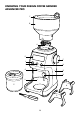
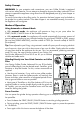
Knowing Your Design Coffee Grinder Advanced Pro C B A E F J I H G D K L P N M O Q 28
M A Conical burr sleeve— hardened stainless steel for reduced grinding heat N/O Cradles for Portafilter 50-54 mm and 58 mm – for fixing your Portafilter under the grind outlet B Bean hopper – with locking system for easy removal and filling P Grinds container – for storing ground coffee; with container lid, filling hole, and cap C Bean hopper lid – the air tight seal preserves maximum bean freshness Q D Power base – made of brushed stainless steel E Burr cleaning brush Backlit LCD screen
Important Safeguards Carefully read all instructions before operating this appliance and save for further reference. Do not attempt to use this appliance for any other than the intended use, described in these instructions. Any other use, especially misuse, can cause severe injuries or damage by electric shock, moving parts, or fire. These instructions are an essential part of the appliance. Do not pass the appliance without this booklet to third parties.
• Do not place the appliance or any part of it on or near hot surfaces (e.g. burner, heater or oven). Do not use any parts of the appliance with any other device or for any other purpose. Before operation, always ensure that the appliance is assembled completely and correctly according to the instructions in this booklet. Do not handle the appliance or any part of it with violence. • Do not insert your fingers or any foreign objects (e.g.
Always grasp the plug to disconnect the power cord. Do not touch the appliance or power plug with wet hands when the appliance is connected to the power supply. • DO NOT drip or spill any liquids on the power base or power cord. Do not place the burr sleeve or bean hopper on the power base, when these parts are wet. Otherwise liquid could run into the power base, causing risk of electric shock or fire. Additionally, moistened coffee powder could block the milling works.
Safety Concept WARNING: For your protection and convenience, your new Coffee Grinder is equipped with various safety features. Do not attempt to damage or by-pass the safety interlocks! Do not attempt to operate the appliance using others than the designated parts (e.g. bean hopper or burr sleeve). To avoid injuries due to the milling works, for operation the bean hopper must be locked on the grinder via a safety interlock.
Energy Saving Feature In general, it is best to avoid leaving any electrical device connected to the power supply needlessly. Thus, always unplug the appliance from mains power outlet, when not in use. The pre-selections you adjusted for grind size (COARSE to FINE) and amount per cup/shot (GRIND AMOUNT) will remain unchanged. The appliance will automatically switch off when not used for more than 5 minutes. In this case, the screen and all buttons get dark.
Before First Use WARNING: DO NOT let young children play with the appliance, or any part of it, or the packaging! 1. Unpack the appliance and all accessories carefully. 2. Check that no parts are damaged or missing. (See: ›Knowing Your Design Coffee Grinder Advanced Pro‹) 3. Carefully remove all shipping materials and promotional materials, but DO NOT remove the rating label. Especially ensure that there are no foreign objects (e.g. packaging material)in the interior of the bean hopper or milling works.
2. Ensure that the burr sleeve is assembled correctly in the milling works. There is a red arrow on the burr sleeve that must point to the LOCK mark at the brim of the milling works. For further instructions see Reassembling the Appliance. 3. P lace the bean hopper over the milling works. See also: ›Reassembling the Appliance‹. For this, turn the bean hopper lock to UNLOCK position (turned counter-clockwise). Then place the bean hopper on the milling works and turn it gently until it settles down.
• When using filter bags or Portafilter, you may fill the filter basket or Portafilter directly without any need to transfer the ground coffee from another receptacle. • Portafilter possibly fit in one of the supplied cradles. (See: ›Grinding into Portafilter‹) • If you wish to store some coffee powder for later use, you should use the supplied grinds container. See ›Filling the Grinds Container‹ for further instructions. However, any other fitting container will do.
Tip: You can press the Portafilter button with your finger or by pressing the Portafilter on it. 6. After grinding is finished, remove the Portafilter carefully to avoid spilling the coffee powder. If you have used the cradle, simply pull the cradle out. WARNING: Do not leave the appliance unattended, while it is connected to the power supply. Always unplug the appliance, when it is not in use. 7. If you have finished your work, unplug the appliance.
Adjusting the Grind Amount Via the GRIND AMOUNT function, you can modify the preset amount to deliver more or less grinds per cup or shot. Thus, you will get your coffee as strong as you prefer, independently from the number of cups/shots you wish to prepare. 1. Correctly prepare the appliance for operation (see: ›Preparing the Appliance for Use‹). 2. Turn the GRIND AMOUNT button. – Turn to the right to increase the amount per cup/shot. – Turn to the left to decrease the amount per cup/shot.
Adjusting conical burrs Some types of coffee may require a wider grind range to achieve an ideal extraction or brew. A feature of your Design Coffee Grinder Advanced Pro is the ability to extend this range with an adjustable upper burr. We recommend making only one adjustment at a time.
Problem Reason The Solution Appliance does not start after pressing START | PAUSE | CANCEL button Appliance is not plugged in! Plug power cord into power outlet. Check, whether power outlet is live. Appliance is overheated. Remove power plug from power outlet. Leave for 20 minutes to cool down before trying again. Bean hopper is not attached correctly. »LOCK BEAN HOPPER« will be displayed on LCD screen. Lock bean hopper into position.
Problem Reason The Solution The Portafilter overfills. It is normal for the correct amount of coffee to appear overfilled in your portafilter. Tamper the coffee powder. Untamped coffee can reach three times the volume of tamped coffee. The GRIND SIZE dial is tight You cannot assemble the bean hopper or the bean hopper will not stand tight on the grinder. Run milling works empty briefly by pressing the START | PAUSE | CANCEL button whilst turning the dial.
For operation the bean hopper is locked on the power base. Do not use violence, when attempting to remove the bean hopper or release the lock, to avoid damage. Disassembling the Appliance 1. Unplug the appliance and remove the bean hopper lid. 2. Turn the bean hopper lock counterclockwise to unlock the bean hopper. Then lift the bean hopper up and out. 3. Remove the coffee beans from the bean hopper. Then reassemble the bean hopper and turn the bean hopper lock clockwise to lock the bean hopper in place.
wise, moisture could get into the milling works and coffee powder could stick to the surfaces and block the milling works. 1. Insert the grind catch tray into the base of the appliance. The grind catch tray is secured via a magnet. It is correctly in place, when on a level with the exterior of the power base. 2. Assemble the burr sleeve. For this, grasp the burr sleeve at the shackle and insert it in the milling works with the red arrow pointing to ALIGN.
2. Loosely wind the power cord around the cord storage in the bottom of the appliance without squeezing, bending or knotting the power cord. 3. You may place the cradles and the cleaning brush into the bean hopper. If the grind container is empty, it is best to place it under the grind outlet with the cap open. The magnet at the rear of the appliance will hold the grind container in place. 4.
Index safety interlock..................................... 33 saving energy...................................... 33 abroad operation................................. 31 service................................................ 43 accessories.......................................... 30 settings............................................... 38 amount............................................... 38 solving problems.................................. 39 assembling.....................................
20140801 GASTROBACK GmbH Gewerbestraße 20 . 21279 Hollenstedt / Germany Telefon +49 (0)41 65/22 25-0 . Telefax +49 (0)41 65/22 25-29 info@gastroback.de . www.gastroback.