
Installation Guide

Exterior
Exterior
Hinges
Bisagras
Left hand door
Puerta hacia la izquierda
Right hand door
Puerta hacia la derecha
Hinges
Bisagras
2. INSTALLATION OF LOCKSET
2. INSTALACIÓN DE CERRADURAS
A-1. INSTALL SINGLE CYLINDER DEADBOLT
A-1. INSTALACIÓN DE CERRADURA CON CILINDRO SIMPLE
3. HOW TO CHANGE LEVER HANDING:
3. CÓMO CAMBIAR LA COLOCACIÓN DE LA PALANCA:
A-2. INSTALL DOUBLE CYLINDER DEADBOLT
A-2. INSTALACIÓN DE CERRADURA CON CILINDRO DOBLE
J
Hardware Used/Aditamentos utilizados
3-1/9 in. (79 mm) Mounting bolts Qty. 2
Pernos de montaje de 79 mm (3-1/9 pulg)
Cantidad
2
a. Install Outside Cylinder
a. Instale el cilindro exterior
OUTSIDE
EXTERIOR
INSIDE
INTERIOR
WARRANTY/GARANTÍA
Limited Lifetime Warranty
The Manufacturer extends a Limited Lifetime Mechanical and Finish Warranty to the original “User” of this
Product against defects in materials and workmanship as long as the User occupies the residential premises
upon which the Product was originally installed. Upon return of a defective Product to the Manufacturer, the
Manufacturer shall either replace, repair or refund the purchase price in exchange for the Product. This
warranty does not cover abused or misused Products or those Products used in commercial applications. No
other warranties, express or implied are made with respect to the Product including but not limited to any
implied warranty of merchantability or fitness for a particular purpose. The Manufacturer DOES NOT authorize
any person to create for it any obligation or liability in connection with the Product. The Manufacturer
maximum liability hereunder limited to the purchase price of the Product, and in no event shall the company
be liable for any consequential, indirect, incidental or special damages of any nature arising from the sale or
use of this Product, whether in contract, tort, strict liability or otherwise. (For warranty service, please call
1-877-442-8347, 8:00 a.m. - 8:00 p.m. EST, Monday through Friday)
Note: Should the Product be considered a consumer product it may be covered by the Magnusson Moss
Federal Warranty Act, please be advised that: (1) Some states do not allow limitations or incidental
consequential damages on how long an implied warranty lasts so that the above limitations may not fully
apply: and (2) This warranty gives specific legal rights and a User may have other rights which may vary from
state to state.
Garantía limitada de por vida
El fabricante extiende una garantía limitada de por vida, mecánica y del acabado, al “usuario” original de este
producto, contra defectos de fabricación en el material y en la mano de obra mientras el usuario ocupe las
instalaciones residenciales en las que se instaló originalmente el producto. Cuando se devuelve un producto
defectuoso al fabricante, éste deberá reemplazar, reparar o reembolsar el precio de compra a cambio del
producto. Esta garantía no cubre productos que hayan sufrido abuso o mal uso ni aquellos productos usados
en aplicaciones comerciales. No se otorgan otras garantías, expresas o implícitas, con respecto al producto,
incluida, entre otras, cualquier garantía implícita de comerciabilidad o idoneidad para cualquier propósito
determinado. El fabricante NO autoriza a ninguna persona para crear una obligación o responsabilidad en
conexión con el producto. La máxima responsabilidad del fabricante según la presente se limita al precio de
compra del producto y en ningún caso la empresa será responsable de ningún daño resultante, indirecto,
accidental o especial de ninguna naturaleza causado por la venta o uso de este producto, ya sea contractual,
extracontractual, en estricta responsabilidad o de otra manera. (Para servicio de garanía, llame al
1-877-42-8347, de lunes a viernes de 8:00 a.m. a 8:00 p.m., hora estándar del Este)
Nota: Si el producto se considera de consumo, es posible que esté cubierto por la ley federal de garantías
Magnuson-Moss, por lo que debe tener presente que: (1) Algunos estados no permiten limitaciones ni daños
resultantes accidentales en cuanto a la duración de una garantía implícita, de modo que las limitaciones
anteriores pueden no aplicarse completamente; y (2) esta garantía otorga derechos legales específicos y el
usuario podría tener también otros derechos que varían según el estado.
OR O
M
OR O
a. Install Outside Cylinder
a. Instale el cilindro exterior
b. Install Inside Cylinder
b. Instale el cilindro interior
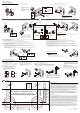
B. INSTALL EXTERIOR KNOB/LEVER
Press exterior knob/lever against exterior surface of the door making certain the stems are positioned horizontally so they go
through holes in the latch case.
Note: The exterior knob/lever has no visible screws. If the door lock has a key hole.
For knobset, make sure that the key hole is in a vertical position and the "key teeth" are facing up;
For leverset, make sure that the key hole is in a horizontal position and the "key teeth" are facing the lever.
B. INSTALE LA PERILLA/PALANCA EXTERIOR
Presione la perilla/palanca exterior contra la superficie exterior de la puerta, asegurándose de que los vástagos estén en
posición horizontal, de manera que pasen por los orificios de la caja del pestillo.
Nota: La perilla/palanca exterior no tiene tornillos visibles. Si la cerradura para puerta tiene un ojo de la cerradura.
En el caso del conjunto de perilla, asegúrese de que el ojo de la cerradura se encuentra en posición vertical y que los
“dientes de la llave” apuntan hacia arriba.
En el caso del conjunto de palanca, asegúrese de que se encuentre en posición horizontal y que los “dientes de la llave”
apuntan hacia la palanca.
C. INSTALL INTERIOR KNOB/LEVER
a. Install interior knob/lever by placing on spindle and aligning screw holes with stems.
b. Push flush against the door. Tighten screw near the door edge first, then tighten the other side until lockset is firm.
Note: To have the proper leveling of lock knob/levers and to avoid sagging after installation, check knob/lever fit and
orientation prior to installing and securely tightening the mounting screws.
C. INSTALE LA PERILLA/PALANCA INTERIOR
a. Instale la perilla/palanca interior colocándola en el eje y alineando los orificios de los tornillos con los vástagos.
b. Empuje hasta dejarla al ras de la puerta. Primero, apriete el tornillo que está cerca del borde de la puerta, luego apriete el
del otro lado hasta que el cerrojo quede firme.
Nota: Para lograr un apalancamiento adecuado de la perilla/palanca de la cerradura y así evitar el aflojamiento después de
la instalación, se sugiere revisar el ajuste y la orientación de la perilla/palanca, antes de instalar y apretar firmemente
los tornillos de montaje.
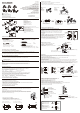
A. DETERMINE HANDING OF YOUR DOOR
Stand at exterior side and face the door.
a. Your door is a left hand door if hinges are installed at
your left hand.
b. Your door is a right hand door if hinges are installed at
your right hand.
A. DETERMINE LA COLOCACIÓN DE LA PUERTA
Coloque en el exterior enfrentando la puerta.
a. La puerta está orientada hacia la izquierda si las
bisagras están instaladas a la izquierda.
b. La puerta está hacia la derecha si las bisagras están
instaladas a la derecha.
B. INSERT KEY TO UNLOCK OUTSIDE LEVER.
Rotate key to horizontal position and withdraw.
B. INSERTE LA LLAVE PARA DESBLOQUEAR
LA PALANCA EXTERIOR.
Gire la llave hasta dejarla en posición horizontal
y retírela.
C. INSERT CATCH TOOL INTO CATCH HOLE ON THE OUTSIDE ROSE AND
PULL OUTSIDE LEVER OFF SPINDLE.
Repeat the same on the inside to remove inside lever.
C. INSERTE EL LLAVÍN EN EL AGUJERO DEL RETÉN EN LA ELEVACIÓN
EXTERIOR Y JALE LA PALANCA EXTERIOR HASTA EXTRAERLA DEL EJE.
Repita el mismo procedimiento en el interior para retirar la palanca interior.
Catch hole
Orificio del cuello
Insert
Inserte
Pull
Jala
Hole on lever
Orificio de la palanca
Catch tool
El llavín
Catch hole
Agujero del retén
Note: Remove catch tool as you pull lever off.
If cylinder is also removed from spindle, please insert
it back into the spindle to the end to be secure in place.
Nota: Retire el llavín del agujero del retén de la perilla al extraer
la palanca.
Si también retira el cilindro del eje, vuelva a insertarlo en
éste hacia el extremo, para asegurarlo en su lugar.
D. SWAP LEVERS.
Insert lever over to spindle, align punched hole on the
lever shank with catch hole on the rose and press until
secure and full engagement between lever and spindle
is reached.
D. INTERCAMBIE LAS PALANCAS.
Inserte la palanca sobre el eje, alinee los orificios
taladrados del vástago de la palanca con el orificio de
cuello en la elevación y presione hasta que quede fijo
y entre completamente entre la palanca y el eje.
Note: Please install two locks respectively
according to the installation instruction sheets
attached inside.
Nota: Instale dos cerraduras respectivamente,
de acuerdo con la hoja de instrucciones
adjunta en el interior.
1-9/16 in. 1-3/8 in.
40 mm 35 mm
1-3/4 in.
45 mm
Drill 1 in. (25 mm) hole
at center of door edge.
Taladre un orificio de
25 mm (1 pulg) al
centro del borde de la
puerta.
Fit here on door edge
Fije aquí en el borde de
la puerta
Hole for deadbolt
Orificio para
cerradura con pestillo
CENTER TO CENTER 5 in. (127 mm)
DE CENTRO A CENTRO 127 mm (5 pulg)
Hole for lockset
Orificio para cerradura
Backset 2-3/8 in. (60 mm)
Seguro de 60 mm (2-3/8 pulg)
Backset 2-3/4 in. (70 mm)
Seguro de 70 mm (2-3/4 pulg)
1-9/16 in. 1-3/8 in.
40 mm 35 mm
1-3/4 in.
45 mm
ø2-1/8 in.
ø 54 mm
ø2-1/8 in.
ø 54 mm
M
Hardware Used/Aditamentos utilizados
1-5/16 in. (34 mm) Mounting screws for Knob
1-1/2 in. (38 mm) Mounting screws for Lever
Qty. 2
Tornillos de montaje para perilla de 34 mm (1-5/16 pulg)
Tornillos de montaje para palanca de 38 mm (1-1/2 pulg)
Cantidad 2
b. Install Inside Thumbturn Assembly
b. Instale el ensamble de cierre manual interior
CORRECT
CORRECTO
INCORRECT
INCORRECTO
CORRECT
CORRECTO
INCORRECT
INCORRECTO
OR O
INSIDE
INTERIOR
J
OUTSIDE
EXTERIOR
CAUTION: Latch bolt must be retracted
during all installation steps or unit will not
operate properly.
PRECAUCIÓN: El perno del pestillo debe
retraerse durante todos los pasos de la
instalación o la unidad podría no funcionar
adecuadamente.
CORRECT
CORRECTO
WRONG
INCORRECTO
Caution: Please remove the key
before installation.
PRECAUCIÓN: Retire la llave
antes de la instalación.
Caution:
Make sure the
torque blade insert
in horizontal position.
Precaución:
Asegúrese de que
la cuchilla de torsión
esté insertada en
posición horizontal.
CORRECT
CORRECTO
WRONG
INCORRECTO
J
Hardware Used/Aditamentos utilizados
2-1/2 in. (63 mm) Mounting bolts Qty. 2
Pernos de montaje de 63 mm (2-1/2 pulg)
Cantidad
2
OUTSIDE
EXTERIOR
INSIDE
INTERIOR
Caution:
Make sure the torque blade insert in vertical
position.
Precaución:
Asegúrese de que la cuchilla de torsión esté
insertada en posición vertical.
INSIDE
INTERIOR
OUTSIDE
EXTERIOR
2.
1.
INSIDE
INTERIOR
CAUTION: Latch bolt must be retracted during all
installation steps or unit will not operate properly.
PRECAUCIÓN: El perno del pestillo debe retraerse
durante todos los pasos de la instalación o la
unidad podría no funcionar adecuadamente.
J
CORRECT
CORRECTO
WRONG
INCORRECTO
CAUTION: Please remove
the key before installation.
PRECAUCIÓN: Retire la
llave antes de la instalación.
WRONG
INCORRECTO
CORRECT
CORRECTO
WRONG
INCORRECTO
CORRECT
CORRECTO
OUTSIDE
EXTERIOR
Caution:
Make sure the torque blade insert in horizontal
position.
Precaución:
Asegúrese de que la cuchilla de torsión esté
insertada en posición horizontal.
TEMPLATE/PLANTILLA
Printed in Taiwan
Impreso en Taiwán
AB14561