
Installation Guide

WARRANTY/GARANTÍA
Limited Lifetime Warranty
The Manufacturer extends a Limited Lifetime Mechanical and Finish Warranty to the original “User” of this Product against defects in materials and workmanship as long as the User occupies the residential premises upon which the Product was originally
installed. Upon return of a defective Product to the Manufacturer, the Manufacturer shall either replace, repair or refund the purchase price in exchange for the Product.
This warranty does not cover abused or misused Products or those Products used in commercial applications.
No other warranties, express or implied are made with respect to the Product including but not limited to any implied warranty of merchantability or fitness for a particular purpose.
The Manufacturer DOES NOT authorize any person to create for it any obligation or liability in connection with the Product.
The Manufacturer maximum liability hereunder limited to the purchase price of the Product, and in no event shall the company be liable for any consequential, indirect, incidental or special damages of any nature arising from the sale or use of this Product,
whether in contract, tort, strict liability or otherwise.
( For warranty service, please call 1-877-4GATEHS, 8:30 a.m. - 5:30 p.m. EST, Monday through Friday )
Note: Should the Product be considered a consumer product it may be covered by the Magnusson Moss Federal Warranty Act, please be advised that: (1) Some states do not allow limitations or incidental consequential damages on how long an implied
warranty lasts so that the above limitations may not fully apply: and (2) This warranty gives specific legal rights and a User may have other rights which may vary from state to state.
Garantía
Limitada de por vida
El fabricante extiende una garantía limitada de por vida, mecánica y del acabado, al “usuario” original de este producto, contra defectos de fabricación en el material y en la mano de obra mientras el usuario ocupe las instalaciones residenciales en las
que se instaló originalmente el producto. Cuando se devuelve un producto defectuoso al fabricante, éste deberá reemplazar, reparar o reembolsar el precio de compra a cambio del producto.
Esta garantía no cubre productos que hayan sufrido abuso o mal uso ni aquellos productos usados en aplicaciones comerciales.
No se otorgan otras garantías, expresas o implícitas, con respecto al producto, incluida, entre otras, cualquier garantía implícita de comerciabilidad o idoneidad para cualquier propósito determinado.
El fabricante NO autoriza a ninguna persona para crear una obligación o responsabilidad en conexión con el producto.
La máxima responsabilidad del fabricante según la presente se limita al precio de compra del producto y en ningún caso la empresa será responsable de ningún daño resultante, indirecto, accidental o especial de ninguna naturaleza causado por la venta
o uso de este producto, ya sea contractual, extracontractual, en estricta responsabilidad o de otra manera.
( Para servicio de garanía, llame al 1-877-4GATEHS, de lunes a viernes de 8:30 a.m. a 5:30 p.m., hora estándar del Este )
Nota: Si el producto se considera de consumo, es posible que esté cubierto por la ley federal de garantías Magnuson-Moss, por lo que debe tener presente que: (1) Algunos estados no permiten limitaciones ni daños resultantes accidentales en cuanto
a la duración de una garantía implícita, de modo que las limitaciones anteriores pueden no aplicarse completamente; y (2) esta garantía otorga derechos legales específicos y el usuario podría tener también otros derechos que varían según el estado.
Printed in Taiwan
Impreso en Taiwán
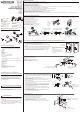
Install strike plate using
the 2 in. (51 mm) screws
provided.
Instale la placa del cerrojo,
utilizando los tornillos
de 5,1 cm (2”) que se
incluyen.
B. INSTALL STRIKE PLATE IN DOOR JAMB
B. INSTALE LA PLACA DEL CERROJO EN EL MARCO INTERIOR PARA PUERTA
A. INSTALL LATCH IN MORTISED AREA OR INSTALL DRIVE IN LATCH
A. ISTALE EL PESTILLO EN EL ÁREA RANURADA O INSTALE UN PESTILLO EMPOTRABLE
Strike Plate
Placa del cerrojo
2 in. (51 mm) Strike Screws (2)
Tornillos del cerrojo (2)
de 5,1 cm (2”)
Warning:
The lock will not
operate properly
if torque blade
is not horizontal.
Advertencia:
La cerradura no
funcionará
correctamente si la
cuchilla de torsión
no está en posición
horizontal.
CORRECT
CORRECTO
WRONG
INCORRECTO
Faceplate
Placa frontal
Backset
Seguro
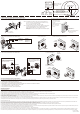
C. INSTALL SINGLE CYLINDER DEADBOLT
C. INSTALACIÓN DE CERRADURA CON CILINDRO SIMPLE
OUTSIDE
EXTERIOR
1. Install Outside Cylinder
1. Instale el cilindro exterior
2. Install Inside Thumbturn Assembly
2. Instale el ensamble de cierre manual interior
1. OUTSIDE
1. EXTERIOR
NOTE: If the backset of your door is 2-3/8 in. (60 mm), please install it now.
If your door is set up to use a standard type latch, please do so using
the 3/4 in. (19 mm) screws that are provided.
If you use the drive in type latch, please tap it in place.
NOTA: Si el seguro de su puerta es de 6 cm (2-3/8"), instálelo en este momento.
Si la puerta está configurada para usar un pestillo de tipo estándar,
hágalo usando los tornillos de 1,9 cm (3/4”) que se incluyen.
Si usa un pestillo de tipo empotrable, golpéelo suavemente hasta dejarlo
en su lugar.
INSIDE
INTERIOR
2. INSIDE
2. INTERIOR
2. INSTALLATION OF LOCKSET/INSTALACIÓN DE CERRADURAS
1-3/4 in.
4,5 cm
(45 mm)
1-3/8 in.
3,5 cm
(35 mm)
1-9/16 in.
4 cm
(40 mm)
Ø 2-1/8 in. (54 mm)
Ø 5,4 cm (2-1/8")
Fit here on door edge
Fije aquí en el borde
de la puerta
Drill 1 in. (25 mm)
hole at center of
door edge.
Taladre un orificio
de 2,5 cm (1”) al
centro del borde
de la puerta.
a. Install Outside Cylinder
a. Instale el cilindro exterior
D. INSTALL DOUBLE CYLINDER DEADBOLT
D. INSTALACIÓN DE CERRADURA CON CILINDRO DOBLE
OUTSIDE
EXTERIOR
INSIDE
INTERIOR
Warning: The lock will not operate
properly if torque blade is not horizontal.
Advertencia: La cerradura no funcionará
correctamente si la cuchilla de torsión no
está en posición horizontal.
WRONG
INCORRECTO
CORRECT
CORRECTO
OUTSIDE
EXTERIOR
Warning: The lock will not operate
properly if torque blade is not vertical.
Advertencia: La cerradura no funcionará
correctamente si la cuchilla de torsión no
está en posición vertical.
Outside torque
Torsión exterior
OUTSIDE
EXTERIOR
WRONG
INCORRECTO
CORRECT
CORRECTO
INSIDE
INTERIOR
b. Install Inside Cylinder
b. Instale el cilindro interior
2.
1.
Inside torque
Blade vertical
Torsión interior
Hoja vertical
INSIDE
INTERIOR
Backset 2-3/8 in. (60 mm)
Seguro de 6 cm (2-3/8")
Backset 2-3/4 in. (70 mm)
Seguro de 7 cm (2-3/4")
CARE AND MAINTENANCE/CUIDADO Y MANTENIMIENTO
THE FOLLOWING CARE INSTRUCTIONS SHOULD BE FOLLOWED TO ENSURE A LONG LASTING FINISH:
1. Remove locks, or do not install locks, prior to painting you door.
2. Periodically clean with mild soap and a soft cloth only.
Do not use abrasives or harsh chemicals and avoid sharp objects.
SE DEBEN SEGUIR LAS SIGUIENTES INSTRUCCIONES DE CUIDADO PARA ASEGURAR UN ACABADO DURADERO:
1. Retire todas las cerraduras o no las instale antes de pintar la puerta.
2. Limpie periódicamente sólo con jabón y un paño suave.
No use agentes químicos abrasivos y evite los objetos afilados.