
Maintaining and Troubleshooting: E-3200

System Components 31
1.
Turn off the system and disconnect the power cord.
2.
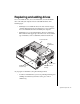
Open the case and remove the front bezel, observing the “Static
Electricity Precautions” on page 2.
3.
Remove the bezel insert (you can save and replace the insert should
you need to remove the device and continue to use the system).
4.
Remove the 3.5-inch diskette and CD-ROM drive (see “Replacing the
3.5-inch diskette or CD-ROM drive” on page 29). This will allow
access to the bottom drive bay.
5.
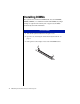
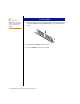
Remove the metal shield from the front of the drive bay by placing a
flat-bladed screwdriver in the metal shield tab and pulling it outwards.
6.
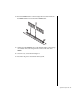
Snap the rails onto the drive, making sure the front rail extensions are
towards the front of the device.
7.
Align the rails with the bay, and slide the drive into the chassis until the
locking tabs snap into place.
8.
Connect the power and data cables to the back of the drive. (See drive
documentation for proper drive jumper settings and cable orientation.)
9.
Close the case, as described in Chapter 1.
10.
Reconnect the power cord and turn on the system.
11.
Run the configuration software, if required.
To install an additional drive in the 3.5-inch drive bay
Caution!
Your system was designed
to adhere to safe emissions
standards, and the shield is
an integral part of the
system. Installing an
approved device should
continue to maintain those
standards. If you remove
the device, you should
replace the shield.