
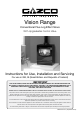
Conventional Flue Instructions

5
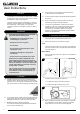
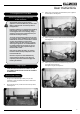
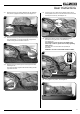
Lighting the Pilot
2.3 To start the left-hand and right-hand control knobs must both
point to off (
):
2.4 Press in the right-hand control knob and rotate anti-
clockwise until a click is heard. Continue to press in. The
knob points to the pilot (
).
The pilot is lit.
2.5 Keep the knob depressed for 10 seconds before releasing.
The pilot remains lit.
Repeat the above steps if the pilot does not stay lit.
NOTE: If the pilot goes out, the Interlock system
prevents you lighting again for a short period.
2.6 If, after repeating the above steps the pilot does not light,
contact your Retailer or Installer.
2.7 Turn the right-hand knob to the left to main burner
setting (
).
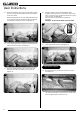
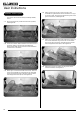
Adjusting the Flame height
2.8 You can now adjust the flame height and temperature using
the left-hand control knob.
2.9 Turn the left-hand knob anti-clockwise to increase the
flame height.
2.10 Turn clockwise to decrease the height.
IMPORTANT: YELLOW FLAMES TYPICALLY
APPEAR WHEN THE APPLIANCE HAS REACHED
NORMAL OPERATING TEMPERATURE. THIS CAN
TAKE UP TO 30 MINUTES.
WARNING: IF THE APPLIANCE FAILS TO LIGHT OR
BECOMES EXTINGUISHED IN USE, WAIT 3
MINUTES BEFORE ATTEMPTING TO RELIGHT.
3. Turning OFF the Appliance
3.1 To turn the main burner off turn the left-hand knob until it
points to off (
). Just the pilot remains lit.
3.2 Press in and turn the right-hand knob until it points to off
(
). The pilot goes out.
4. Upgrading the Appliance
4.1 The appliance is fitted with a control valve that can easily be
upgraded to battery powered remote control.
There are two versions of this control which can be obtained
through your local Gazco stockist.
There is no requirement for this upgrade to be carried out by
an approved Gas engineer. However Gazco recommend
that this task is undertaken by a suitably competent person.
4.2 This upgrade can be fitted before or after installation but if
side clearances are limited then it will be easier to upgrade
the appliance before installation. Full instructions are
included with the kit.
If the appliance is left unattended for long periods of
time (e.g. vacation), it is recommended to place the
control valve in the Off or Pilot position.
Take care when leaving the appliance unattended,
in exceptional circumstances sound waves from
sources other than the transmitter can cause
changes in the ame height adjustment.
DO NOT install two or more appliances using
upgradeable controls in the same room, interference
between the remote control frequencies can occur.
Standard Remote Control
(PART NUMBER 8455)
4.3 This remote control can control the gas appliance after
the pilot has been lit. It can turn the main burner on and
regulate it from low through to high and back again.
It can turn the main burner off leaving the pilot burning.
Thermostatic and Timer Remote Control
(PART NUMBER 8456)
4.4 This remote control can control the gas appliance after the
pilot has been lit.
MANUAL MODE
Can be used to turn the main burner on and manually
regulate it from low through to high and back again. It can
also be used to turn the main burner off leaving the pilot
burning.
AUTO MODE
Will automatically regulate the room to a pre-set
temperature.
TIMER MODE
Will turn the appliance on and off according to a pre-set
programme and automatically regulate the room
temperature during the two on periods.
5. Cleaning the Appliance
IMPORTANT: THE OUTER PANELLING OF THE
VISION IS MADE FROM GLASS. USE CAUTION
WHEN INSTALLING, REMOVING AND STORING AS
THE COMPONENTS ARE FRAGILE AND COULD
BREAK UNLESS HANDLED CAREFULLY.
5.1 Make sure the appliance and surrounds are cool before
cleaning.
Use:
– A dry cloth to clean the appliance casing.
– A damp cloth for the glass front.
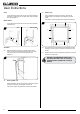
5.2 Remove the glass plinth to access the controls:
User Instructions