
Installation Guide
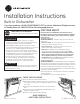


Dishwasher Installation
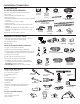
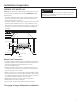
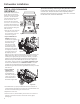
STEP 10: SLIDE DISHWASHER THREE-FOURTHS
OF THE WAY INTO CABINET
IMPORTANT – Do not push against front panel with
knees. Damage will occur.
• Grasp the sides of the
front panel and slide
dishwasher into the
opening a few inches
at a time.
• As you proceed, pull the drain hose through the opening under the
sink. Stop pushing when the dishwasher extends about 6 inches
IRUZDUGRIDGMDFHQWFDELQHWV
• Make sure drain hose is not kinked under or behind the dishwasher.
• Make certain the house wiring, drain line and water line do not
interfere with components under dishwasher.
8
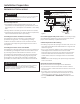
STEP 11: INSTALL TRIM PIECES
In this step you will need the trim pieces set aside in Step 1.
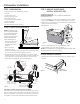
STEP 12: INSTALL MOUNTING BRACKETS
You will need the mounting brackets and 2 #8 hex-head screws set
aside in Step 1.
You must install the mounting brackets onto the dishwasher tub
frame top or sides prior to sliding the dishwasher into place under
the countertop. This dishwasher is capable of a true-flush installation
at a 24” deep opening. The mounting brackets have several
available attachment positions to accommodate different cabinet
constructions.
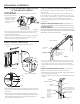
Install mounting brackets on top if the underside of
countertop is wood or wood-like material that accepts screws:
IMPORTANT - After installing brackets and before
FORVLQJWKHGLVKZDVKHUGRRUDGMXVWWKHEUDFNHWVE\EHQGLQJ
them up as needed, so that they do not contact the top of the
dishwasher door and cause damage.
• If you are installing the dishwasher under a counter with a short
overhang, the countertop brackets may extend beyond the edge
of the counter. If this is the case, remove the excess length by
repeatedly bending the brackets at the front notch only until they
break.
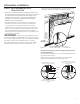
Install mounting brackets on sides if the countertop is
granite or similar material that will not accept wood screws:
%UHDNRȺIURQWSRUWLRQRIWKHWDEZLWKSOLHUVDWWKHORFDWLRQVKRZQ
prior to attaching to dishwasher.
• Position the left-hand side bracket as shown. Repeat with the right
bracket.
Dishwasher
tub frame
#8 Bracket
Screw
Bracket
Bend and break here
after installing if
counter has a short
overhang.
Top Mounting
• Select the top trim piece (See Figure R) and line up center to the top
ODWFK3UHVVWKHWULPSLHFHRQWRWKHWXEÀDQJHPRYLQJIURPRQHVLGH
to the other.
• Select the left trim piece (see Figure R).Align top edge with the top
WULPDQGSUHVVLWRQWRWKHOHIWVLGHRIWKHWXEÀDQJHPRYLQJIURPWKH
WRSWRWKHERWWRP5HSHDWIRUWKHULJKWVLGHWXEÀDQJHWULPSLHFH
(See Figure R for right side trim piece.)
Figure S
Figure Q
Do not push against
front door panel with
knee. Damage to the
door panel will occur.
Side Trim
Figure R
Side
Trim
Top View
Side
Trim
Top Trim
)XOO\VHDWWRWXEÀDQJH
Figure T
Bracket
Dishwasher
tub frame
#8 Bracket
screw as
supplied
Side Mounting
Bend and break
here if necessary
Care should be taken to
ensure mounting screws
do not damage cabinetry
Do not pinch
the latch
wires in
#8 bracket
screw
Tub trim
Top
View
Handle
Door
Tub trim
Tub frame