
Full Product Manual


Care and cleaning of the cooktop.
10
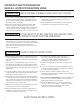
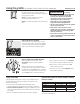
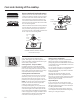
Outer
burner
cap
Inner burner
cap
Burner
base
Tri-Ring Burner
Electrode
Burner
head
PGP986, CGP650, PGP963, CGP350
(Center burner only)
Burner Grates
Your range has three professional-style
grates These grates are position-specific For
maximum stability, these grates should only be
used in their proper position
Cleaning Grates - Soap and Water
Lift grates out when cool Grates should be
washed regularly and, after spillovers Wash
them in hot, soapy water and rinse with clean
water When replacing the grates, be sure they
are positioned securely over the burners
Cleaning Grates—Self-Clean Oven
To get rid of burned-on food, you may use the
self-clean cycle of your oven if your oven has
self-clean racks Remove any burnt-on food
particles prior to placing the grates in the oven
NOTE: Use caution when removing the grates
from the oven after the self-clean cycle has
ended. The grates may still be hot.
For heavily-soiled grates, you may notice some
white ash on the grate Wipe it off with a damp
cloth after the grate cools If white spots remain,
remove them with a soap-filled scouring pad and
rinse thoroughly with a vinegar and water mixture
These deposits are usually a salt residue that
cannot be removed by the clean cycle
Cleaning Grates—Dishwasher
The grates may be cleaned in the dishwasher
Remove any burnt-on food particles prior to
placing the grates in the dishwasher Place them
on the lowest rack of the dishwasher and run on
a “heavy duty” cycle
Do not operate a burner for an extended period
of time without cookware on the grate The
finish on the grate may chip without cookware
to absorb the heat
Although the grates are durable, they will
gradually lose their shine, regardless of the
best care you can give them This is due to their
continual exposure to high temperatures and
abrasion by the cookware
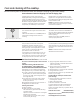
Support Bumpers
If one or more of the circular silicone grate
support bumpers in the cooktop are missing or
damaged, replacement parts can be obtained
by calling 1800GECARES
To insert the new bumpers, simply insert the
cone shaped end and push down while gently
twisting or rocking the bumper
Appearance may vary
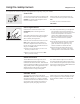
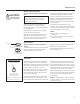
Burner Head and Cap Replacement
Replace the burner head onto the burner base,
making sure that the head is properly oriented
over the burner base and the electrode Make
sure to place the correct burner head on the
correct burner base and that the burner head
sits level on the burner base The burner heads
are not interchangeable
Make sure the slot in the burner head is positioned
over the electrode. The burner cap has three to
four pins. When replacing the cap, make sure
none of the pins sits in the stability chamber. The
burner caps are not interchangeable.
Burner cap not properly seated
Burner cap properly seated
Burner cap
Burner head
Burner
base
Electrode
Stability
chamber