OPAL 2.0 ICE MAKER SAFETY INFORMATION . . . . . . . . . 3 PARTS INCLUDED. . . . . . . . . . . . . . . . 5 OWNER’S MANUAL GETTING STARTED . . . . . . . . . . . . . . 6 XPIO13BCBT XPIO13SCSS CARE AND CLEANING. . . . . . . . . . . 7 XPIO23SCSS DISPLAY SETTINGS. . . . . . . . . . . . . 10 MAKING ICE. . . . . . . . . . . . . . . . . . . . . . 10 XPIO23BCBT ENGLISH/FRANÇAIS DRAINING . . . . . . . . . . . . . . . . . . . . . . . . 10 WATER FILTER. . . . . . . . . . . . . . . . . .
THANK YOU FOR MAKING GE APPLIANCES A PART OF YOUR HOME. Whether you grew up with GE Appliances, or this is your first, we’re happy to have you in the family. We take pride in the craftsmanship, innovation and design that goes into every GE Appliances product, and we think you will too. Among other things, registration of your appliance ensures that we can deliver important product information and warranty details when you need them. 2 49-1000464 Rev.
READ ALL INSTRUCTIONS BEFORE USING THE APPLIANCE o reduce the risk of fire, explosion, electric shock, exposure to UV radiation, or injury WARNING T when using your Opal, follow these basic safety precautions. ■ D o not, under any circumstances, alter or remove the third (ground) prong from the power cord. For personal safety, this product must be properly grounded. ■ Do not exceed power outlet ratings. It is recommended that the ice maker is connected to its own circuit.
CONSIGNES DE SÉCURITÉ IMPORTANTES CONSIGNES DE SÉCURITÉ IMPORTANTES LISEZ, SUIVRE, ET CONSERVER CES INSTRUCTIONS AVERTISSEMENT our réduire le risque d'incendie, d'explosion, de choc électrique, P d’exposition aux rayons UV ou de blessure lors de l’utilisation de votre Opal, observez les consignes de sécurité élémentaires suivantes. ■ E n cas, vous ne devez modifier ni retirer la troisième broche (terre) du cordon électrique. Pour votre sécurité, ce produit doit être correctement mis à la terre.
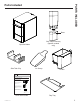
PARTS INCLUDED Parts Included Base Side Tank Accessory (Specific models only) Opal Ice Maker Side Tank Clip Ice Scoop Ice Bin OPAL Ice Maker Quickstart Guide IMPORTANT: Read and understand all safety instructions detailed in Owner's Manual before using the Opal. Cleaning the Ice Bin and Water Reservoir Remove the ice bin and wash with warm soapy water, then rinse thoroughly. Use a damp sponge to wipe down the water reservoir under the ice bin. Never use soap inside your Opal icemaker.
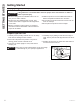
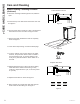
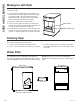
GETTING STARTED Getting Started Installation Requirements CAUTION Lifting Hazard: It is recommended to have two people move and install the ice maker in order to prevent injury. ■ Product is designed to be installed indoors. Do not use your ice maker outdoors. ■ Install the product in a well-ventilated area with an ambient temperature between 55°F and 90°F. ■ Product must be installed upright on a flat, level surface that is able to support the total weight when full of water.
To keep your nugget ice tasting fresh and your Opal looking great, we recommend cleaning/sanitizing your Opal once per week. To clean the exterior of the ice maker, unplug the product, then use a soft cloth dampened with soapy water to gently clean the exterior surfaces. Dry with a soft cloth. The exterior stainless steel surfaces can be cleaned with commercially available stainless steel cleaner. Use only a liquid cleaner free of grit and rub in the direction of the brush lines with a damp, soft sponge.
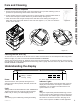
vCARE AND CLEANING Care and Cleaning System Cleaning / Sanitizing Procedure (continued) Pull to the left to unhook 8. When the 'Cleaning' indicator light turns off, drain the Opal. 9. Unhook the top of the drain hoses at the back of the unit. See figure 5. Figure 5 10. Then lay them down to drain into a sink or bucket that is below the level of the ice maker. See figure 6 and 7. 11. Remove the plugs and allow the water to completely drain. See figure 7. 12.
Removal of Mineral Deposits 1. Fill the reservoir with white vinegar to the max fill line and run up to three cleaning cycles. Or purchase an Opal Cleaning Kit and follow instructions inside. 2. If using vinegar, leave the vinegar in the unit for 18 hours and set a vinegar-soaked towel on the ice chute overnight to further dissolve any mineral buildup. See figure 10. 3. C lean the sensors with vinegar and wipe clean with water.
CARE AND CLEANING Making Ice with Opal Once Opal has been cleaned/sanitized, move the ice maker to its desired location and complete the following steps. 1. Remove ice bin. 2. Fill reservoir with potable (safe to drink) water up to the "Max Fill" line. Water hardness must be less than 12 grains per gallon. Do not fill reservoir with any liquid except water. Using any liquid except potable water is misuse and will void your warranty. 3. Plug the ice maker into a grounded outlet. Max fill line 4.
NOTE: There are two drain tubes located on the back of your Opal Nugget Ice Maker indicated as drain tube A and B in the illustration on page 12. 1. Hand Wash Only: Rinse and hand wash Opal Side Tank with warm water and a mild dish soap. Remove Opal Side Tank’s cap and wash the cap and rubber valve with water and a mild dish soap. The Side Tank base can be washed by disconnecting the hose and adding a small amount of soapy water to it. Scrub as needed and rinse thoroughly.
SIDE TANK ACCESSORY Side Tank Accessory 6. Continued. Side tank clip Side tank clip area Side tank clip Bottom view Side tank clip Bottom view Side tank 7. Remove Opal Side Tank’s reservoir from its base. 8. Unscrew Opal Side Tank’s cap from the reservoir. Fill the clear reservoir with water. 9. Replace Opal Side Tank’s cap. Ensure the cap is clean when installing. 10. Carefully flip over Opal Side Tank’s reservoir and place in the base.
To reduce the risk of electrical shock or injury when using your Opal, follow these basic WARNING safety precautions: ■ Unplug the product before cleaning by hand and when not in use. ■ Do not use with water that is microbiologically unsafe or of unknown quality. ■ Use caution when filling and installing Opal Side Tank, as filled unit may be heavy. ■ Do not use this side tank for any liquid other than water. ■ Children should not fill or install Opal Side Tank, as filled unit may be heavy.
TROUBLESHOOTING Normal Operating Sounds Your new ice maker may make sounds that are not familiar. Most of these sounds are normal. Hard surfaces like the floor, walls, and countertops can amplify these sounds. The following describes the sounds that may be new to you and what may be creating them. ■ WHIR - When Opal is first turned on, you may notice toned humming sound while it is running. the condenser fan spinning. ■ CLICK - As nugget ice is produced, it drops into the ice drawer.
Description of product Portable nugget ice maker Model XPIO13BCBT / XPIO13SCSS / XPIO23BCBT / XPIO23SCSS Voltage/Frequency 120V AC/60Hz Current 3.0 A Ice storage capacity 3.0 lbs Ice making rate 24 lbs per day / 1 lb per hour* Dimensions (width x depth x height) 13.43 x 17.5 x 16.5 Installation clearance (sides and back) 3 in Operating environment 55°F - 90°F Weight (when empty) 38.6 lbs NOTE:Technical data and performance information provided for reference only.
NOTES 16 Notes 49-1000464 Rev.
49-1000464 Rev.
NOTES 18 Notes 49-1000464 Rev.
LIMITED WARRANTY GE Appliances Ice Maker Limited Warranty GEAppliances.com Please have your serial number and your model number available when calling for service. Call 1.866.907.6718 for service questions.
CONSUMER SUPPORT 20 Consumer Support Service and Registration Register your new appliance on-line at your convenience! Timely product registration will allow for enhanced communication and prompt service under the terms of your warranty, should the need arise. Register your appliance at GEAppliances.com/register or visit myopalservice.com to submit a service request.