Top-mount no-frost Refrigerators GE Appliances Owner’s Manual Models 14, 16, 18 GE Answer Center ® 800.626.2000 Part No. 162D3905P007 Pub. No.
Congratulations! You Are Now Part of the GE Family. Welcome to the GE family. We’re proud of our quality products and we are committed to providing dependable service. You’ll see it in this easy-to-use Owner’s Manual and you’ll hear it in the friendly voices of our customer service department. Best of all, you’ll experience these values each time you use your refrigerator. That’s important, because your new refrigerator will be part of your family for many years.
Read this manual Inside you will find many helpful hints on how to use and maintain your refrigerator properly. Just a little preventive care on your part can save you a great deal of time and money over the life of your refrigerator. Review the section on Troubleshooting Tips Temperature Control Dial . . . . . .8 Shelves . . . . . . . . . . . . . . . . .9, 10 Storage Drawers . . . . . . . .11, 12 Automatic Icemaker . . . . . . . . .13 Care and Cleaning . . . . . . .
Safety Information IMPORTANT SAFETY INFORMATION. READ ALL INSTRUCTIONS BEFORE USING. WARNING! Installation Instructions Operating Instructions Use this appliance only for its intended purpose as described in this Owner’s Manual. SAFETY PRECAUTIONS When using electrical appliances, basic safety precautions should be followed, including the following: ■ This refrigerator must be properly installed and located in accordance with the Installation Instructions before it is used.
Safety Information IMPORTANT: PROPER DISPOSAL OF THE REFRIGERATOR Operating Instructions Installation Instructions Child entrapment and suffocation are not problems of the past. Junked or abandoned refrigerators are still dangerous…even if they will sit for “just a few days.” If you are getting rid of your old refrigerator, please follow the instructions below to help prevent accidents. Before You Throw Away Your Old Refrigerator or Freezer: ■ Take off the doors.
Safety Information IMPORTANT SAFETY INFORMATION. READ ALL INSTRUCTIONS BEFORE USING. WARNING! HOW TO CONNECT ELECTRICITY Installation Instructions Operating Instructions Do not, under any circumstances, cut or remove the third (ground) prong from the power cord. For personal safety, this appliance must be properly grounded.
Safety Information The larger slot in the adapter must be aligned with the larger slot in the wall outlet to provide proper polarity in the connection of the power cord. Operating Instructions Installation Instructions When disconnecting the power cord from the adapter, always hold the adapter in place with one hand while pulling the power cord plug with the other hand. If this is not done, the adapter ground terminal is very likely to break with repeated use.
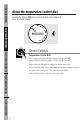
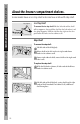
Safety Information About the temperature control dial. 7 Installation Instructions Operating Instructions F OF 9 Turning the dial to OFF stops cooling in both compartments— fresh food and freezer. 5 3 1 Control Settings Temperature Control Dial The temperature control dial has nine settings plus OFF. 1 is the warmest. 9 is the coldest. At first, set the dial at 5. After using the refrigerator, adjust the dial if necessary.
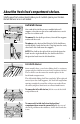
Safety Information About the fresh food compartment shelves. Shelf supports at various levels allow you to custom-space your shelves. Not all features are on all models. Half-Width Shelves 1 Tilt up Operating Instructions Installation Instructions 2 Lift up and out One end of the shelf rests on a molded side-wall support; a bracket on the other end hooks into a track on the rear cabinet wall. To remove, lift the shelf up at front, then off the support and out of the track.
Safety Information About the freezer compartment shelves. Some models have an ice-tray shelf and some have a full-width step shelf. Plug Supports Ice-Tray Shelf Installation Instructions Operating Instructions To remove the ice-tray shelf: Lift the left side of the shelf off its supports, then pull the shelf to the left to free it of the plug supports. Pull the shelf to the right to free the pins from the holes in the cabinet wall.
Safety Information About the storage drawers. Not all features are on all models. Fruit and Vegetable Drawers Operating Instructions Installation Instructions Excess water that may accumulate in the bottom of the drawers should be emptied and the drawers wiped dry. Snacks Drawer The snacks drawer can be moved to the most useful location for your family’s needs.
Safety Information About storage drawer and cover removal. Not all features are on all models. Drawer and Cover Removal Installation Instructions Operating Instructions Drawers can be removed easily by grasping the sides and lifting up slightly while pulling drawers past the stop location. Full-Width Drawer with Plastic Cover To remove the cover, lift it off its supports, pull it forward, tilt it and take it out. Twin Drawers With Glass Cover To remove: 1 Remove the drawers.
Safety Information About the automatic icemaker. A newly-installed refrigerator may take 8 to 12 hours to begin making ice. Icemaker Automatic Icemaker (on some models) The icemaker will produce eight cubes per cycle— approximately 100 cubes in a 24-hour period, depending on freezer compartment temperature, room temperature, number of door openings and other use conditions.
Safety Information Care and cleaning of the refrigerator. Cleaning the Outside The door handles and trim (on some models). Clean with a cloth dampened with soapy water. Dry with a soft cloth. Installation Instructions Operating Instructions Keep the outside clean. Wipe with a clean cloth lightly dampened with kitchen appliance wax or mild liquid dish detergent. Dry and polish with a clean, soft cloth. Do not wipe the refrigerator with a soiled dish cloth or wet towel.
Safety Information Under the Refrigerator For most efficient operation, keep the area under the refrigerator clean. Turn the temperature control dial to OFF. Sweep away or vacuum up dust. Operating Instructions Installation Instructions Clean the condenser coils at least once a year. For best results, use a brush specially designed for this purpose. It is available at most appliance parts stores. Behind the Refrigerator Be careful when moving the refrigerator away from the wall.
Safety Information Care and cleaning of the refrigerator. Light Bulb Replacement Installation Instructions Operating Instructions To replace a burned out bulb, unplug the refrigerator from its electrical outlet, unscrew the bulb when cool and replace it with an appliance bulb of the same or lower wattage. Turning the control to the OFF position does not remove power to the light circuit. Preparing for Vacation For long vacations or absences, remove food and unplug the refrigerator.
Safety Information Preparing to install the refrigerator. Read these instructions completely and carefully. Operating Instructions Installation Instructions Water Supply to the Icemaker (on some models) If the refrigerator has an icemaker, or if you plan to add an icemaker later, it will have to be connected to a cold water line. A water supply kit (containing copper tubing, shutoff valve, fittings and instructions) is available at extra cost from your dealer or from Parts and Accessories, 800-626-2002.
Safety Information Preparing to install the refrigerator. Read these instructions completely and carefully. Rollers and Leveling Legs Installation Instructions Operating Instructions Leveling legs near each front corner of the refrigerator are adjustable. They firmly position the refrigerator and prevent it from moving when the doors are opened. Leveling legs should be set so the front of the refrigerator is raised just enough that the doors close easily when opened about halfway.
Safety Information Installing the water line. Read these instructions completely and carefully. Before You Begin Operating Instructions Installation Instructions This water line installation is not warranted by the refrigerator or icemaker manufacturer. Follow these instructions carefully to minimize the risk of expensive water damage. Water hammer (water banging in the pipes) in house plumbing can cause damage to refrigerator parts and lead to water leakage or flooding.
Safety Information Installing the water line. Read these instructions completely and carefully. What You Will Need Installation Instructions Operating Instructions To determine how much copper tubing you need: Measure the distance from the water valve on the back of the refrigerator to the water supply pipe. Then add 8 feet (244 cm).
Safety Information Shut Off the Main Water Supply Turn on the nearest faucet long enough to clear the line of water. Operating Instructions Installation Instructions Install the Shutoff Valve 1 Install the shutoff valve on the nearest frequently used drinking water line. a location for the valve that is easily accessible. It is best to connect 2 Choose into the side of a vertical water pipe.
Safety Information Installing the water line. Read these instructions completely and carefully. Route the Copper Tubing and Connect It to the Shutoff Valve Installation Instructions Operating Instructions Route the copper tubing between the cold water line and the refrigerator. Route the tubing through a hole drilled in the wall or floor (behind the refrigerator or adjacent base cabinet) as close to the wall as possible.
Safety Information Connect the Tubing to the Refrigerator Before making the connection to the refrigerator, be sure the refrigerator power cord is not plugged into the wall outlet. Operating Instructions Installation Instructions We recommend installing a water filter if your water supply has sand or particles that could clog the screen of the refrigerator’s water valve. Install it in the water line near the refrigerator. 1 Remove the plastic flexible cap from the water valve.
Safety Information Reversing the door swing. Read these instructions completely and carefully. Important Notes Installation Instructions Operating Instructions When reversing the door swing : ■ Read the instructions all the way through before starting. ■ Handle parts carefully to avoid scratching paint. ■ Set screws down by their related parts to avoid using them in the wrong places. ■ Provide a non-scratching work surface for the doors.
Safety Information Removing the doors. Before Removing the Doors 1 Unplug the refrigerator from its electrical outlet. 2 Empty all door shelves, including the dairy compartment. Operating Instructions Installation Instructions CAUTION: Do not let either door drop to the floor. To do so could damage the door stop. Remove the Freezer Door 1 Tape the door shut with masking tape. a 5/16² hex-head socket screwdriver, remove the screws that hold the 2 With top hinge to the cabinet.
Safety Information Removing the doors/Reversing the hardware. Read these instructions completely and carefully. Remove the Fresh Food Door Installation Instructions Operating Instructions 1 Tape the door shut with masking tape. Using a 5/16² hex-head socket screwdriver and a 5/16² open-end wrench, 2 remove the two screws holding the center hinge (and the shim glued to it) to the cabinet. Lift the center hinge to free its pin from the socket in the top of the door, and set hinge and screws aside.
Safety Information Reversing the door handles. Transfer Top Hinge to the Left Interchange hinge (and the shim glued to it) and screws at top right with screws at top left of cabinet. Operating Instructions Installation Instructions Do not tighten screws on hinge side at this time. Some hinges have four holes. Which holes you use for installing the hinge depends on which side you install the hinge. The outer edge of the hinge should be parallel to the edge of the case for correct installation.
Safety Information Rehanging the doors. Read these instructions completely and carefully. Transfer Door Stop Installation Instructions Operating Instructions the metal door stop from any screws from the left end 1 Move 2 Move the right end to the left end. Use a to the right end. Torxdriver. Right Side Door Stop Left Side Reinstalling the Fresh Food Door Handle the handle to the right side of the door with screws at the top and 1 Attach under the handle plug. 2 Reinstall the handle plug.
Safety Information Rehang the Fresh Food Door the bottom socket of the fresh food door onto the pin on the bottom 1 Lower hinge. Be sure the washer is in place on the pin. Operating Instructions Installation Instructions the pin on the center hinge into the socket in the top of the door. 2 Insert NOTE: The center hinge must be turned over as shown when mounted on the left side. the door toward the cabinet.
Safety Information Normal operating sounds. Installation Instructions Operating Instructions Depending on the placement of the refrigerator in your kitchen, you may want to place a piece of rubber backed carpet under the refrigerator to reduce noise. The fan circulating air inside the freezer which keeps the temperatures even. Boiling water or a gurgling noise. The flow of refrigerant through the freezer cooling coils. Sizzling, hissing or popping sound.
Safety Information Before you call for service… Troubleshooting Tips Save time and money! Review the charts on the following pages first and you may not need to call for service. What To Do Refrigerator does not operate Refrigerator in defrost cycle. • Wait about 30 minutes for defrost cycle to end. Temperature control dial in OFF position. • Move the temperature control dial to a temperature setting. Refrigerator is unplugged. • Push the plug completely into the outlet.
Safety Information Before you call for service… Customer Service Troubleshooting Tips Installation Instructions Operating Instructions Troubleshooting Tips 32 Problem Possible Causes What To Do Fresh food or freezer compartment too warm Temperature control dial not set cold enough. • See About the temperature control dial. Warm weather or frequent door openings. • Set the temperature control dial one step colder. See About the temperature control dial. Door left open.
Safety Information Possible Causes What To Do Ice cubes have odor/taste Ice storage bin needs cleaning. • Empty and wash bin. Discard old cubes. Food transmitting odor/ taste to ice cubes. • Wrap foods well. Interior of refrigerator needs cleaning. • See Care and cleaning. Moisture forms on cabinet surface between the doors Not unusual during periods of high humidity. • Wipe surface dry and reset temperature control dial one setting colder.
Customer Service Troubleshooting Tips Installation Instructions Operating Instructions Safety Information Notes 34
Safety Information Operating Instructions Installation Instructions Troubleshooting Tips Customer Service 35
Customer Service Troubleshooting Tips Installation Instructions Operating Instructions Safety Information Notes 36
GE Service Protection Plus™ GE, a name recognized worldwide for quality and dependability, offers you Service Protection Plus ™—comprehensive protection on all your appliances — No Matter What Brand! Benefits Include: • Backed by GE • All brands covered • Unlimited service calls • All parts and labor costs included • No out-of-pocket expenses • No hidden deductibles • One 800 number to call We’ll Cover Any Appliance. Anywhere. Anytime.
Consumer Product Ownership Registration Dear Customer: Thank you for purchasing our product and thank you for placing your confidence in us. We are proud to have you as a customer! Follow these three steps to protect your new appliance investment: 1 2 3 After mailing the registration below, store this document in a safe place. It contains information you will need should you require service. Our service number is 800-GE-CARES (800-452-2737).
Safety Information Refrigerator Warranty All warranty service provided by our Factory Service Centers, or an authorized Customer Care® technician. For service, call 800-GE-CARES. GE Will Replace, At No Charge To You: One Year From the date of the original purchase Any part of the refrigerator which fails due to a defect in materials or workmanship. During this full one-year warranty, GE will also provide, free of charge, all labor and in-home service to replace the defective part.
Safety Information Installation Instructions Operating Instructions Troubleshooting Tips Service Telephone Numbers. GE Answer Center ® 800.626.2000 The GE Answer Center® is open 24 hours a day, 7 days a week. In-Home Repair Service 800-GE-CARES (800-432-2737) Expert GE repair service is only a phone call away. Special Needs Service 800.626.2000 TDD 800-TDD-GEAC (800-833-4322) GE offers, free of charge, a brochure to assist in planning a barrierfree kitchen for persons with limited mobility.