HALOGEN OVEN Model Number: 169104 UPC: 681131691048 Customer Assistance 1 877 207 0923 (US) 1 877 556 0973 (Canada) Thank you for purchasing a GE small appliance. In keeping with the GE ecomagination initiative, please consider the option to recycle the packaging material and donate the appliance you are no longer using. To read about GE’s ecomagination commitment, visit http://ge.ecomagination.
IMPORTANT SAFEGUARDS When using electrical appliances, basic safety precautions should always be followed, including the following: • • • • • • • • • • • • • • • • • • • • • • Read all instructions. Do not touch hot surfaces. Use handles or knobs. To protect against electrical shock, do not immerse cord, plug or oven in water or other liquid. Close supervision is necessary when any appliance is used by or near children. Unplug unit from the outlet when not in use and before cleaning.
This appliance is for HOUSEHOLD USE ONLY. It may be plugged into an AC electrical outlet (ordinary household current). Do not use any other electrical outlet. DO NOT OPERATE APPLIANCE IF THE LINE CORD SHOWS ANY DAMAGE, OR IF APPLIANCE WORKS INTERMITTENTLY OR STOPS WORKING ENTIRELY. A short power-supply cord is provided to reduce the risk resulting from becoming entangled in or tripping over a longer cord.
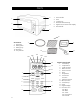
PARTS 4 1 2 1. 2. 3. 4. 5. 6. 5 3 Door Handle Door Crumb Tray Stainless Steel Housing Digital Control Panel and Display Side Handle 6 8 Accessories 7. Pizza Pan 8. Baking Rack 9. Baking Tray 10. Broil Pan 11. Tray Handle 7 9 10 14a 14b 14c 11 14d 14e 14 13 12 1 11 2 3 4 10 5 9 8 6 4 7 Digital control panel 1. Time/Temp 2. Temperature 3. Toast Function 4. Bake Function 5. Clock Function 6. Start 7. Stop/Pause 8. Convection Function 9. Defrost Function 10. Broil Function 11.
INSTRUCTIONS FOR USE For your safety, always read and understand this Instruction Manual before attempting to use the Halogen Oven. Before Using: 1. Carefully unpack the oven. Remove all packaging materials. 2. Wash the rack, bake tray, drip pan, pizza pan, crumb tray and handle in hot soapy water. Dry thoroughly. Wipe the inside of the oven with a damp cloth or sponge. Blot dry with paper towels to be sure the oven is dry before using. 3.
Please note: When baking in a toaster oven, rather than a conventional oven, time and temperature may need to be adjusted. This oven comes with a Tray Handle. Use this handle to safely insert and remove the baking or pizza trays. Setting the clock: 1. Plug oven into wall outlet. 2. The digital screen will flash “00:00”. 3. Press the clock key, and then press the + or – keys to adjust to the correct hour. Press the clock key again and use the + or – keys to adjust to the correct minute. 4.
c. Press the temperature key. The default temperature is 350 degrees. Use the “+” or “-“ buttons to adjust for desired temperature. Press the temperature key to lock in the selected temperature. d. Press the Start button. The oven will begin operating and the screen will show the count down time. When the time reaches 00:00 the cycle is complete and 3 tones will sound. Bake: 1. Insert the Baking Pan into the lower rack guide.
b. Press the Convection key if desired c. Press the Start button. The oven will begin operating and the screen will show the count down time. When the time reaches 00:00 the cycle is complete and you will here 3 audible tones. Display features: 1. When adjusting the time and/or temperature with the + or – keys, the display will advance with each press of the key. If a rapid advance is desired, press and hold the key. The display will begin to rapidly advance in 10 minute increments after 1 or 2 seconds. 2.