
Instructions / Assembly


6
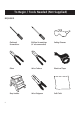
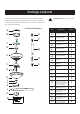
Package Contents
Carefully unpack and identify each part to make sure you
have everything ready for installation. Lay out each part on
erus ekam ot kcehC . roolf ro elbat a sa hcus aera talf naelc a
you have the following:
A
A
1
E
1
1
1
J
Q
4
C
I
1
G
O
B
G
1
F
D
J
1
H
P
1
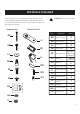
PART DESCRIPTION
Powerplug receptacle
Motor assembly
Finial cap
Finial nut
Canopy mounting screw
Canopy assembly
Light kit assembly
Canopy trim ring
Glass bowl
QUANTITY
ATTENTION: Parts are not to scale.
Functional Fasteners
B
C
E
F
R
S
L
1
K
2
Collar set screw
Clevis pin
M
1
Cotter pin
D
O
3
Switch housing screw
1
Coupling cover
I
H
P
Q
10 - watt LED bulb
3
(Preassembled to mounting
bracket)
(Preassembled to coupling of
motor assembly)
(Preassembled to downrod of
canopy assembly)
(Preassembled to downrod of
canopy assembly)
(Preassembled to mounting
plate of motor assembly)
K
L
M
R
S
Blade
Optional switch housing
Blade holder set
5
5
1
N
Wire extension
Keep this for longer downrod
(option sold separately) installation.
Instructions are available at
www.gelightingandfans.com)
1
N