AIR CONDITIONER Portable Room SAFETY INFORMATION . . . . . . . . .3 USING THE AIR CONDITIONER Controls . . . . . . . . . . . . . . . . . . . . . . . . . . . . . .4 CARE AND CLEANING Air Filter . . . . . . . . . . . . . . . . . . . . . . . . . . . . . .8 OWNER’S MANUAL AND INSTALLATION INSTRUCTIONS APCA08 APCA10 INSTALLATION INSTRUCTIONS . . . . . . . . . . . . . . . . . . .9 TROUBLESHOOTING TIPS. . . . . . 13 LIMITED WARRANTY . . . . . . . . . . . 15 CONSUMER SUPPORT . . . . . . . . . .
THANK YOU FOR MAKING GE APPLIANCES A PART OF YOUR HOME. Whether you grew up with GE Appliances, or this is your first, we’re happy to have you in the family. We take pride in the craftsmanship, innovation and design that goes into every GE Appliances product, and we think you will too. Among other things, registration of your appliance ensures that we can deliver important product information and warranty details when you need them. Register your GE appliance now online.
READ ALL INSTRUCTIONS BEFORE USING THE APPLIANCE IMPORTANT SAFETY INSTRUCTIONS WARNING: To reduce the risk of fire, electrical shock, injury to persons, or damage when using the air conditioner, follow basic precautions, including the following: • Read all of the instructions before using this • • • • • • • • appliance. Plug into a grounded 3 prong outlet. Do not remove ground prong. Do not use an adapter. Do not use an extension cord.
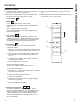
USING THE AIR CONDITIONER Controls Features and appearance will vary. Lights next to the touch pads on the air conditioner control panel indicate the selected settings. 7 6 FULL POWER 1 TIMER 2 MODE COOL CONSTANT COOL DRY HIGH FAN FAN LOW Hold 3 Sec for Constant Cool 3 _ + 5 Air Conditioner Controls Controls 1. Power Control The power control turns the unit on and off. The louvers will automatically open when the power is turned on. 2.
Remote Control Ŷ 7R HQVXUH SURSHU RSHUDWLRQ DLP WKH UHPRWH FRQWURO DW the signal receiver on the air conditioner. Ŷ 0DNH VXUH QRWKLQJ LV EHWZHHQ WKH DLU FRQGLWLRQHU DQG the remote control that could block the signal. Ŷ 7KH UHPRWH FRQWURO VLJQDO KDV D UDQJH RI XS WR feet. Ŷ 0DNH VXUH EDWWHULHV DUH IUHVK DQG LQVWDOOHG FRUUHFWO\ as indicated on the remote control. 1. Power On/Off 2. Mode Cool: LED lights when in cooling mode. Dehumidification: LED lights when in dehumidification mode.
USING THE AIR CONDITIONER Controls The display will always default to show the room temperature. When the air conditioner is turned on, it will automatically start in the last mode and fan settings selected. Cool Mode Use the COOL mode for cooling and for economy cooling. To set the COOL mode: 1. Press the MODE pad until the COOL indicator light is lit. 2. Press the FAN pad to set HIGH or LOW fan speed. 3. Press + or - to set the desired temperature between 61°F and 89°F in 1°F increments.
Air Conditioner Use IMPORTANT: If the air conditioner has been tilted on its side, wait 24 hours before turning on the air conditioner to allow the oil to return to the compressor. This will prevent the air conditioner from failing prematurely. • Allow 20” (51 cm) of space around the unit for proper air circulation. • Do Not operate the air conditioner without air filters in place.
CARE AND CLEANING Care and Cleaning CLEANING WARNING Electrical Shock Hazard Disconnect power before cleaning. Failure to do so can result in death or electrical shock. 1. Unplug or disconnect power. 2. Use only a soft cloth dampened with water to clean the cabinet. NOTE: •Do not use a liquid or spray cleaner to clean the air conditioner. •DO NOT use chemicals, abrasives, ammonia, chlorine bleach, concentrated detergents, solvents or scouring pads.
Questions? Call GE Appliances at 800.GE.CARES (800.432.2737) or visit our Website at: GEAppliances.com. In Canada, call 1.800.561.3344 or visit our Website at: www.GEAppliances.ca BEFORE YOU BEGIN Read these instructions completely and carefully. • IMPORTANT — Save these instructions for local inspector’s use. • IMPORTANT — Observe all governing codes and ordinances. • Note to Installer – Be sure to leave these instructions with the Consumer.
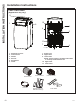
INSTALLATION INSTRUCTIONS Installation Instructions PARTS INCLUDED (Appearance may vary) 2 1 3 10 8 4 5 11 7 6 9 1. 2. 3. 4. 5. 6. Automatic Louvers Control Panel Handle Air Inlet Air Exhaust Caster 7. Power Cord 8. Upper Drain 9. Lower Drain NOTE: Please ensure if the water outlet drain is securely installed before use. 10. Upper Filter 11.
1. LOCATION REQUIREMENTS • Place the air conditioner on a flat, level surface in a location that is at least 20” (51 cm) from any wall. NOTE: The recommended distance from the window for optimal performance is 31.5 (80 cm). • Maintain a minimum 20” (51 cm) clearance around the air conditioner to not block airflow. • Keep the air conditioner free of any obstructions such as drapes, curtains, blinds, etc. • The exhaust hose should be free of any obstructions.
INSTALLATION INSTRUCTIONS Installation Instructions 4. INSTALL WINDOW PANELS A. Insert the window panel B and C to each end of the main panel A. Adjust to fix the length of window C A 5. ATTACH EXHAUST HOSE TO THE EXHAUST NOZZLE • Insert the other end of the exhaust hose assembly (with hose connector #3) onto the window bracket. B B. Open the window and place window panels into window. Adjust the extension panels to fit width or height of window by the screw and nut sets mounted on the main panel A.
PROBLEM POSSIBLE CAUSE(S) Unit does not start or Power supply cord is not plugged into an operate outlet. Power supply cord has tripped. SOLUTION Plug the power cord into a grounded 3 prong outlet. Press and release the RESET button on the power supply cord. The Power button has not been pressed. Press the Power button on the Control Panel or Remote Control to turn ON the air conditioner. Remote control is not working There is no power to the electrical outlet.
NOTES 14 Notes 49-7819-1
For The Period Of: Will Replace: One Year From the date of the original purchase Replacement, repair, or refund of the original retail price for any product which fails due to a defect in materials or workmanship. If the unit is exchanged, the replacement unit is warranted for the remainder of your product’s original one-year warranty period. GEA will, at its sole discretion, replace the product with a product of the same or comparable functionality and quality or refund the original retail price.
CONSUMER SUPPORT Consumer Support GE Appliances Website Have a question or need assistance with your appliance? Try the GE Appliances Website 24 hours a day, any day of the year! You can also shop for more great GE Appliances products and take advantage of all our on-line support services designed for your convenience. In the US: GEAppliances.
PARA SALA ACCONDICIONADORES DE AIRE INFORMACIÓN DE SEGURIDAD . . . . . . . . . . . . . . . . . . .3 USO DEL ACONDICIONADOR DE AIRE Controles . . . . . . . . . . . . . . . . . . . . . . . . . . . . .4 CUIDADO Y LIMPIEZA MANUAL DEL PROPIETARIO Y INSTRUCCIONES DE INSTALACIÓN APCA08 APCA10 Filtro de aire . . . . . . . . . . . . . . . . . . . . . . . . . .8 INSTRUCCIONES DE INSTALACIÓN . . . . . . . . . . . . . . . .9 SOLUCIONAR PROBLEMAS . . . . 13 GARANTÍA LIMITADA . . . . . . . . . .
GRACIAS POR HACER QUE GE APPLIANCES SEA PARTE DE SU HOGAR. Ya sea que haya crecido usando GE Appliances, o que ésta es su primera vez, nos complace tenerlo en la familia. Sentimos orgullo por el nivel de arte, innovación y diseño de cada uno de los electrodomésticos de GE Appliances, y creemos que usted también. Entre otras cosas, el registro de su electrodoméstico asegura que podamos entregarle información importante del producto y detalles de la garantía cuando los necesite.
INSTRUCCIONES IMPORTANTES DE SEGURIDAD ADVERTENCIA Para reducir el riesgo de incendio, choque eléctrico, lesiones a personas o daños al utilizar el acondicionador de aire, siga precauciones básicas, incluyendo las siguientes: • Lea todas las instrucciones antes de usar este electrodoméstico. • Conecte a un contacto de pared de conexión a tierra de 3 terminales. • No quite el terminal de conexión a tierra. • No use un adaptador. • No use un cable eléctrico de extensión.
USO DEL ACONDICIONADOR DE AIRE Controles Las luces al lado de las teclas de toque en el panel de control del acondicionador de aire indicarán los ajustes seleccionados. Las funciones y el aspecto pueden variar. 7 6 FULL POWER 1 TIMER 2 MODE COOL CONSTANT COOL DRY HIGH FAN FAN LOW Hold 3 Sec for Constant Cool _ + 3 5 Controles del acondicionador de aire BOTONES 1. Control del encendido El control del encendido enciende y apaga la unidad.
Control Remoto Ŷ 3DUD JDUDQWL]DU XQD RSHUDFLyQ DSURSLDGD RULHQWH HO FRQWURO remoto hacia el receptor de señal del acondicionador de aire. Ŷ (O UHFHSWRU GH VHxDO WLHQH XQ UDQJR Pi[LPR GH SLHV Ŷ &HUFLyUHVH GH TXH QR KD\D QDGD HQWUH HO DFRQGLFLRQDGRU GH aire y el control remoto que pueda bloquear la señal. Ŷ (O FRQWURO UHPRWR FXHQWD FRQ XQ LPiQ TXH SHUPLWH DGKHULUOR D superficies metálicas. 1. 2. 3.
USO DEL ACONDICIONADOR DE AIRE Controles La pantalla siempre mostrará la temperatura del ambiente por omisión. Cuando el acondicionador de aire sea encendido, se iniciará de forma automática en las configuraciones de modo y ventilación que fueron usadas por última vez. Modo de Refrigeración Use el modo COOL (Refrigeración) para enfriar. Para configurar el modo COOL (Refrigeración): 1. Presione la tecla MODE (Modo) hasta que la luz indicadora de COOL (Refrigeración) esté encendida. 2.
Uso del Acondicionador de Aire IMPORTANT : Si le climatiseur a été incliné sur le côté, patienter 24 heures avant de le remettre en marche pour laisser le temps à l’huile de rejoindre le compresseur. Cela évitera au climatiseur de tomber en panne prématurément. • Laisser un dégagement de 20” (51 cm) autour de l’appareil pour permettre à l’air de circuler correctement. • Ne Pas faire fonctionner le climatiseur si les filtres à air ne sont pas en place.
CUIDADO Y LIMPIEZA Cuidado y Limpieza LIMPIEZA ADVERTENCIA Riesgo de descarga eléctrica. Desconecte la fuente de alimentación antes de limpiar. El incumplimiento de estas instrucciones puede provocar la muerte o una descarga eléctrica FILTROS DE AIRE Los filtros de aire deben limpiarse al menos una vez a la semana para garantizar que la unidad funcione con una eficiencia óptima. PRECAUCIÓN No opere el acondicionador de aire si los filtros de aire no están en su lugar. Para eliminar: 1.
¿Preguntas? Llame a GE Appliances al 800.GE.CARES (800.432.2737) o visite nuestro sitio web en: GEAppliances.com. En Canadá, llame al 1.800.561.3344 o visite nuestro Sitio Web en: www.GEAppliances.ca ANTES DE INICIAR Lea estas instrucciones completa y cuidadosamente. • IMPORTANTE — Guarde estas instrucciones para uso del inspector local. • • • • • • • • • IMPORTANTE — Observe todos los códigos y órdenes de ley. Nota al instalador – Asegúrese de dejar estas instrucciones con el consumidor.
INSTRUCCIONES DE INSTALACIÓN Instrucciones de instalación PARTES INCLUIDAS (Apariencia puede variar) 2 1 3 8 4 5 11 7 6 9 1. 2. 3. 4. 5. 6. 7. Lumbreras automáticas Panel de Control Manija Entrada de Aire Salida de Aire Ruedita Cable de Corriente 8. Drenaje Superior 9. Drenaje Inferior NOTA: Por favor, asegúrese de que el drenaje de la salida de agua se encuentre instalado de forma segura antes de su uso. 10. Filtro Superior 11.
1. REQUISITOS DE UBICACIÓN • Coloque el acondicionador de aire en una superficie plana y nivelada a al menos 20 “(51 cm) de cualquier pared. NOTA: La distancia recomendada desde la ventana para un rendimiento óptimo es de 31.5 “(80 cm). • Mantenga una distancia de al menos 20 “(51 cm) alrededor del acondicionador de aire para evitar obstruir el flujo de aire. • No obstruya el aire acondicionado de ninguna manera (cortinas, persianas, etc.). • La manguera de drenaje debe estar libre de obstrucciones.
INSTRUCCIONES DE INSTALACIÓN Instrucciones de instalación 4. INSTALE LOS PANELES DE VENTANA 1.Inserte los paneles de ventana B y C en cada extremo del panel principal A. Haga ajustes para hacer coincidir la extensión de la ventana. C A 5. ADHIERA LA MANGUERA DEL EXTRACTOR A LA BOCA DEL EXTRACTOR 1. Inserte el otro extremo del ensamble de la manguera del extractor (con el conector de manguera nº 3) en el soporte de la ventana. B 2.Abra la ventana y coloque los paneles de ventana en la ventana.
Problema Causas posibles Qué hacer La unidad no se pone en marcha ni funciona El cable de suministro de energía no está enchufado en un toma corriente. Conecte el cable eléctrico a un toma corriente de 3 terminales con conexión a tierra. El cable de suministro de energía se ha disparado. Presione y libere RESET (Restablecer) en el cable de suministro de energía. El botón Power (Encendido) no se ha presionado.
NOTAS 14 Notas 49-7819-1
Por el período de: GE Appliances reemplazarán: Un año A partir de la fecha de la compra original Unidad de reemplazo para cualquier producto que falle debido a defectos en los materiales o en el proceso de fabricación. La unidad de reemplazo está garantizada para el resto del período de un año de garantía original del producto. La unidad de reemplazo puede ser una nueva o una reparada.
SOPORTE PARA EL CONSUMIDOR Soporte para el Consumidor GE Appliances Sitio Web ¿Desea realizar una consulta o necesita ayuda con su electrodoméstico? ¡Intente a través del Sitio Web de Electrodomésticos de GE Appliances las 24 horas del día, cualquier día del año! Usted también puede comprar más grandiosos productos de GE Appliances y sacar ventaja de todos nuestros servicios a través de Internet diseñados para su conveniencia. En EE.UU.: GEAppliances.