CG709 Camcorder User’s Guide We bring good things to life. ..
Important Safety Information Be sure to read all the safety information before you begin to use this product. WARNING: To reduce the risk of fire or shock hazard, do not expose camcorder or AC adapter/charger to rain or moisture. CAUTION This symbol indicates “dangerous voltage” inside the product that presents a risk of electric shock or personal injury. RISK OF ELECTRIC SHOCK DO NOT OPEN ATTENTION This symbol indicates important instructions accompanying the product.
Assistance We want to make sure you enjoy your new camcorder. If you have any questions, call: Camcorder Exchange Warranty.......... 800-283-6503 (pages 60-61) Customer Service......................................... 800-447-1700 (page 59) Accessories............................................. 800-338-0376 (pages 47-50) Table of Contents Safety Precautions .................................i Product Registration .............................i Table of Contents ..............................
Table of Contents Recording Features • Viewfinder..........................................18 • Viewfinder Displays .....................19-21 Date and Time Display • Recording the Time and Date (or Date) on Your Tape..................22 • Install the Clock Battery .................22 • Set (or Correct) the Display............23 • Camcorder Features • CAMERA AUTO Feature ................24 • Microphone.....................................24 • Record Review................................
First-Time Operation This section describes only the basic steps to setup your camcorder to record. Refer to the other sections for detailed operation and feature options. Assistance The toll-free numbers are available to help you with any problem you may encounter. Camcorder Exchange Warranty...................800-283-6503 Customer Service.........................................800-447-1700 Accessories..................................................800-338-0376 1. Unpack camcorder and accessories.
First-Time Operation EJECT BATT EJECT DC IN 12V RF DC AUDIO VIDEO AUDIO VIDEO DC OUT 12V 2A Jack POWER Indicator DC Cable (Supplied) CHARGE DC O UT 1 POWER DC IN 12V Jack 2V 2 A AC Adapter/Charger To AC Outlet (100-240 V, 50/60 Hz.) 2. Attach the adapter/charger. Since the battery must be charged before it can be used the first time, attach the adapter/charger to the camcorder. • Attach one end of DC cable to DC IN 12V jack on side of camcorder.
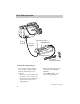
First-Time Operation Tape Windows STOP/EJ ECT BATT EJECT DC IN 12V RF DC VIDEO AUDIO VIDEO AUDIO Handstrap Lens Cap on Lens Cap Holder Press Here to Close 3. Adjust the handstrap. Open the strap, adjust to fit your right hand, and close the strap. 4. Remove the lens cap and attach it to the handstrap. 5. Insert a cassette. A. Press STOP/EJECT to open cassette compartment. B. Insert cassette with safety tab facing up and tape windows facing out. C. Close cassette compartment door.
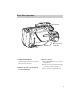
First-Time Operation POWER Switch and Indicator STOP/EJECT Button TT CT BAEJE ECT STOP/EJ POWER PAUSE STILL Viewfinder in Operating Position REW PLAY F.FWD CT AUD •DUB RD •VID RECO EDIT ADV. TITLE SELE PAUSE/STILL Button US UAL FOC MAN W REVIE FADE W/B S FOCU AUTO R RA VC CAME N O MA MAN AUT ME TER TO SH/AU DATE/TI SHUT TER PU COUN K SELF TIMER TITLE CLOC Y DISPLA SELECT TIME RESET SET Eyepiece Focus Control LAPSE CAMERA/VCR Switch 6.
First-Time Operation STOP/EJEC T BATT EJECT DC IN 12V RF DC VIDEO AUDIO VIDEO AUDIO 8. Rotate the viewfinder into operating position and adjust the eyepiece focus control. If the image in the viewfinder is blurry, adjust the eyepiece focus control for your vision. 9. Start and Stop Recording. Press the thumb trigger to start and stop recording. Do not hold the thumb trigger. REC will appear in the viewfinder when the camcorder is recording.
First-Time Operation 11. Review camcorder’s operating controls. F.FWD (Fast Forward) Button (Also TITLE SELECT + Button) PLAY Button (Also TITLE SELECT Button) POWER Switch and Indicator AUD (Audio) DUB Button) (Also EDIT ADV. Button) REW Button (Also TITLE SELECT – Button) VID (Video) DUB Button) RECORD Button PAUSE/STILL Button POWER PAUSE REW PLAY F.FWD AUD • DUB • VID RECORD TITLE SELECT STILL EDIT ADV.
First-Time Operation 11. Review camcorder’s operating controls.
Powering the Camcorder Using the Adapter/Charger The DC cable attaches the adapter/charger to the camcorder and lets you power your camcorder directly from standard household power. EJECT BATT EJECT POWER Indicator AC Adapter/ Charger POWER CHARGE DC IN 12V RF DC DC O AUDIO VIDEO DC IN 12V Jack AUDIO UT 12 VIDEO V 2A DC Cable DC OUT 12V 2A Jack To AC Outlet (100-240 V, 50/60 Hz.) Attach the Adapter/Charger Using an Optional Plug Adapter 1.
Powering the Camcorder Using the Battery to Power Your Camcorder The battery must be charged before it can be used the first time. Initial charging will take approximately two hours. When fully charged, the battery should supply about 100-120 minutes of operating time (depending on how much you use zoom and pause). When using the battery to power the camcorder, slide POWER to turn off the camcorder during recording breaks to conserve the battery’s power. Charging the Battery WARNING: LEAD-ACID BATTERY.
Powering the Camcorder Using the Battery to Power Your Camcorder Insert Charged Battery. Match “+” Side of Battery to “+” on Camcorder. T BAT EJECT T STOP/EJEC POWER PAUSE REW PLAY F.FWD T AUD •DUB D •VID RECOR BATT (Battery) EJECT Lever EDIT ADV.
Powering the Camcorder Checking Battery Power (Battery Level Indicator) The battery level indicator ( ) in the viewfinder shows you how much battery power is left. This indicator will not be recorded on the tape when it is displayed. Repeatedly press the COUNTER DISPLAY button to display and remove the battery level indicator from the viewfinder. 0000 Battery Level Indicator Display in Viewfinder • When the battery is fully charged, the display reads . • After a while, only appears.
Powering the Camcorder Battery Care and Storage • The battery will provide better service and longer performance if you charge it before and after use, and store it at normal room temperature. • Recharge the battery once at least every 6 months. Lead-acid batteries tend to discharge if not used for extended periods. After being stored for a long period, the battery may not supply power for the specified time. Additional rechargings may help restore operation time.
Camcorder Recording Tips Make a video recording of your home and contents to store in a safe place in case of fire or theft. Practice recording under different lighting conditions. This will help you respond quickly whenever you see a scene you want to record. Do not move the camcorder rapidly from side-to-side while recording. A steady, gradual “pan” avoids blurring and “jitter”. Use the viewfinder to make sure the camcorder is level while recording or your scenes will appear “tilted”.
Video Cassettes We recommend our cassettes be used with your camcorder. The tape in these cassettes is of high-quality formulation manufactured to critical specifications for excellent performance. Use of tape not meeting these specifications could considerably reduce the performance of your camcorder. Use of poor quality tapes or tapes that have been damaged or mishandled can contaminate the video heads, resulting in a snowy picture or no picture at all during playback.
Video Cassettes Inserting and Removing Cassettes Safety Tab STOP/EJECT Button STOP/EJEC T BATT EJECT DC IN 12V RF DC VIDEO AUDIO VIDEO Tape Windows AUDIO Press Here to Close 1. Attach a power source (either a charged battery or adapter/charger). 2. Press STOP/EJECT to open the cassette door. 3. Insert or remove the cassette from the cassette compartment. Caution: Insert cassette with safety tab facing up and the tape windows facing out. The cassette should slide easily into the compartment. 4.
Viewfinder The camcorder’s viewfinder is a miniature monitor that displays the picture seen by the camcorder when recording. The viewfinder can also be used for viewing the tape during playback. For convenient viewing, turn the viewfinder to the left and lock it into position. After the viewfinder is locked, you can slide it out and use the right or left eye. Caution: When carrying or storing the camcorder, turn the viewfinder back to the front to prevent damage to the viewfinder and/or camcorder.
Viewfinder Displays 1 Self-Timer and 3 Battery Level INTERVAL Indicators Indicator INTERVAL 0:60 2 Titler TITLER Displays in Viewfinder BATT EJECT STOP/EJECT PAUSE POWER REW PLAY F.FWD AUD •DUB •VID RECORD EDIT ADV.
Viewfinder Displays 4 Shutter Speed Indicators 7 Counters and 1000 6 Time-Remaining Display REC 5 Manual White 7 Balance Indicators 6 Time and Date Display and Clock Battery Warning ( ) M0000 INDEX 8 Status, TAPE, and DEW Indicators 9 INDEX and END 10:30AM Indicators NOV.18 1995 Displays in Viewfinder 4 Shutter Speed Indicators • The higher shutter speed (1/100, 1/250, 1/1000, 1/2000, or 1/4000) selected with SHUTTER appears. No display appears for the standard 1/60 second shutter speed.
Viewfinder Displays BATT EJECT STOP/EJECT PAUSE POWER REW PLAY F.FWD AUD •DUB •VID RECORD EDIT ADV. TITLE SELECT STILL W/B (White Balance) Button CAMERA/VCR Switch S AL FOCU MANU REVIEW FADE W/B FOCUS AUTO CAMERA MAN MAN VCR COUNTER RESET Button AUTO ME R TO PUSH/AU SELF TIMER DATE/TI SHUTTE R COUNTE TITLE CLOCK T AY RESE DISPL CT SET SELE E TIME LAPS COUNTER DISPLAY Button DATE/TIME Button SHUTTER Button • Press again to display the tape counter with memory stop.
Date and Time Display Recording the Time and Date (or Date) on Your Tape Install the clock battery and set the correct time and date before you record them on your tape. Whenever the time and date (or date) appear in the viewfinder, it will be recorded on the tape. If you do not want to record the display, remove it from the viewfinder by repeatedly pressing the DATE/TIME button.
Date and Time Display Set (or Correct) the Time and Date Display Follow the steps below to set (or correct) the time and date display. T BAT EJECT T STOP/EJEC POWER PAUSE REW PLAY F.FWD AUD •DUB T D •VID RECOR EDIT ADV.
Camcorder Features PLAY Button F.FWD (Fast Forward) Button REW (Rewind) Button POWER PAUSE REW STILL PLAY F.FWD AUD • DUB • VID RECORD TITLE SELECT EDIT ADV. BATT EJECT STOP/EJ PAUSE POWER Microphone REW PLAY F.FWD AUD •DUB ECT •VID RECORD EDIT ADV.
Camcorder Features Camera Edit Electronic Indexing Edit as you record by positioning the tape with F.FWD, REW, or PLAY while the camcorder is in record pause. The CAMERA/VCR switch must be in CAMERA. • Press and hold REW (rewind) to visually search the recorded tape in reverse. • Press and hold F.FWD (fast forward) to visually scan forward on the recorded tape. • Press and hold PLAY to view the recorded tape at normal speed.
Focusing Your Camcorder Power Zoom Buttons “T” and “W” TT CT BAEJE ECT STOP/EJ POWER PAUSE STILL MANUAL FOCUS Buttons REW PLAY AUD •DUB F.FWD CT RD •VID RECO EDIT ADV.
Focusing Your Camcorder Manual Focus Under certain conditions, you may need to focus manually. 1. Place the CAMERA/VCR switch in CAMERA MAN. 2. Place the FOCUS AUTO/MAN switch in MAN. 3. To maintain proper focus throughout the zoom range, zoom in on the subject by pressing power zoom button “ T”. 4. Press one of the MANUAL FOCUS buttons to display a sharp, clear picture in the viewfinder. When FOCUS MAN is in MAN, you can press and hold PUSH/AUTO to switch to auto focus.
Using Variable Shutter Speeds The camcorder has a variable shutter with five higher shutter speeds than the normal 1/60 second speed. The shutter speed is automatically set to the normal shutter speed of 1/60 second when the CAMERA/VCR switch is in CAMERA AUTO. No indicator appears in the viewfinder when the shutter speed is set to 1/60. BATT EJECT STOP/EJECT PAUSE REW POWER PLAY F.FWD AUD •DUB •VID RECORD EDIT ADV.
Zooming and Fading In and Out of Scenes Power Zoom Buttons BATT EJECT STOP/EJECT T = Telephoto PAUSE POWER REW PLAY F.FWD AUD •DUB •VID RECORD EDIT ADV.
Counters and Time-Remaining Display Repeatedly press COUNTER DISPLAY to display the tape counter, tape counter with memory stop, elapsed time counter, or time-remaining display in the viewfinder. These displays are not recorded on the tape. BATT EJECT STOP/EJECT PAUSE POWER REW PLAY F.FWD AUD •DUB •VID RECORD EDIT ADV.
Counters and Time-Remaining Display Repeatedly press COUNTER DISPLAY 0000 M0000 Tape Counter with Memory Stop Tape Counter Displays in Viewfinder 0:00:00 Elapsed-Time Counter TR -:-- No Display Time-Remaining Display Elapsed-Time Counter Time-Remaining Display The time counter shows actual time elapsed while recording. The CAMERA/VCR switch must be in CAMERA for the time counter to operate.
SELF TIMER/TIME LAPSE Button POWER Switch T BAT EJECT T STOP/EJEC POWER PAUSE REW PLAY F.FWD CT AUD •DUB RD •VID RECO EDIT ADV.
SELF TIMER/TIME LAPSE Button Adjustable Time-Lapse Recording This feature lets you compress slow-moving action, such as nature studies, into clean, short videos. The camcorder will record for approximately one second at preset intervals. 1. Turn on camcorder and place CAMERA/VCR switch in CAMERA. 2. Slide SELF TIMER/TIME LAPSE three times. INTERVAL 0:60 appears in the viewfinder. Interval Indicator PAUSE INTERVAL 0:60 Display in Viewfinder 3. Press the thumb trigger (or PAUSE/STILL).
Titler The titler can create and store two different titles. Each title can contain two lines with a total of 32 characters – 16 on each line. The built-in character register contains 47 different characters for creating titles. POWER PAUSE REW STILL PLAY F.FWD AUD • DUB • VID RECORD TITLE SELECT EDIT ADV. EDIT ADV. Button TITLE SELECT – Button TITLE SELECT + Button TITLE SELECT Button BATT EJECT STOP/EJ PAUSE POWER REW PLAY F.FWD AUD •DUB ECT •VID RECORD EDIT ADV.
Titler Chart of Characters in Titler’s Register A L W B M X C N Y D O Z E P F Q G R H S I T J U 0 1 2 3 4 5 6 7 8 9 : - , . ' ; / ? < > K V ! Correcting Errors During Programming 1. Press EDIT ADV. until the flashing cursor is placed over the character you wish to correct. 2. Press TITLE SELECT + or – until the correct character appears. Note: To delete a character, press TITLE SELECT + or – until the blank space appears. Recording Titles on a Tape in the Camcorder 1.
Audio Dubbing The audio dubbing feature lets you record new sound (audio) on a previously recorded tape without erasing the original picture (video). Tapes must be recorded in SP tape speed. New audio can be dubbed by connecting an external sound system to the AUDIO IN jack.
Video Dubbing The video dubbing feature lets you record new pictures (video) on a previously recorded tape without erasing the original sound (audio). Tapes must be recorded in SP tape speed. New video can be dubbed by connecting an external video source to the VIDEO IN jack.
Recording from a TV (or VCR) To record on the camcorder from a TV (or VCR) with AUDIO and VIDEO OUT jacks, you will need the audio/video cable that came with your camcorder.
Recording from a TV (or VCR) Installation 1 Attach a power source (AC adapter/ charger or battery) to the camcorder. 2 Attach the white audio plug to the AUDIO OUT jack on the TV (or VCR). Note: If your TV (or VCR) has RIGHT and LEFT AUDIO OUT jacks, attach the white audio plug to the one labeled MONO. If one is not labeled MONO, you may need a Y-adapter to record sound from both channels. 3 Attach the yellow video plug to the VIDEO OUT jack on the TV (or VCR).
Viewfinder Playback and Playback Features REW Button PLAY Button PAUSE/STILL Button POWER F.FWD Button PAUSE REW STILL PLAY F.FWD AUD • DUB • VID RECORD TITLE SELECT EDIT ADV. POWER Switch and Indicator T BAT EJECT STOP/EJECT POWER PAUSE REW PLAY TITLE STILL F.FWD SELECT AUD •DUB D •VID RECOR EDIT ADV.
Viewfinder Playback and Playback Features Playback Features Stop-Action Pause Tracking During playback, you can stop the action, and view one frame of the tape. During playback, the CLOCK SELECT and SET buttons are also the tracking buttons. Tracking is used when you play a tape that was recorded on a different camcorder (or VCR). • Press PAUSE/STILL. Caution: Pause is designed for momentary interruptions and should not be used for an extended period of time.
Playback on a TV (or VCR) with AUDIO and VIDEO IN Jacks To connect your camcorder to a TV monitor (or VCR) with AUDIO IN and VIDEO IN jacks, you will need the audio/video cable supplied with the camcorder. If your TV is already connected to a VCR, you can attach the camcorder to the VCR and watch what the camcorder is recording or playing on the TV.
Playback on a TV (or VCR) (continued) Installation 1 Attach the audio/video cable’s white plug to the AUDIO IN jack on the TV (or VCR). Note: If your TV (or VCR) has stereo left and right AUDIO IN jacks, attach the plug to the one labeled MONO. If one of the jacks is not labeled MONO, you may need a Y-adapter to hear both channels. 2 Attach the audio/video cable’s yellow plug to the VIDEO IN jack on the TV (or VCR).
Playback on a TV without Audio/Video Input Jacks To connect your camcorder to a TV without audio/video input jacks, follow the steps below. You will need an optional 1CVA488 RF output adapter. Optional accessories are shown on page 49.
Playback on a TV (or VCR) (continued) Playback Operation 1. Choose 3CH/4CH using the switch on the RF output adapter. 2. Turn on the TV and tune it to the same channel you selected with the 3CH/4CH switch on the RF output adapter. 3. Place the camcorder’s CAMERA/VCR switch in VCR, and slide POWER. 4. Insert the cassette you want to play back into the camcorder. 5. Press the PLAY button on the camcorder. 6. Press the STOP/EJECT button on the camcorder when you are finished playing back the tape.
Attaching the Shoulder Strap The shoulder strap is designed to let you carry the camcorder from your shoulder, and – when ready to record – bring the camcorder to recording position in one quick movement. 1. Unhook one end of the strap from the buckle leaving the tension band in place. 3. Thread end of strap back through tension band and then through buckle. Buckle Strap Buckle Tension Band Tension Band 2. Thread the end of the strap through one of the strap attachment rings. 4.
Optional Accessories We invite you to take a look at some great ideas for sparking creativity and adding to the fun of using your GE camcorder. These accessories are designed to make the process of recording and watching your videos more enjoyable. To order accessories, contact your local dealer. If a dealer is not nearby, all accessories are available through tollfree ordering or by using the order form on pages 51-53.
Optional Accessories VDC88 Color Enhancement Light This light is an indispensible accessory for camcorder users who desire brighter, sharper pictures. It also brightens natural colors in extremely low-light situations. The light comes with a battery pack (BP1000) and battery charger (VDC085). Uses one replacement bulb (VDC090). VCC1000 Video Color Control Center The VCC1000 is two accessories in one. It allows you to adjust color intensity, tint, white balance, and sharpness of tapes being dubbed.
Optional Accessories A N T O U T 1CVA488 RF Output Adapter This adapter is used to connect your camcorder to a standard TV (one without audio/video input jacks) for playback. If your antenna cable is the flat twin-lead type attached by two screws, you will also need a 300-75 ohm transformer, such as 193983. If your TV has 300 ohm VHS screw terminals, you will need an optional 75-300 ohm transformer, such as AH011.
Optional Accessories AC088 Super Lightweight Tripod Mounting the camcorder on a tripod, such as AC088, will keep the camcorder steady and produce excellent video results. This tripod’s fluid-effect head provides smooth camera pan and tilt. The quickrelease mount makes it easy to attach or remove the camcorder. The grooved, tubular 3-section leg design folds down to 26" when not in use. Rubber feet allow for sure footing. BATT EJECT STOP/EJECT PAUSE POWER REW PLAY F.FWD AUD •DUB •VID RECORD EDIT ADV.
Accessory Order Form Order Form for Camcorder Model CG709 Description Super Lightweight Tripod 75-300 Ohm Transformer Battery Pack for VDC88 Video Color Control Center Battery Charger for VDC88 Replacement Bulb for VDC88 Light Color Enhancement Light Rechargeable Battery RF Output Adapter Soft Camcorder Case 300-75 Cable Transformer Audio/Video Cable DC Cable Shoulder Strap AC Adapter/Charger Part No. AC088 AH011 BP1000 VCC1000 VDC085 Price $ 39.95 $ 1.90 $ 29.95 $ 349.00 $ 18.
Accessory Order Form Charge your order on your VISA or MasterCard by filling in below USE YOUR CREDIT CARD ® IMPORTANT: Copy complete account number from your VISA card My card expires: IMPORTANT: Copy complete account number from your MasterCard Copy Number above your name on MasterCard s r r TM My card expires: AUTHORIZED SIGNATURE Prices are subject to change without notice. PLEASE Print or type your name and address clearly. This will be your mailing label.
Accessory Order Form To order accessories, contact your local Dealer. If a dealer is not nearby, you can also follow the directions below to order by telephone or direct-by-mail. United States and Canada Orders To place your order by phone, have your Visa or MasterCard ready and call the tollfree number listed below between 8AM and 8PM Eastern Standard Time. Use this number only to place an order for accessory items listed on this order form.
Care and Maintenance Keep dust and grit from entering the camcorder’s cassette door. Dust and grit are abrasive and will cause excessive wear to both the camcorder’s recording and playback heads and cassettes. Do not use strong or abrasive detergents when cleaning your camcorder. They may damage the camcorder. Before handling your camcorder, make sure your hands and face are free from any chemical products such as suntan lotion, as it may damage the finish.
Trouble Checks Troubles sometimes are caused by simple “faults” that you can easily correct without the help of a service technician by first checking a few basic remedies. Before you call or take your camcorder to an Authorized GE Camcorder Servicenter, look below for the type of trouble you are experiencing. Then perform the simple checks and adjustments listed for that trouble.
Trouble Checks Trouble Checks and Adjustments Viewfinder Displays are out of Focus • Try adjusting the eyepiece focus control. Details are on page 18. Poor Picture Quality During Recording • There is insufficient light. Add more light. • Place the CAMERA/VCR switch in CAMERA AUTO, or repeatedly press SHUTTER to set the shutter speed to normal (1/60 second). Details are on page 28. • Place the FOCUS AUTO/MAN switch in AUTO position to have the camcorder focus automatically. Details are on pages 26-27.
Trouble Checks Trouble Checks and Adjustments Recorded Audio Low • Subject may have been too far from the camcorder. Play, Rewind or Fast Forward Does Not Work • Make sure titler graphics are not in viewfinder. Buttons operate differently when titler is displayed. Higher Shutter Speed or White Balance Indicator Will Not Appear in Viewfinder • CAMERA/VCR switch must be in CAMERA MAN position. • Press SHUTTER for higher shutter speeds. • Press W/B for manual white balance.
Specifications General Power requirement: 12VDC Power consumption: 10.5 watts (normal) Weight: 5.28 lbs. (2.4 kg) Dimensions: 3.8"(W) x 8.3"(H) x 15.8"(D) (97 x 211 x 401 mm) Video Recorder Section Format: VHS Record/Playback System: Two video record/playback heads One flying erase head Headwheel Cylinder Diameter: 62 mm Video Signal: EIA Standard NTSC Color Camera Section Scanning: 525 Lines/60 Fields/30 Frames Image Sensor: One integral color filter CCD Imager Lens: 1:12 5.4 ~ 64.
Customer Assistance and Service You can reach Thomson at the following number: 800-283-6503 (Toll free inside U.S.A.) Our toll-free Camcorder number operates from 8 a.m. to 5 p.m., CST Monday – Friday for U.S. customers only Thomson provides a toll-free telephone number to help you with any problems you may encounter with your camcorder. Many can be diagnosed over the phone, and if necessary, a replacement unit can be shipped to you.
Limited Warranty What your warranty covers: • Any defect in materials or workmanship. For how long after your purchase: • 90 days for labor charges. • One year for parts. What we will do: During the initial 90 days • Exchange your camcorder with a new or, at our option, a refurbished unit or at your option, repair your camcorder at no cost to you. After the 90 days and within one year • Exchange your camcorder with a new or, at our option, a refurbished unit or at your option, repair your camcorder.
Limited Warranty Make sure you insure your shipment in case of damage or loss. Include with the shipment: • A copy of your dated bill of sale to verify your unit’s warranty eligibility. • A brief note describing your camcorder problem. • Your name, address and phone number. Return transportation, storage, and handling costs and insurance are your sole responsibility. We accept no liability in case of damage or loss. To receive a replacement unit after we have received your unit: 1.
Index –A– A.DUB Indicator . . . . . . . . . . . . . .36-37 Accessories, Included . . . . . . . . . . . . . .3 Accessories, Optional . . . . . . . . . .47-50 Accessory Shoe . . . . . . . . . . . . . . . . . . .8 Accessory, Order Form . . . . . . . . .51-53 Adapter/Charger, Using . . . . . . . . . .4,10 Animation Recording . . . . . . . . . . . . .33 Assistance . . . . . . . . .1,3,59,Back Cover AUD DUB Button . . . . . . . . . . . .8,36-37 AUDIO and VIDEO IN Jacks . . . . . . . . . . . . . .
Index –E– –L– EDIT ADV. Button . . . . . . . . . . .8,34-35 Elapsed Time Counter . . . . . . . . . . . . .31 Electronic Indexing . . . . . . . . . . . . . . .25 END Indicator . . . . . . . . . . . . . . . .20-21 Erase Protection . . . . . . . . . . . . . . . . .16 Eyepiece Focus Control . . . . . . . .7,8,18 Lens . . . . . . . . . . . . . . . . . . . . . . . . . . . .8 Lens Cap . . . . . . . . . . . . . . . . . . . . . . . .5 Lens Hood . . . . . . . . . . . . . . . . . . . . . . .9 Limited Warranty . .
Index Playback Speed . . . . . . . . . . . . . . . . . .16 Playback, Viewfinder . . . . . . . . . . . . .40 Plug Adapter . . . . . . . . . . . . . . . . . . . .10 POWER Switch and Indicator . . . . . . . . . . . .6,8,23,40,43 Power Zoom Buttons . . . . . . .9,26-27,29 Powering the Camcorder . . . . . . . .10-14 Problem Solving . . . . . . . . . . . . . .55-57 Product Registration .Inside Front Cover –R– REC Indicator . . . . . . . . . .7,20-21,36-37 RECORD Button . . . . . . . . . . . . . . .
Index –U– Unpacking the Camcorder . . . . . . . . . .3 –V– V.DUB Indicator . . . . . . . . . . . . . . . . .37 Variable Shutter Speeds . . . . . . . . . . .28 VID DUB Button . . . . . . . . . . . . . . .8,37 Video Cassettes . . . . . . . . . . . . . . .16-17 Video Dubbing . . . . . . . . . . . . . . . . . .37 Viewfinder . . . . . . . . . . .7,8,18,19-21,40 Viewfinder Displays . . . . . . . . . . .19-21 Viewfinder Playback . . . . . . . . . . . . . .40 Visual Searching . . . . . . . . . . . . . . . . .
Need Assistance? We want to help! U.S. Consumers: Camcorder Exchange Warranty . . . . . .800-283-6503 Customer Service . . . . . . . . . . . . . . . . .800-447-1700 Accessories . . . . . . . . . . . . . . . . . . . . .800-338-0376 Canadian Consumers: English . . . . . . . . . . . . . . . . . . . . . . . . .800-522-0338 French . . . . . . . . . . . . . . . . . . . . . . . . .800-522-0445 If your camcorder needs service, please contact your dealer or the nearest Servicenter from the yellow pages.