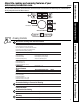
Convection/Microwave Oven GE Profile ge.com Safety Instructions . . . . . . . . . . . . .2–6 Operating Instructions Bake Features . . . . . . . . . . . . 10, 18, 20 Best Method of Cooking Chart . . . .21 Changing Power Level . . . . . . . . . . . 14 Cooking Options . . . . . . . . . . . . . . . .10 Cookware Tips . . . . . . . . . . . . . . . . . .20 Fast Bake Feature . . . . . . . . .10, 19, 20 Features of Your Oven . . . . . . . . . 8, 9 Microwave Terms . . . . . . . . . . . . . . . 14 Other Features .
Safety Instructions Operating Instructions Care and Cleaning IMPORTANT SAFETY INSTRUCTIONS. READ ALL INSTRUCTIONS BEFORE USING. WARNING! For your safety, the information in this manual must be followed to minimize the risk of fire, explosion, electric shock, exposure to excessive microwave energy, or to prevent property damage, personal injury, or loss of life.
IMPORTANT SAFETY INSTRUCTIONS. ■ Keep power cord away from heated surfaces. ■ Thermometer—Do not use regular cooking or oven thermometers when cooking by microwave or using the Fast Bake mode. The metal and mercury in these thermometers could cause arcing and possible damage to the oven. Do not use a thermometer in food you are microwaving unless the thermometer is designed or recommended for use in the microwave oven.
WARNING! FOODS ■ Do not pop popcorn in your microwave oven unless in a special microwave popcorn accessory or unless you use popcorn labeled for use in microwave ovens. Operating Instructions Safety Instructions IMPORTANT SAFETY INSTRUCTIONS. READ ALL INSTRUCTIONS BEFORE USING. ■ Do not boil eggs in a microwave oven. Pressure will build up inside egg yolk and will cause it to burst, possibly resulting in injury.
MICROWAVE-SAFE COOKWARE Do not operate the oven in the microwave mode without the turntable and the turntable support seated and in place. The turntable must be unrestricted so it can rotate. Make sure all cookware used in your microwave oven is suitable for microwaving. Most glass casseroles, cooking dishes, measuring cups, custard cups, pottery or china dinnerware which does not have metallic trim or glaze with a metallic sheen can be used. Some cookware is labeled “suitable for microwaving.
WARNING! GROUNDING INSTRUCTIONS WARNING: Improper use of the grounding plug can result in a risk of electric shock. Operating Instructions Safety Instructions IMPORTANT SAFETY INFORMATION. READ ALL INSTRUCTIONS BEFORE USING. Ensure proper ground exists before use. This appliance must be grounded. In the event of an electrical short circuit, grounding reduces the risk of electric shock by providing an escape wire for the electric current.
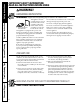
ge.com Available at extra cost from your GE supplier. Filler Panel Kits Filter Kits ■ JX40WH—White ■ JX41—Black ■ JX81D—Recirculating Charcoal Filter Kit When replacing a 36″ range hood, filler panel kits fill in the additional width to provide a custom built-in appearance. Available at extra cost from your GE supplier. See the back cover for ordering by phone or at ge.com. JX81D Operating Instructions For installation between cabinets only; not for end-of-cabinet installation.
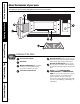
Throughout this manual, features and appearance may vary from your model. Care and Cleaning Operating Instructions Safety Instructions About the features of your oven. Features of the Oven Troubleshooting Tips Door Latch Release Handle. Door Latches. Removable Turntable. Do not operate the oven in the microwave mode without the turntable and turntable support seated and in place. Window with Metal Shield. Screen allows cooking to be viewed while keeping microwaves confined in the oven.
ge.com You can cook by Microwave, Convection Bake, Convection Roast or Combination Fast Bake. Keep hot, cooked foods at serving temperature with the Warm feature. Safety Instructions About the cooking and warming features of your microwave/convection oven.
Safety Instructions Operating Instructions Care and Cleaning Troubleshooting Tips Available cooking options. Microwave Cooking Your oven uses microwave energy to cook by a set time or weight, or automatically by sensor. Sensor microwave works by detecting the increasing humidity released during cooking. The oven automatically adjusts the cooking time to various types and amounts of food. Do not use the shelves when microwave cooking.
ge.com Using the Dial You can make selections on the oven by turning the dial and pressing it to enter the selection. Pressing the dial can also be used in place of the START/PAUSE button for quicker programming of the oven. Time Cook I Time Cook II Allows you to microwave for any time between 15 seconds and 95 minutes. Lets you change power levels automatically during cooking. Here’s how to do it: 1 2 Turn the dial to set the cook time and press the dial to enter.
Safety Instructions About the time and auto microwave features. Fast Defrost (Do not use the shelves when microwave cooking.) Fast Defrost automatically sets the defrosting times and power levels to give even defrosting results for meats, poultry and fish weighing up to one pound. Operating Instructions ■ Remove meat from package and place on microwave-safe dish. 1 2 Press the DEFROST button once. 3 Press the START/PAUSE button to start defrosting.
Time Defrost (Do not use the shelves when microwave cooking.) Use Time Defrost to defrost for a selected length of time. 3 Press the START/PAUSE button to start defrosting. 4 Turn the food over if the oven signals TURN FOOD OVER. Turn the dial to select the time you want. Press the dial to enter. You may change the defrost time at any time during defrosting by turning the dial. A dull thumping noise may be heard during defrosting. This is normal when oven is not operating at High power.
The power level may be entered or changed immediately after entering the time for Time Cook, Time Defrost or Express Cook. The power level may also be changed during time countdown. Consumer Support Troubleshooting Tips Care and Cleaning Operating Instructions Safety Instructions About changing the power level. 1 First, follow directions for Time Cook, Time Defrost or Express Cook. 2 3 Press the POWER button. 4 Press the START/PAUSE button to start cooking.
ge.com Humidity Sensor What happens when using the Sensor Features: The Sensor Features detect the increasing humidity released during cooking. The oven automatically adjusts the cooking time to various types and amounts of food. Do not use the Sensor Features twice in succession on the same food portion—it may result in severely overcooked or burnt food. If food is undercooked after the countdown, use Time Cook for additional cooking time.
Safety Instructions Auto Cook (Do not use the shelves when microwave cooking.) 1 Place covered food in the oven and close the door. Press the AUTO COOK button. ENTER FOOD TYPE appears in the display. 2 Turn the dial to the desired food type. Press to enter. See the Sensor Food Type Guide below for specific foods and instructions. NOTE: Do not use this feature twice in succession on the same food portion—it may result in severely overcooked or burnt food.
Popcorn (Do not use the shelves when microwave cooking.) To use the Popcorn feature: 1 Follow package instructions, using Time Cook if the package is less than 1.5 ounces or larger than 3.5 ounces. Place the package of popcorn in the center of the turntable. Press the POPCORN button. The oven starts immediately. If you open the door while POPCORN SENSOR is displayed, an error message will appear. Close the door, press CLEAR/OFF and begin again.
Baking or roasting uses a heating element to raise the temperature of the air inside the oven. Any oven temperature from 225°F to 450°F may be set. A fan gently circulates this heated air throughout the oven, over and around the food, producing golden brown exteriors and rich, moist interiors. This circulation of heated air is called convection.
ge.com Fast Bake offers the best features of microwave energy and convection cooking. Microwaves cook food fast and convection circulation of heated air browns foods beautifully. Any oven temperature from 225°F to 450°F may be set. For Best Results… Correct shelf position Use one shelf in the lower position and leave at least a 1-inch gap between the cooking dish and the sides of the oven. For two-level cooking only, use both shelves. Safety Instructions About the Fast Bake feature.
Convection Bake or Roast Metal Pans are recommended for all types of baked products, but especially where browning is important. Dark or dull finish metal pans are best for breads and pies because they absorb heat and produce crisper crust. Shiny aluminum pans are better for cakes, cookies or muffins because they reflect heat and help produce a light tender crust. Glass or Glass-Ceramic casserole or baking dishes are best suited for egg and cheese recipes due to the cleanability of glass.
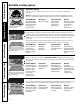
ge.com Use the following guide to select the best method of cooking. Recipes can be adapted using the guidelines below to determine the appropriate cooking mode.
The WARM feature will keep hot, cooked foods at serving temperature. Always start with hot food. Use cookware and utensils that can withstand temperatures up to 230°F. For Best Results… Correct shelf position Always use the shelf in its “low” position when warming. The shelf is required for good air circulation and even warming. See the Cookware Tips section for information on suggested cookware. Operating Instructions Safety Instructions About the warming feature.
ge.com Help The HELP button displays feature information and helpful hints. Press HELP, then turn the dial to select a feature and press the dial to enter. To remind you that you have food in the oven, the oven will display YOUR FOOD IS READY and beep once a minute until you either open the oven door or press the CLEAR/OFF button. Resume 1 2 RESUME COOKING will be displayed and the oven will restart immediately at 10% of the original time. 4 Turn the dial to select AM or PM.
Auto Nite Light The Auto Nite Light can be set to come on and go off at desired times. 1 Consumer Support Troubleshooting Tips Care and Cleaning Operating Instructions Safety Instructions About the other features. 24 Press the OPTIONS button and turn the dial to select AUTO NITE LIGHT. Press the dial to enter. 2 Turn the dial to select SET TIMES. Press the dial to enter. 3 Enter the time of day for the light to come on by turning the dial to select the hour, minutes and AM or PM.
Measures More Time Message Measurements can be set to display in Default (English) or metric. After cooking is complete, a message can be displayed giving you the option to cook the food longer at the same settings. See the Resume section. 1 2 Press the OPTIONS button and turn the dial to select MEASURES. Press the dial to enter. Turn the dial to select DEFAULT or METRIC and press to enter. Press the OPTIONS button and turn the dial to select MORE TIME MESSAGE. Press the dial to enter.
Helpful Hints An occasional thorough wiping with a solution of baking soda and water keeps the inside fresh. Be sure the power is off before cleaning any part of this oven. Operating Instructions Safety Instructions Care and cleaning of the oven. How to Clean the Inside Walls, Floor, Inside Window, Metal and Plastic Parts on the Door Some spatters can be removed with a paper towel; others may require a damp cloth. Remove greasy spatters with a sudsy cloth, then rinse with a damp cloth.
CleanSteel Use a clean, soft, light and lightly dampened cloth, then dry thoroughly. Do not use appliance wax, polish, bleach or products containing any chemical agent on the CleanSteel surfaces. Plastic Color Panels Safety Instructions ge.com Use a clean, soft, lightly dampened cloth, then dry thoroughly. It’s important to keep the area clean where the door seals against the microwave. Use only mild, non-abrasive detergents applied with a clean sponge or soft cloth. Rinse well.
Charcoal filter (on some models). Vent Fan The vent fan has two metal reusable vent filters. Models that recirculate air back into the room also use a charcoal filter. Operating Instructions Safety Instructions About the exhaust feature. Reusable vent filters (on all models). Reusable Vent Filters The metal filters trap grease released by foods on the cooktop. They also prevent flames from foods on the cooktop from damaging the inside of the oven.
Charcoal Filter The charcoal filter cannot be cleaned. It must be replaced. Order Part No. WB02X10943 from your GE supplier. If the model is not vented to the outside, the air will be recirculated through a disposable charcoal filter that helps remove smoke and odors. The charcoal filter should be replaced when it is noticeably dirty or discolored (usually after 6 to 12 months, depending on usage). See “Optional Kits,” page 7, for more information.
Safety Instructions Troubleshooting Tips Save time and money! Review the charts on the following pages first and you may not need to call for service. Problem Possible Causes What To Do Oven will not start A fuse in your home may be blown or the circuit breaker tripped. • Replace fuse or reset circuit breaker. Power surge. • Unplug the microwave oven, then plug it back in. Plug not fully inserted into wall outlet. • Make sure the 3-prong plug on the oven is fully inserted into wall outlet.
Possible Causes What To Do Food browns on top much faster than on the bottom Rack has been placed in the “high” position. • Always use the rack in its “low” position. Oven temperature fluctuates during cooking The cooking element cycles on and off to maintain the oven temperature at the desired setting. • This is normal. Vent fan comes on automatically The vent fan automatically turns •This is normal. on to protect the microwave if it senses too much heat rising from the cooktop below.
Things That Are Normal With Your Microwave Oven ■ Moisture on the oven door and walls while cooking. Wipe the moisture off with a paper towel or soft cloth. ■ Moisture between the oven door panels when cooking certain foods. Moisture should dissipate shortly after cooking is finished. Operating Instructions Safety Instructions Before you call for service… ■ Steam or vapor escaping from around the door. ■ Light reflection around door or outer case.
GE Service Protection Plus™ GE, a name recognized worldwide for quality and dependability, offers you Service Protection Plus ™—comprehensive protection on all your appliances— No Matter What Brand! Benefits Include: • Backed by GE • All brands covered • Unlimited service calls • All parts and labor costs included • No out-of-pocket expenses • No hidden deductibles • One 800 number to call We’ll Cover Any Appliance. Anywhere. Anytime.
Consumer Product Ownership Registration Dear Customer: Thank you for purchasing our product and thank you for placing your confidence in us. We are proud to have you as a customer! Follow these three steps to protect your new appliance investment: 1 2 3 Complete and mail your Consumer Product Ownership Registration today. Have the peace of mind of knowing we can contact you in the unlikely event of a safety modification. After mailing the registration below, store this document in a safe place.
All warranty service provided by our Factory Service Centers, or an authorized Customer Care® technician. To schedule service, on-line, 24 hours a day, visit us at ge.com, or call 800.GE.CARES (800.432.2737). Please have serial and model numbers available when calling for service. Staple your receipt here. Proof of the original purchase date is needed to obtain service under the warranty.
Consumer Support. GE Appliances Website ge.com Have a question or need assistance with your appliance? Try the GE Appliances Website 24 hours a day, any day of the year! For greater convenience and faster service, you can now download Owner’s Manuals, order parts, catalogs, or even schedule service on-line. You can also “Ask Our Team of Experts™” your questions, and so much more... Schedule Service ge.com Expert GE repair service is only one step away from your door.
GE Profile Horno de Convección/Microondas ge.com Instrucciones de seguridad . . 2–6 Instrucciones de Funcionamiento Cambio de nivel de potencia . . . 15 Consejos de utensilios de cocina . . . . . . . . . . . . . . . . . .23 Función de “Calentar” . . . . .11, 25 Función de horneado y asado par convección . . . . . . . .10, 20, 21 Función de horneado rápido . . . . . . . . . . . . . . .11, 22, 23 Funciones de sensor . . . . . . . 17–20 Funciones de su horno . . . . . .
Instrucciones de seguridad Instrucciones de funcionamiento INSTRUCCIONES IMPORTANTES DE SEGURIDAD. LEA PRIMERO TODA LAS INSTRUCCIONES. ¡PRECAUCIÓN! Por su seguridad, la información contenida en este manual debe seguirse para minimizar el riesgo de incendio, explosión, descarga eléctrica, exposición a energía microondas o para evitar daños a la propiedad, lesiones personales o pérdida de vida. PRECAUCIONES PARA EVITAR POSIBLE EXPOSICIÓN A UNA EXCESIVA ENERGÍA DE MICROONDAS .
INSTRUCCIONES IMPORTANTES DE SEGURIDAD. ■ Al utilizar las funciones de Horneado (Bake), Asado (Roast) u Horneado rápido (Fast Bake), tanto el exterior como el interior del horno microondas estarán a altas temperaturas. Utilice siempre manoplas de cocina para sacar los recipientes de comida y los accesorios, como por ejemplo el estante del horno. ■ No use estropajos o fregados metálicos para limpiar. Podrían caer partes del estropajo y tocar elementos eléctricos que pudieran causar una descarga eléctrica.
¡PRECAUCIÓN! COMIDAS ■ No haga rosetas o palomitas de maíz en el microondas a no ser que esté usando un accesorio especial para prepararlas o que esté empleando rosetas o palomitas de maíz que indiquen ser válidas para el uso de hornos microondas. ■ No hierva huevos dentro de un horno microondas. Se generará presión dentro de la yema del huevo que causará que explote pudiendo, posiblemente, dañar a alguien. Instrucciones de funcionamiento Instrucciones de seguridad INSTRUCCIONES IMPORTANTES DE SEGURIDAD.
UTENSILIOS DE COCINA PARA MICROONDAS No ponga en marcha el horno en el modo microondas sin que el dispositivo giratorio y el soporte del dispositivo estén encajados en su lugar. El dispositivo giratorio debe estar suelto para que pueda girar. Asegúrese de que todos los utensilios de cocina que use en su horno sean aptos para microondas.
Instrucciones de seguridad INFORMACIÓN IMPORTANTE DE SEGURIDAD. LEA PRIMERO TODA LAS INSTRUCCIONES. ¡ADVERTENCIA! INSTRUCCIONES DE TOMA DE TIERRA ADVERTENCIA: El uso indebido del enchufe de tierra puede resultar en riesgo de descarga Instrucciones de funcionamiento eléctrica. Asegúrese de que existe una conexión apropiada a tierra antes del uso. Este electrodoméstico debe estar conectado a tierra.
ge.com Disponibles en su distribuidor GE por un costo adicional. Kits de panel de relleno Kits de filtros ■ JX40WH—Blanco ■ JX41—Negro ■ JX81D—Kit de filtro de carbón vegetal de Al cambiar la tapa de una cocina encimera de 36″ los kits de paneles de relleno ocupan el espacio adicional proveyendo un aspecto de montaje a medida. JX81D Los kits de filtros están disponibles a un costo adicional en su abastecedor GE. Para pedir, llame a GE o JX40, JX41 visite nuestro sitio Web, ge.
Su modelo puede tener otras características y apariencia que las ilustradas en este manual. Instrucciones de cuidado y limpieza Instrucciones de funcionamiento Instrucciones de seguridad Las funciones de su horno. Funciones del horno Mango de apertura del enganche de la puerta. Consejos para la solución de problemas Enganches de puerta. Ventana con escudo metálico. La ventana permite ver como se cocinan los alimentos y evita que salgan microondas del horno. Panel de control y dial selector.
Es posible cocinar en modo Microondas, Horneado por convección, Asado por convección u Horneado rápido combinado. Gracias a la función “Calentar” puede mantener calientes los alimentos ya horneados y servirlos a una temperatura apropiada. Instrucciones de seguridad Acerca de las funciones de cocción y calentamiento de su horno microondas/por convección. ge.
Instrucciones de seguridad Opciones de cocción disponibles. Cocción por microondas Su horno usa energía de microondas para cocinar según un período de tiempo predeterminado, según el peso o de forma automática por medio de un sensor. El microondas por sensor funciona detectando el incremento de humedad liberada durante la cocción. El horno ajusta de forma automática el tiempo de cocción a varios tipos y cantidades de alimentos.
ge.com Combination Fast Baking (Horneado rápido combinado) Su horno también tiene la opción de cocción rápida (Fast Baking), usando la energía microondas junto a la cocción por convección. De esta forma cocina con velocidad y precisión, proporcionando al mismo tiempo alimentos dorados y crujientes. Método de cocción Energía microondas y aire caliente en circulación. Conducción del calor La comida se calienta por energía instantánea por penetración y calor proveniente del exterior de los alimentos.
Instrucciones de seguridad Funciones de microondas por tiempo y automático. Cómo usar el dial Podrá hacer selecciones en el horno girando el dial y presionando para ingresar la selección. Usted también puede presionar el dial en vez de botón START/PAUSE para una programación más rápida del horno.
Descongelación rápida (no utilizar los estantes cuando cocina por microondas) Fast Defrost ajusta de forma automática los tiempos de descongelación y los niveles de potencia para producir resultados de descongelación parejos para carnes, aves y pescado que pesen hasta una libra. el botón DEFROST 1 Presione (descongelar) tres veces. el dial hasta alcanzar el peso de la 2 Gire comida usando la Tabla de Conversión a la derecha. Por ejemplo, ponga el dial a .
Instrucciones de seguridad Funciones de microondas por tiempo y automático. Descongelación por tiempo (no utilizar los estantes cuando cocina por microondas) Use Time Defrost para descongelar por un período de tiempo seleccionado. el botón DEFROST 1 Presione (descongelar) una vez. Instrucciones de funcionamiento el dial para seleccionar el tiempo 2 Gire que desee. Presione el dial para seleccionar. el botón START/PAUSE para 3 Presione empezar a descongelar.
El nivel de potencia puede introducirse o cambiarse de forma inmediata tras introducir el tiempo de cocción (Time Cook), el tiempo de descongelación (Time Defrost), o Express Cook. El nivel de potencia también puede cambiarse durante la cuenta atrás. siga las instrucciones para 1 Primero, el tiempo de cocción (Time Cook), 2 Presione el botón POWER. el dial, en el sentido de las agujas 3 Gire del reloj, para aumentar y en el sentido contrario para disminuir la potencia. Presione el dial para seleccionar.
Instrucciones de seguridad Terminología de microondas. Término Definición Arco eléctrico El arco eléctrico es lo que, en la terminología de los microondas, describe las chispas en el horno. El arco eléctrico se produce cuando: ■ el estante de metal se ha instalado de forma incorrecta y está tocando las paredes del microondas. ■ hay un metal o papel de aluminio tocando el lateral del horno. ■ hay algún metal, como cintas de cierre con metal, pinchos de pollo, o platos con decoración de oro.
ge.com Sensor de humedad ■ Use siempre recipientes aptos para microondas y cúbralos con tapas o film de plástico agujereado. No use nunca recipientes cerrados por completo—pueden hacer que el vapor no salga y causar que la comida se cocine demasiado. Cubierto Consejos para la solución de problemas ■ Asegúrese que tanto el exterior de los recipientes como el interior del horno microondas estén secos antes de poner la comida en el horno.
Instrucciones de seguridad Características de microondas por sensor. Auto Cook (cocinar automáticamente) (no utilizar los estantes cuando cocina por microondas) Dado que la mayoría de los recipientes deben estar cubiertos durante Auto Cook, esta función trabaja mejor con comidas que quiera hacer al vapor o en las que quiera mantener la humedad. NOTA: No se recomienda el uso del estante de metal con Auto Cook.
Tabla de tipos de comidas con sensor Tamaños de las raciones Piezas de pollo 1a4 2a8 piezas Use un plato ovalado, cuadrado o redondo. Cubra con envoltura plástica ventilada. Pescado 1a4 4 a 16 oz. Use un plato ovalado, cuadrado o redondo. Cúbralo con un film plástico agujereado. — 8 a 32 oz. Use plato de guisos redondo. Reparta la carne en el plato. Cúbralo con un papel de cera o un film plástico agujereado. Papas 1a4 8 a 32 oz. Rompa la piel con un tenedor.
Reheat (recalentar) REHEAT NOTA: No utilice esta función dos veces consecutivas en la misma porción de comida. Puede resultar en que los alimentos se cocinen en exceso o se quemen. Instrucciones de funcionamiento Instrucciones de seguridad Características de microondas por sensor. (no utilizar los estantes cuando cocina por microondas) La función de recalentar (Reheat) vuelve a calentar raciones de comidas previamente cocinadas o un plato de sobras.
Horneado o asado con precalentamiento 1 2 5 Cierre la puerta del horno. Gire el dial para ajustar el tiempo de cocción y presione START/PAUSE para empezar a cocinar. Cuando se acabe de cocinar, el horno dará una señal y se apagará. NOTA: Podrá cambiar el tiempo de cocción en cualquier momento durante la cocción girando el dial. Podrá cambiar la temperatura del horno en cualquier momento durante la cocción presionando el botón POWER.
Instrucciones de seguridad Función de horneado rápido. Fast Bake (horneado rápido) le ofrece las mejores funciones de la energía de microondas con la cocina por convección. Las microondas cocinan la comida de forma rápida y la circulación de convección del aire caliente dora los alimentos de forma maravillosa. Puede programarse cualquier temperatura entre los 225°F y los 450°F. Posición correcta del estante. Para conseguir mejores resultados...
ge.com Horneado o asado por convección Se recomienda el uso de bandejas metálicas para todo tipo de productos horneados, pero especialmente cuando es importante que estén dorados. Las bandejas con acabados oscuros o mates son mejores para panes y pasteles rellenos ya que absorben calor y producen un exterior más crujiente. Instrucciones de seguridad Consejos de utensilios de cocina.
Use la tabla siguiente para seleccionar el mejor método para cocinar. Las recetas pueden ser adaptadas usando la tabla a continuación para determinar el modo de cocción apropiado.
ge.com La función CALENTAR mantendrá calientes las comidas ya horneadas, a una temperatura óptima para servirlas. Comience siempre por comida caliente. Utilice recipientes y utensilios de cocina que puedan resistir temperaturas de hasta 230ºF. Para obtener mejores resultados... Posición correcta del estante Utilice siempre el estante en su posición "baja" al calentar. El estante es necesario para una buena circulación del aire e incluso para calentar de forma pareja.
Help (ayuda) El botón HELP le muestra información de características y consejos prácticos. Presione HELP, gire el dial para seleccionar una función y presione el dial para seleccionar. Instrucciones de funcionamiento Instrucciones de seguridad Las otras funciones. Señal de final de cocción Para recordarle que tiene comida en el horno, aparecerá el mensaje YOUR FOOD IS READY (Su comida está lista) y sonará un pitido cada minuto hasta que abra la puerta del horno o presione el botón CLEAR/OFF.
Clear/Off (borrar/apagado) CLEAR / OFF Presione el botón CLEAR/OFF para parar y cancelar la cocción en cualquier momento. Instrucciones de seguridad ge.com Bloqueo para niños CLEAR / OFF Para bloquear y desbloquear los controles, apriete y mantenga el botón CLEAR/OFF durante un período de tres segundos. Con el panel de control bloqueado aparecerá brevemente el mensaje CONTROL LOCKED cada vez que se apriete un botón o el dial.
Selección de Conversión Auto Recipe™ Idioma de pantalla Cuando esta función se activa, convertirá automáticamente las temperaturas de horneado regulares a temperaturas de horneado por convección. Consulte la sección Conversión Auto Recipe™ en la seccion “Acerca de las functiones de Horneado y Asado“. Presione el botón OPTIONS y gire el dial para seleccionar OFFSET. Presione el dial para seleccionar. Gire el dial para seleccionar CONVECTION BAKE TEMP OFFSET-ON/OFF (Compensación de temp.
Luz de superficie Presione SURFACE LIGHT una vez para una iluminación fuerte, dos veces para la luz nocturna o una tercera vez para apagarla. Instrucciones de seguridad ge.com Temporizador 1 Presione el botón TIMER. el dial para configurar los minutos. 2 Gire Presione el dial para seleccionar. Para cancelar, presione el botón TIMER. Cuando se acabe el tiempo, el horno dará una señal. Para apagar la señal del temporizador, presione TIMER.
Instrucciones de seguridad Cuidado y limpieza del horno. Consejos prácticos Para mantener el interior fresco pásele un paño con una solución de agua y bicarbonato sódico de cuando en cuando. Asegúrese de que esté apagado (en off) antes de limpiar cualquier parte de este horno. Instrucciones de funcionamiento Cómo limpiar el interior Paredes, suelo, ventana interior y piezas de plástico de la puerta Algunas salpicaduras pueden limpiarse con un papel toalla, otras pueden necesitar un paño húmedo.
Cómo limpiar el exterior (cont.) CleanSteel Utilice un paño suave, ligero y ligeramente humedecido y a continuación seque bien. No utilice cera, pulimento, lejía ni productos que contengan agentes químicos en las superficies CleanSteel. Instrucciones de seguridad ge.com Paneles plásticos de color Utilice un paño suave, limpio y ligeramente humedecido y, a continuación, seque bien toda la zona. Es importante mantener el área donde la puerta se sella con el horno de microondas limpia.
Instrucciones de seguridad Filtro de carbón vegetal (en algunos modelos) Ventilador extractor El ventilador extractor tiene dos filtros de metal reutilizables. Los modelos que hacen recircular el aire de nuevo a la habitación usan un filtro de carbón vegetal Filtros de extractor reutilizables (en todos los modelos). Filtros de extractor reutilizables Los filtros metálicos atrapan la grasa liberada por la comida en la cocina encimera.
Filtros de carbón vegetal El filtro de carbón vegetal no puede limpiarse. Debe cambiarse por otro. Pida el recambio No. WB02X10943 de su suministrador GE. Si el modelo no realiza la extracción al exterior, el aire recirculará a través de un filtro de carbón vegetal no reutilizable que ayuda a quitar olores y humos. El filtro de carbón vegetal debería cambiarse cuando está visiblemente sucio o descolorido (normalmente trás 6 o 12 meses, según el uso).
Instrucciones de seguridad Resolución de Problemas ¡Ahorre tiempo y dinero! Revise las tablas en las páginas siguientes y tal vez no necesite llamar al servicio de reparación. Problema Posibles causas Qué hacer El horno no se pone en marcha Puede que se haya fundido un fusible de su casa o que haya saltado el diferencial. • Cambie el fusible o reconecte el diferencial. Apagón de corriente. • Desenchufe el horno microondas de la corriente y vuélvalo a enchufar.
Qué hacer El horno desprende un olor a humo y sale humo gris después de usar la función de horneado Se están quemando aceites •Esto es normal. en la cavidad de acero inoxidable después de usar la función de Horneado las primeras veces. La comida se dora mucho más rápido en la parte de arriba que en la parte de abajo La parrilla se fijó en la posición alta. •Siempre use la parrilla en la posición baja.
Cosas normales de su horno microondas ■ Humedad en la puerta y paredes del horno al cocinar. Frote la humedad con una toallita de papel o un paño suave. ■ Humedad entre los paneles de las puertas del horno al cocinar determinados alimentos. La humedad se disipará poco después de terminar de cocinar. ■ El vapor se escapa por la puerta.
Instrucciones de funcionamiento Instrucciones de cuidado y limpieza Consejos para la solución de problemas Ayuda al cliente 37 Instrucciones de seguridad ge.com Notas.
Ayuda al cliente Consejos para la solución de problemas Instrucciones de cuidado y limpieza Instrucciones de funcionamiento Instrucciones de seguridad Notas.
Todos los servicios de garantía los proporcionan nuestros Centros de Reparación de Fábrica o nuestros técnicos Customer Care ® autorizados. Pare concertar una cita de reparación, en línea, 24 horas al día, visite ge.com, o llame al 800.GE.CARES (800.432.2737). Cuando llame para solicitar servicio, por favor tenga a mano el número de serie y el número de modelo. Grape aquí su recibo. Se requiere facilitar prueba de la fecha de compra original para obtener un servicio bajo la garantía.
Ayuda al cliente. Página Web de GE Appliances ge.com ¿Tiene alguna pregunta sobre su electrodoméstico? ¡Pruebe la página Web de GE Appliances 24 horas al día, cualquier día del año! Para mayor conveniencia y servicio más rápido, ya puede descargar los Manuales de los Propietarios, pedir piezas o incluso hacer una cita en línea para que vengan a realizar una reparación.