Refrigerators Top-Freezer Safety Instructions . . . . . . . . . . .2-3 Operating Instructions Temperature Controls . . . . . . . . . . . . . .4 Shelves . . . . . . . . . . . . . . . . . . . . . . . . . . . .4 Storage Drawers . . . . . . . . . . . . . . . . 4, 5 Automatic Ice Maker . . . . . . . . . . . . . . .5 AutoFill Pitcher . . . . . . . . . . . . . . . . . . . . .6 Care and Cleaning . . . . . . . . . . . . . . . . .7 Installation Instructions Preparing to Install the Refrigerator . . . . . . . . .
IMPORTANT SAFETY INFORMATION. READ ALL INSTRUCTIONS BEFORE USING. SAFETY IMPORTANT SAFETY INFORMATION READ ALL INSTRUCTIONS BEFORE USING GE Appliances website For more information on your refrigerator’s operation, visit www.GEAppliances.com or call 800.GECARES (800.432.2737). In Canada visit GEAppliances.ca or call 800.561.3344. REFRIGERATOR SAFETY INFORMATION This is the safety alert symbol. This symbol alerts you to potential hazards that can kill or hurt you and others.
IMPORTANT SAFETY INFORMATION. READ ALL INSTRUCTIONS BEFORE USING. SAFETY GEAppliances.com (CONT.) INSTALLATION WARNING Explosion Hazard. .HHS ÀDPPDEOH PDWHULDOV DQG YDSRUV VXFK DV JDVROLQH DZD\ IURP UHIULJHUDWRU )DLOXUH WR GR VR FDQ UHVXOW LQ ¿UH H[SORVLRQ RU GHDWK CONNECTING ELECTRICITY WARNING Electrical Shock Hazard.
About the temperature control. The temperature control adjusts the refrigerator from its warmest to coldest settings. Your refrigerator will come with the recommended factory setting on “Colder”. For colder temperature, turn the knob clockwise to setting “Coldest”. For warmer temperature, turn the dial counter-clockwise to setting “Cold”. To turn off the cooling in both compartments, turn the knob counter-clockwise to setting “Off”. Note that this does not shut off power to the refrigerator.
About storage drawer and cover removal. GEAppliances.com Not all features are on all models. Humidity Controlled Drawer (on some models) Slide the control all the way to the HIGH setting to provide high humidity recommended for most vegetables. Slide the control all the way to the LOW setting to provide lower humidity levels recommended for most fruits. Drawer Removal Drawers can be removed easily by grasping the sides and lifting up slightly while pulling drawers past the stop location.
About the AutoFill pitcher (on some models). WARNING To reduce the risk associated with choking, do not allow children less than 3 years of age to have access to small parts during the installation of this product. 7KH $XWR)LOO SLWFKHU LV GHVLJQHG IRU KDQGV IUHH UH¿OOLQJ RI WKH pitcher for a constant supply of fresh water. The refrigerator shelf must be at the second position to use the AutoFill pitcher. 1. Place the lid onto the pitcher so it fits securely.
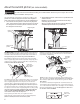
Care and cleaning of the refrigerator. Cleaning the Outside Moving the Refrigerator The door handles and trim (on some models). Clean with a cloth dampened with soapy water. Dry with a soft cloth. Be careful when moving the refrigerator away from WKH ZDOO $OO W\SHV RI ÀRRU FRYHULQJV FDQ EH GDPDJHG particularly cushioned coverings and those with embossed surfaces. Turn the leveling legs at each front corner of the refrigerator counterclockwise until the rollers support the refrigerator.
Installation Instructions Models 15, 16, 18 If you have questions, call 1.800.GE.CARES or visit our Website at: GEAppliances.com In Canada, call 1.800.561.3344 or Visit our Website at: www.geappliances.ca BEFORE YOU BEGIN CLEARANCES Read these instructions completely and carefully. Allow the following clearances for ease of installation, proper air circulation and plumbing and electrical connections. • IMPORTANT – Save these instructions for local inspector’s use.
Installation Instructions 1 INSTALLING THE WATER LINE (ON SOME MODELS) WHAT YOU WILL NEED (CONT.) BEFORE YOU BEGIN SmartConnect™ Refrigerator Tubing Kits are available in the following lengths: 8’ (2.4 m) – WX08X10006 15’ (4.6 m) – WX08X10015 25’ (7.6) m) – WX08X10025 Be sure that the kit you select allows at least 6’ (1.8 m) as described above. Recommended copper water supply kits are WX8X2, WX8X3 or WX8X4, depending on the amount of tubing you need.
Installation Instructions 1 INSTALLING THE WATER LINE (CONT.) ,QVWDOO WKH VKXWRȺ YDOYH RQ WKH QHDUHVW IUHTXHQWO\ XVHG GULQNLQJ ZDWHU OLQH 5 ROUTE THE TUBING 1 SHUT OFF THE MAIN WATER SUPPLY AND UNPLUG REFRIGERATOR Route the tubing between the cold water line and the refrigerator. Route the tubing through a hole drilled in the wall or ÀRRU EHKLQG WKH UHIULJHUDWRU RU DGMDFHQW EDVH FDELQHW as close to the wall as possible. NOTE: %H VXUH WKHUH LV VXȻFLHQW H[WUD WXELQJ DERXW feet [1.
Installation Instructions 1 INSTALLING THE WATER LINE (CONT.) 8 CONNECT THE TUBING TO THE 9 TURN THE WATER REFRIGERATOR ON AT THE SHUTOFF VALVE NOTES: • Before making the connection to the refrigerator, be sure the refrigerator power cord is not plugged into the wall outlet. :H UHFRPPHQG LQVWDOOLQJ D ZDWHU ¿OWHU *;5/4 DYDLODEOH RQ JHZDWHU¿OWHUV FRP RU LI \RXU ZDWHU supply has sand or particles that could clog the screen of the refrigerator’s water valve.
Installation Instructions 2 INSTALLING THE DOOR HANDLE 1 INSTALL FASTENER 2A PLASTIC HANDLE Install the handle fastener into the hole on the freezer and fresh food doors. The fasteners correspond with the handle side (the side opposite the hinge). 1. Attach handle to freezer door by sliding handle up onto fastener and with screws at the bottom of the handle. 2. Attach handle to fresh food door by sliding handle down onto fastener and with screws at top of handle.
Installation Instructions 3 REVERSING THE DOOR SWING 2 REMOVE THE FREEZER DOOR IMPORTANT NOTES 2.1 Tape the door shut with masking tape. When reversing the door swing: • Read the instructions all the way through before starting. • Handle parts carefully to avoid scratching paint. • Set screws down by their related parts to avoid losing them. • Provide a non-scratching work surface for the doors. IMPORTANT: Once you begin, do not move the cabinet until door-swing reversal is completed.
Installation Instructions 3 REVERSING THE DOOR SWING (CONT.) 4 REVERSING THE HARDWARE 3 REMOVE THE FRESH FOOD DOOR 3.1 Tape the door shut with masking tape. 4.1 Interchange the hinge and screws at top right with screws at top left of cabinet. Do not tighten screws on hinge side. NOTE: Some hinges have 4 holes. Which holes you use for installing depends on which side you install the hinge. The outer edge of the hinge should be parallel to the edge of the case for correct installation. 3.
Installation Instructions 5 REVERSING THE DOOR HANDLES 5 REVERSING THE DOOR HANDLES (CONT.) STAINLESS STEEL HANDLE PLASTIC HANDLE ASSEMBLY 5.1a. Remove handle screws from the top of fresh food door. Remove handle screws from the bottom of freezer door. 5.2a. Loosen set screw on handle with the provided 1/8” wrench. 5.3a. Remove door handle. 5.4a. Change places between the handle fastener and plug button on door front. 5.5a.
Installation Instructions 3 REVERSING THE DOOR SWING (CONT.) 6 RE-HANGING THE DOORS 6.1 Re-hang the fresh food door 6 RE-HANGING THE DOORS (CONT.) 6.2 Re-hang the freezer door 6.1.1 Lower the fresh food door onto the bottom hinge pin. Be sure the washer is in place on the pin. 6.2.1 Lower the freezer door onto the center hinge pin. Be sure the washer is in place on the pin. Plastic Washer Plastic Washer Hinge Pin Hinge Pin 6.1.2 Tilt the door towards the cabinet.
Normal operating sounds. GEAppliances.com 1HZHU UHIULJHUDWRUV VRXQG GLȺHUHQW IURP ROGHU UHIULJHUDWRUV 0RGHUQ UHIULJHUDWRUV KDYH PRUH IHDWXUHV DQG XVH newer technology. Do you hear what I hear? These sounds are normal. 7KH QHZ KLJK HȻFLHQF\ HUMMM... WHOOSH... You may hear the fans spinning at high compressor may run faster and longer than your old refrigerator and you may hear a high-pitched hum or pulsating sound while it is operating. speeds.
Service (Continued). Before you call for service, review the detailed troubleshooting tips in the Owner’s manual. If needed, service can be scheduled by visiting us online GEAppliances.com or calling 800.GECARES 800.432.2737. In Canada visit GEAppliances.ca or call 800.561.3344. Truth or Myth Truth or Myth? Answer Explanation Refrigerator door handles can be easily tightened. TRUE If door handles are loose or have a gap, the handle can be adjusted with set screws located on the ends of the handles.
Refrigerator Warranty. For US Customers, all warranty service provided by our Factory Service Staple your receipt here. Proof Centers, or an authorized Customer Care® technician. To schedule of the original purchase date is service, on-line, 24 hours a day, visit us at GEAppliances.com, or call needed to obtain service under 800.GE.CARES (800.432.2737). Please have serial number and model the warranty. number available when calling for service. In Canada, call 800.561.3344.
Consumer Support. GE Appliances Website In the U.S.: GEAppliances.com Have a question or need assistance with your appliance? Try the GE Appliances website, 24 hours a day, any day of the year! For greater convenience and faster service, you can now download Owner’s Manuals, order parts or even schedule service on-line. In Canada: www.GEAppliances.ca Schedule Service In the U.S.: GEAppliances.com Expert GE Appliances repair service is only one step away from your door.
Mesures de sécurité . . . . . . . . . . . . . . . . . . . . 2-3 Instructions de fonctionnement Bouton de commande de la température . . . . . .4 Clayettes . . . . . . . . . . . . . . . . . . . . . . . . . . . . . . . . . . . . .4 Bacs de rangement . . . . . . . . . . . . . . . . . . . . . . . . . 4,5 Machine à glaçons automatique . . . . . . . . . . . . . . .5 Pichet à remplissage automatique . . . . . . . . . . . . .6 Entretien et nettoyage. . . . . . . . . . . . . . . . . . . . . . . . .
INSTRUCTIONS IMPORTANTES DE SÉCURITÉ. LISEZ TOUTES LES INSTRUCTIONS AVANT D’UTILISER VOTRE RÉFRIGÉRATEUR. SÉCURITÉ IMPORTANTES CONSIGNES DE SÉCURITÉ VEUILLEZ LIRE TOUTES LES CONSIGNES AVANT UTILISATION Site Internet d’Électroménagers GE Pour de plus amples informations sur le fonctionnement de votre réfrigérateur, consultez le site www.electromenagersge.ca ou composez le 800.561.3344. CONSIGNES DE SÉCURITÉ POUR LE RÉFRIGÉRATEUR Ce symbole représente une alerte de sécurité.
INSTRUCTIONS IMPORTANTES DE SÉCURITÉ. LISEZ TOUTES LES INSTRUCTIONS AVANT D’UTILISER VOTRE RÉFRIGÉRATEUR. SÉCURITÉ www.electromenagersge.ca (CONT.) INSTALLATION Risque d’explosion. &RQVHUYH] OHV PDWpULDX[ HW YDSHXUV LQÀDPPDEOHV WHOV TXH O·HVVHQFH j O·pFDUW GH YRWUH UpIULJpUDWHXU Une explosion, un incendie voire la mort pourrait en résulter. AVERTISSEMENT BRANCHEMENTS ÉLECTRIQUES AVERTISSEMENT Risque de choc électrique. Branchez l’appareil dans une prise triple avec terre.
Bouton de commande de la température. La commande de température règle le réfrigérateur depuis le plus chaud jusqu’au plus froid. À la livraison, votre réfrigérateur est réglé sur « Colder » (encore plus froid), le réglage d’usine recommandé. Pour une température encore plus froide, tournez le bouton dans le sens des aiguilles jusqu’à « Coldest » (le plus froid). Pour une température moins froide, tournez le bouton dans le sens inverse des aiguilles d’une montre jusqu’à « Cold » (froid).
Enlèvement du bac de rangement et du couvercle. www.electromenagersge.ca Toutes les caractéristiques ne sont pas disponibles sur tous les modèles. Tiroir à humidité contrôlée (sur certains modèles) Faites glisser le réglage en position HIGH (élevée) pour obtenir l’humidité maximum qui est recommandée pour la plupart des légumes. Faites glisser le réglage en position LOW (basse) pour obtenir l’humidité minimum qui est recommandée pour la plupart des fruits.
Pichet à remplissage automatique. AVERTISSEMENT 3RXU UpGXLUH OH ULVTXH GH VXȺRFDWLRQ LQWHUGLVH] DX[ HQIDQWV GH PRLQV GH DQV O·DFFqV DX[ SHWLWHV SLqFHV pendant l’installation de ce produit. Le pichet à remplissage automatique permet d’obtenir un approvisionnement d’eau fraîche constant sans manipulation. L’utilisation du pichet à remplissage automatique exige que la tablette du réfrigérateur se trouve à la deuxième position. 1. Placez solidement le couvercle sur le pichet.
(QWUHWLHQ HW QHWWR\DJH 1HWWR\DJH GH O·H[WpULHXU Les poignées de porte et les garnitures (sur certains modèles). Nettoyez avec un linge trempé dans de l’eau savonneuse. Séchez avec un linge doux. Conservez l’extérieur propre. Essuyez avec un linge propre légèrement humecté de cire à appareil électroménager ou de détersif liquide à vaisselle doux. Séchez et polissez avec un linge doux, propre. N’essuyez jamais votre réfrigérateur avec un torchon sale ou une serviette mouillée.
Instructions d’installation Modèles 15, 16, 18 Si vous avez des questions, appelez le 1.800.561.3344 ou visitez notre site Web à l’adresse: www.electromenagersge.ca DÉGAGEMENTS AVANT DE COMMENCER Prévoyez les dégagements suivants pour faciliter l’installation, la bonne circulation d’air et les raccordements de plomberie et d’électricité. • Côtés : 19 mm (3/4 po) • Dessus : 25 mm (1 po) • Arrière : 50 mm (2 po) Veuillez lire toutes les directives attentivement.
Instructions d’installation 1 INSTALLATION DE LA CONDUITE D’EAU (SUR CERTAINS MODÈLES) CE DONT VOUS AUREZ BESOIN (SUITE) AVANT DE COMMENCER Les trousses SmartConnect™ Refrigerator Tubing sont disponibles dans les dimensions suivantes :-2,4 m (8 pi) – WX08X10006 4,6 m (15 pi) – WX08X10015 7,6 m (25 pi) – WX08X10025 Assurez-vous que votre trousse ait au moins 1,8 m (6 pieds) comme indiqué ci-dessus.
Instructions d’installation 1 INSTALLATION DE LA CONDUITE D’EAU (SUITE) Installez le robinet d’arrêt sur la canalisation d’eau potable la plus fréquemment utilisée. 4 ACHEMINEZ LE TUYAU 1 FERMEZ L’ALIMENTATION PRINCIPALE D’EAU ET DÉBRANCHEZ LE RÉFRIGÉRATEUR Acheminez le tuyau du tuyau d’eau froide au réfrigérateur. Faites passer le tuyau par un trou percé dans le mur ou le plancher (derrière le réfrigérateur ou au niveau de l’armoire de cuisine adjacente), aussi près du mur que possible.
Instructions d’installation 8 FERMEZ L’EAU 7 BRANCHEZ LE TUYAU À VOTRE AU NIVEAU DU ROBINET D’ARRÊT RÉFRIGÉRATEUR NOTES: • Avant de brancher le tuyau à votre réfrigérateur, assurez-vous que le cordon d’alimentation électrique du réfrigérateur ne soit pas branché à la prise murale. 1RXV YRXV UHFRPPDQGRQV GH SRVHU XQ ¿OWUH j HDX *;5/4 GLVSRQLEOH VXU JHZDWHU¿OWHUV FRP RX DX 800.661.
Instructions d’installation 2 INSTALLATION DE LA POIGNÉE 2A MODÈLES AVEC POIGNÉE EN 1 POSEZ LA FIXATION DE POIGNÉE PLASTIQUE 3RVH] OD ¿[DWLRQ GH SRLJQpH GDQV OH WURX VXU OHV SRUWHV GX FRQJpODWHXU HW GX UpIULJpUDWHXU /HV ¿[DWLRQV correspondent au côté poignée (le côté opposé à la charnière). 1. Fixez la poignée sur la porte du congélateur en la JOLVVDQW YHUV OH EDV VXU OD ¿[DWLRQ SXLV j O·DLGH GH YLV dans le bas de la poignée. 2.
Instructions d’installation 3 INVERSION DE L’OUVERTURE DES PORTES 2 ENLÈVEMENT DE LA PORTE DU NOTES IMPORTANTES CONGÉLATEUR Pour inverser le sens d’ouverture des portes : • Lisez toutes les directives avant de commencer. • Manipulez les pièces avec précaution pour éviter de rayer la peinture. • Placez les vis avec leurs pièces associées pour éviter de les perdre. • Posez les portes sur un plan de travail qui ne risque pas de rayer la peinture.
Instructions d’installation 3 INVERSION DE L’OUVERTURE DES PORTES (SUITE) 4 INVERSION DE LA QUINCAILLERIE 3 ENLÈVEMENT DE LA PORTE DU RÉFRIGÉRATEUR 4.1 Intervertissez la charnière et les vis de la droite supérieure avec les vis de la gauche supérieure. Ne serrez pas les vis du côté charnière. NOTA: Certaines charnières sont dotées de 4 trous. Les trous que vous utilisez pour l’installation dépendent du côté où vous posez la charnière.
Instructions d’installation 5 INVERSION DES POIGNÉES DE PORTE (SUITE) 5 INVERSION DES POIGNÉES DE PORTE POIGNÉE EN ACIER INOXYDABLE MONTAGE DE LA POIGNÉE DE PLASTIQUE 5.1a. Enlevez les vis de la poignée dans le haut de la porte du réfrigérateur. Enlevez les vis de la poignée dans le bas de la porte du réfrigérateur. 5.2a. Desserrez la vis de pression de la poignée à l’aide de la clé 1/8 po fournie. 5.3a. Retirez la poignée de porte. 5.4a.
Instructions d’installation 3 INVERSION DE L’OUVERTURE DES PORTES (SUITE) 6 REMISE EN PLACE DES PORTES 6 REMISE EN PLACE DES PORTES 6.1 Remise en place de la porte du réfrigérateur 6.2 Remise en place de la porte du congélateur 6.1.1 Abaissez la porte du compartiment réfrigérateur sur l’axe de charnière inférieur. Assurez-vous que la rondelle est en place sur l’axe. (SUITE) 6.2.1 Placez la porte du congélateur sur l’axe de charnière centrale. Assurez-vous que la rondelle est en place sur l’axe.
Bruits normaux de fonctionnement www.electromenagersge.ca /HV UpIULJpUDWHXUV SOXV UpFHQWV IRQW GHV EUXLWV GLȺpUHQWV GH FHX[ GHV DQFLHQV /HV UpIULJpUDWHXUV PRGHUQHV SUpVHQWHQW plus de fonctions et sont plus avancés sur le plan technologique. Entendez-vous ce que j’entends? Ces bruits sont normaux. Le nouveau OUIR ! HUMMM... WOUUCH...
Service après-vente. Avant de communiquer avec le service après-vente, consultez les conseils de dépannage dans le manuel d’utilisation. Au besoin, une visite de service peut être cédulée en appelant le 800.561.3344. Vérité ou mythe 9pULWp RX P\WKH" Réponse Explication Les poignées de la porte du réfrigérateur peuvent se serrer facilement. MYTHE Lâche ou ont une poignées d’écart peuvent être serrées à l’aide des vis aux extrémités des poignées.
Garantie du réfrigérateur. www.electromenagersge.ca Pour les clients des États-Unis, toutes les réparations en vertu de Agrafez votre facture ici. la garantie sont fournis par nos Centre de Service d’Usine ou par un 3RXU EpQp¿FLHU GX VHUYLFH technicien autorisé Customer Care®. Pour prévoir une réparation, consultez de réparation sous garantie, notre site GEAppliances.com ou appelez le 800.GE.CARE5 (800.432.2737).
Soutien au consommateur. Site Web appareils électroménagers GE electromenagersge.ca Vous avez une question ou vous avez besoin d’aide pour votre appareil électroménager? Contactez-nous par Internet au site electromenagersge.ca 24 heures par jour, tous les jours de l’année. Service de réparations 1.800.561.3344 Service de réparations GE Appliances est tout près de vous. Pour faire réparer votre électroménager GE Appliances, il suffit de nous téléphoner.
Información de seguridad 2-3 Instrucciones de operación Control . . . . . . . . . . . . . . . . . . . . . . . . . . . . . . . . . . . . . . . 4 Estantes . . . . . . . . . . . . . . . . . . . . . . . . . . . . . . . . . . . . . . 4 Gavetas de almacenamiento . . . . . . . . . . . . . . . 4-5 Máquina de hielos automática . . . . . . . . . . . . . . . . 5 Jarra de Llenado Automático . . . . . . . . . . . . . . . . . . 6 Cuidado y limpieza . . . . . . . . . . . . . . . . . . . . . . . . . . .
IMPORTANTE INFORMACIÓN DE SEGURIDAD. LEA TODAS LAS INSTRUCCIONES ANTES DE SU USO. SEGURIDAD INFORMACIÓN IMPORTANTE DE SEGURIDAD LEA TODAS LAS INSTRUCCIONES ANTES DE USAR Sitio Web de Electrodomésticos de GE Para más información sobre el funcionamiento de su refrigerador, visite www. GEAppliances.com o comuníquese al 1-800-GECARES (432-2737). INFORMACIÓN DE SEGURIDAD DEL REFRIGERADOR Éste es el símbolo de alerta de seguridad.
IMPORTANTE INFORMACIÓN DE SEGURIDAD. LEA TODAS LAS INSTRUCCIONES ANTES DE SU USO. SEGURIDAD GEAppliances.com (CONT.) ADVERTENCIA Riesgo de Explosión. 0DQWHQJD FXDOTXLHU PDWHULDO \ YDSRUHV LQÀDPDEOHV WDOHV FRPR JDVROLQD DOHMDGRV GHO UHIULJHUDGRU 6L no se cumple con esto se podrá producir una explosión, incendio o la muerte. CONEXIÓN DE LA ELECTRICIDAD ADVERTENCIA Riesgo de Descarga Eléctrica. Enchufe en un tomacorriente con conexión a tierra de 3 cables. No elimine el cable de conexión a tierra.
Sobre el dial de control de la temperatura. (O FRQWURO GH WHPSHUDWXUD DMXVWD HO UHIULJHUDGRU GHVGH OD FRQ¿JXUDFLyQ PiV FDOLHQWH D la más fría. 6X UHIULJHUDGRU FXHQWD FRQ OD FRQ¿JXUDFLyQ UHFRPHQGDGD GH IiEULFD HQ ´&ROGHUµ (Frío Medio).
Sobre la remoción de la gaveta GH DOPDFHQDPLHQWR \ FXELHUWD GEAppliances.com No todas las características están presentes en todos los modelos. Cajón con Control de Humedad (en algunos modelos) Deslice el control completamente hasta la posición HIGH (alto) para ofrecer la alta humedad recomendada para la mayoría de los vegetales. Lleve el control por completo hasta la posición LOW (bajo) para ofrecer los niveles bajos de humedad recomendados para la mayoría de las frutas.
Acerca de la jarra de llenado automático. ADVERTENCIA $ ¿Q GH UHGXFLU HO ULHVJR DVRFLDGR FRQ DV¿[LD QR SHUPLWD TXH ORV QLxRV PHQRUHV GH DxRV WHQJDQ DFFHVR a las partes pequeñas durante la instalación de este producto. La jarra de llenado automático está diseñada para un uso VLQ PDQRV \ XQD UHFDUJD FRQVWDQWH GH OD MDUUD D ¿Q GH contar con un suministro de agua fresca permanente. La repisa del refrigerador debe estar en la segunda posición para usar la jarra de llenado automático. 1.
&XLGDGR \ OLPSLH]D GHO UHIULJHUDGRU Limpieza exterior /DV PDQLMDV GH OD SXHUWD \ DFFHVRULR (en algunos modelos). Limpie con un paño humedecido con agua jabonosa. Seque con un paño seco. Mantenga el exterior limpio. Límpielo con un paño ligeramente humedecido con cera de cocina para electrodomésticos o detergente líquido suave para platos. Seque y brille con un paño limpio y seco. No limpie el refrigerador con un paño sucio para platos o con una toalla mojada.
Instrucciones para la instalación Modelos 15, 16, 18 Si tiene preguntas, llame al 800.GE.CARES (800.432.2737) o bien visite nuestra página Web: GEAppliances.com ANTES DE INICIAR ÁREA /HD HVWDV LQVWUXFFLRQHV FRPSOHWD \ FXLGDGRVDPHQWH Permita el siguiente espacio para una fácil instalación, apropiada circulación del aire y conexiones de plomería y eléctricas. • Costados 3/4” (19 mm) • IMPORTANTE – Guarde estas instrucciones para uso del inspector local.
Instrucciones para la instalación 1 CÓMO INSTALAR LA TUBERÍA DEL AGUA (EN ALGUNOS MODELOS) QUÉ NECESITA (CONT.) ANTES DE INICIAR Los kits de tubería para el refrigerador SmartConnect™ están disponibles en las siguientes longitudes: 8’ (2,4 m) – WX08X10006 15’ (4,6 m) – WX08X10015 25’ (7,6 m) – WX08X10025 Asegúrese de que el kit que haya seleccionado permita al menos 6 pies (1,8 m) como se describe arriba.
1 Instrucciones para la instalación CÓMO INSTALAR LA TUBERÍA DEL AGUA (EN ALGUNOS MODELOS) Instale la válvula de cierre en la tubería del agua de consumo más frecuentemente utilizada. 5 DIRIJA LA TUBERÍA 1 CIERRE EL SUMINISTRO PRINCIPAL DE AGUA Y DESENCHUFE EL REFRIGERADOR Dirija la tubería entre la línea del agua fría y el refrigerador.
Instrucciones para la instalación 8 CONECTE LA TUBERÍA AL 9 ABRA LA LLAVE DEL REFRIGERADOR AGUA EN LA VÁLVULA DE CIERRE NOTAS: • Antes de hacer la conexión al refrigerador, asegúrese de que el cable de corriente del refrigerador no esté conectado en el tomacorriente de la pared.
Instrucciones para la instalación 2 INSTALACIÓN DE LA MANIJA DE LA PUERTA 1 INSTALE EL AJUSTE DE LA MANIJA 2A MODELOS CON MANIJA DE PLÁSTICO Instale el ajuste de la manija en el agujero del freezer y en las puertas para comidas frescas. Los ajustes coinciden con el lado de la manija (el lado opuesto a la bisagra). 1. Adhiera la manija a la puerta del freezer, deslizando OD PDQLMD VREUH HO DMXVWH \ FRQ ORV WRUQLOORV DO ¿QDO de la manija. 2.
Instrucciones para la instalación 3 CÓMO INVERTIR EL VAIVÉN DE LA PUERTA 2 RETIRE LA PUERTA DEL CONGELADOR NOTAS IMPORTANTES 2.1 Pegue la puerta cerrada con cinta de enmascarar. 2.2 Retire los tornillos que sostienen la bisagra superior del gabinete. Al invertir el vaivén de la puerta: • Lea las instrucciones completamente antes de empezar. • Maneje las partes con cuidado para evitar raspar la pintura. • $MXVWH ORV WRUQLOORV FRQ VXV SDUWHV UHODFLRQDGDV D ¿Q GH evitar su pérdida.
Instrucciones para la instalación 3 CÓMO INVERTIR EL VAIVÉN DE LA PUERTA (CONT.) 3 RETIRE LA PUERTA DE ALIMENTOS 4 CÓMO INVERTIR LOS ELEMENTOS DE FRESCOS SOPORTES 3.1 Coloque cinta de mascarar en el cierre de la puerta.. 4.1 Intercambie la bisagra y los tornillos en la parte superior derecha con tornillos en la parte superior izquierda del gabinete. No ajuste los tornillos del lado de la bisagra. NOTA: Algunas bisagra cuentan con 4 agujeros.
Instrucciones para la instalación 5 CÓMO INVERTIR LAS MANIJAS DE LAS 5 CÓMO INVERTIR LAS MANIJAS DE LAS PERTAS (CONT.) MANIJA DE ACERO INOXIDABLE ENSAMBLE DE LA MANIJA PLÁSTICA PERTAS 5.1a. Retire los tornillos de la manija de la parte superior de la puerta de comidas frescas. Retire los tornillos de la manija de la parte inferior de la puerta del freezer. 5.2a. $ÀRMH HO WRUQLOOR GH OD PDQLMD FRQ OD OODYH GH µ provista. 5.3a. Retire la manija de la puerta. 5.4a.
Instrucciones para la instalación 3 CÓMO INVERTIR EL VAIVÉN DE LA PUERTA (CONT.) 6 CÓMO VOLVER A COLGAR LAS 6 CÓMO VOLVER A COLGAR LAS 6.1 Vuelva a colgar la puerta de los alimentos frescos 6.2 Vuelva a colgar la puerta del congelador PUERTAS PUERTAS (CONT.) 6.2.1 Baje la puerta del congelador al pasador de la bisagra central. Asegúrese de que la arandela esté correctamente colocada en el perno. 6.1.1 Baje la puerta de alimentos frescos al perno de la bisagra inferior.
Sonidos De Funcionamiento Normal GEAppliances.com El sonido de los refrigeradores nuevos es diferente al de aquellos más antiguos. Los refrigeradores modernos cuentan con más funciones y utilizan una tecnología más nueva. ¿Escuchas lo que yo escucho? Estos sonidos son normales. HUMMM... WHOOSH...
Servicio Técnico. Antes de solicitar el servicio técnico, revise los consejos para la solución de problemas de forma detallada en el Manual del Propietario. En caso de ser necesario, se podrá programar el servicio técnico visitándonos a través de Internet en GEAppliances.com o llamando al 800.GE.CARES 800.432.2737. Verdad o Mito ¿Verdad o Mito? Respuesta Explicación Las manijas de la puerta del refrigerador se pueden ajustar fácilmente.
Garantía del refrigerador. GEAppliances.com Todos los servicios de garantía los proporcionan nuestros Centros de Grape aquí su recibo. Se Reparación de Fábrica o nuestros técnicos Customer Care ® autorizados. requiere facilitar prueba de Para concertar una cita de reparación, en línea, 24 horas al día, visíte nos la fecha de compra original al GEAppliances.com, o llame al 800.GE.CARES (800.432.2737).
Soporte al Consumidor. Página Web de GE Appliances GEAppliances.com ¿Tiene alguna pregunta sobre su electrodoméstico? ¡Pruebe la página Web de GE Appliances Appliances 24 horas al día, cualquier día del año! Para mayor conveniencia y servicio más rápido, ya puede descargar los Manuales de los Propietarios, pedir piezas o incluso hacer una cita en línea para que vengan a realizar una reparación. Solicite una reparación GEAppliances.