REFRIGERATORS Bottom Freezer SAFETY INFORMATION .....3 OPERATING INSTRUCTIONS Features . . . . . . . . . . . . . . . . . . . . . . . . . . 5 Controls . . . . . . . . . . . . . . . . . . . . . . . . . . 7 Dispenser* . . . . . . . . . . . . . . . . . . . . . . . . 9 Water Filter - MWF . . . . . . . . . . . . . . . 10 Water Filter - XWF . . . . . . . . . . . . . . . . 11 Shelves and Bins. . . . . . . . . . . . . . . . . . 12 Pans . . . . . . . . . . . . . . . . . . . . . . . . . . . . 13 Freezer Drawer* .
THANK YOU FOR MAKING GE APPLIANCES A PART OF YOUR HOME. Whether you grew up with GE Appliances, or this is your first, we’re happy to have you in the family. We take pride in the craftsmanship, innovation and design that goes into every GE Appliances product, and we think you will too. Among other things, registration of your appliance ensures that we can deliver important product information and warranty details when you need them. Register your GE appliance now online.
READ ALL INSTRUCTIONS BEFORE USING THE APPLIANCE WARNING To reduce the risk of fire, explosion, electric shock, or injury when using your refrigerator, follow these basic safety precautions: Ŷ 7 KLV UHIULJHUDWRU PXVW EH SURSHUO\ LQVWDOOHG DQG ORFDWHG LQ DFFRUGDQFH ZLWK WKH ,QVWDOODWLRQ ,QVWUXFWLRQV EHIRUH LW LV XVHG Ŷ 8QSOXJ WKH UHIULJHUDWRU EHIRUH PDNLQJ UHSDLUV RU cleaning. NOTE: Power to the refrigerator cannot be disconnected by any setting on the control panel.
SAFETY INFORMATION IMPORTANT SAFETY INFORMATION READ ALL INSTRUCTIONS BEFORE USING THE APPLIANCE CONNECTING ELECTRICITY WARNING ELECTRICAL SHOCK HAZARD Plug into a grounded 3-prong outlet 'R QRW UHPRYH WKH JURXQG SURQJ 'R QRW XVH DQ DGDSWHU 'R QRW XVH DQ H[WHQVLRQ FRUG )DLOXUH WR IROORZ WKHVH LQVWUXFWLRQV FDQ UHVXOW LQ GHDWK ILUH RU HOHFWULFDO VKRFN Do not, under any circumstances, cut or remove the third (ground) prong from the power cord.
French Door Models Space-saving icemaker (on some models) ,FHPDNHU DQG ELQ DUH ORFDWHG RQ WKH GRRU FUHDWLQJ more usable storage space. QuickSpace™ shelf (on some models) )XQFWLRQV DV D QRUPDO IXOO VL]HG VKHOI ZKHQ QHHGHG and easily slides back to store tall items below.
USING THE REFRIGERATOR: )HDWXUHV Features Single Door Models Floating snack pan Can be moved to different locations to best serve your needs. LED lighting /(' OLJKW LV ORFDWHG DW WKH WRS RI WKH IUHVK IRRG FRPSDUWPHQW /(' OLJKWV DUH DOVR ORFDWHG LQ WKH IUHH]HU VHH SDJHV DQG Full-width shelves )XOO ZLGWK VKHOYHV WKDW FDQ DFFRPPRGDWH ODUJHU items. Full-width gallon door bins Nonadjustable full-width door bins that will hold gallon containers.
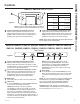
GBE21D, GBE21A ,QWHUQDO &RQWURO Knob Position Temperature Guide Refrigerator Figure A Note: 'R QRW EORFN DLU RXWOHW E\ SODFLQJ IRRG LWHPV directly against it. Erratic temperatures may result. Freezer Compartment Temperature Control $GMXVW IUHH]HU FRPSDUWPHQW WHPSHUDWXUH 7KH IUHH]HU WHPSHUDWXUH LV SUHVHW LQ WKH IDFWRU\ DW WKH Colder position. Allow 24 hours for temperature to VWDELOL]H WR WKH SUHVHW UHFRPPHQGHG VHWWLQJ Freezer Coldest ) (1.1°C) Coldest ) (-21.1°C) Colder ) (2.
USING THE REFRIGERATOR: Controls/Sabbath Modes Controls GYE18J, PYE18H, GFE24J, PFE24J, CFE24S, PFE24H, GFE26J External Control Figure C Freezer Compartment Temperature Control $GMXVW IUHH]HU FRPSDUWPHQW WHPSHUDWXUH 7KH IUHH]HU WHPSHUDWXUH LV SUHVHW LQ WKH IDFWRU\ DW 0°F (-17.8°C) $OORZ KRXUV IRU WHPSHUDWXUH WR VWDELOL]H to the preset recommended setting. Fresh Food Compartment Temperature Control Adjust fresh food compartment temperature.
Water & Ice Dispenser Internal Water Dispenser (See Controls) (on some models) The water dispenser is located on the left wall inside the refrigerator compartment. To dispense water: 1. Hold the glass against the recess. 2. Push the water dispenser button. 3. Hold the glass underneath the dispenser for 2–3 seconds after releasing the dispenser button. Water may continue to dispense after the button is released. 'LVSHQVHU Tray Press the glass gently against the dispenser cradle.
USING THE REFRIGERATOR: :DWHU )LOWHU &DUWULGJH 0:) 10 Water Filter Cartridge - MWF (on some models) Water Filter Cartridge Installing the Filter Cartridge The water filter cartridge is located in back upper right corner of the refrigerator compartment. )LOO WKH UHSODFHPHQW FDUWULGJH ZLWK ZDWHU IURP WKH WDS to allow for better flow from the dispenser immediately after installation. 2. Line up the arrow on the cartridge and the cartridge holder.
Water Filter Cartridge The water filter cartridge holder is located in the back upper-right corner of the fresh food refrigerator compartment. When to Replace the Filter ,I WKHUH LV D UHSODFHPHQW LQGLFDWRU OLJKW IRU WKH ZDWHU ILOWHU cartridge on the dispenser, the red filter light will start blinking to tell you that you need to replace the filter soon. )RU H[WHUQDO FRQWURO PRGHOV WKH ILOWHU OLJKW ZLOO EOLQN while you are dispensing until the filter is replaced.
USING THE REFRIGERATOR: Shelves and Bins 12 Shelves and Bins Not all features are on all models. Rearranging the Refrigerator Shelves Shelves in the refrigerator compartment are adjustable. To remove the shelves: 1. Remove all items from the shelf. 2. Tilt the shelf up at the front. 3. Lift the shelf up at the back and bring the shelf out. To replace the shelves: 1. While tilting the shelf up, insert the top hook at the back of the shelf in a slot on the track. 2.
Not all features are on all models. Climate Zone Pans .HHS IUXLWV DQG YHJHWDEOHV RUJDQL]HG LQ VHSDUDWH compartments for easy access. Excess water that may accumulate in the bottom of the drawers or under the drawers should be wiped dry. To remove pan: Slide the pan out to the stop position, lift the pan up and past the stop position and pull forward. Full -Width Pan (on some models) To remove pan: 1. Pull the pan out to the stop position. 2. Lift the front of the drawer up and out. To replace pan: 1.
USING THE REFRIGERATOR: )UHH]HU 'UDZHU Freezer Drawer (on some models) Not all features are on all models. FREEZER BASKETS 1. An ice bucket in the top basket (on some models). 2. A top full-width basket. 3. A bottom full-width basket (with divider - in some models). NOTE: 'R QRW ILOO EDVNHWV KLJKHU than the rim of the basket. This may cause baskets to stick or jam when opening or closing.
Not all features are on all models. FREEZER SHELF AND BASKET 1. A full-width fixed wire shelf 2. A full-width sliding plastic basket NOTE: 'R QRW ILOO EDVNHWV higher than the rim. This may cause basket to stick or jam when opening or closing. /(' OLJKWV DUH ORFDWHG on both sides of the IUHH]HU 1 2 Basket Removal To remove the full-width sliding basket on freezer door models: 1. Open the basket out to its full extension. 2. Lift up the front of the basket and pull straight out to remove.
USING THE REFRIGERATOR: )UHH]HU 'UDZHU Automatic Icemaker A newly installed refrigerator may take 12 to 24 hours to begin making ice. Automatic Icemaker (on some models) The icemaker will produce seven cubes per cycle approximately 100–130 cubes in a 24-hour period, GHSHQGLQJ RQ IUHH]HU FRPSDUWPHQW WHPSHUDWXUH URRP temperature, number of door openings and other use conditions. ,I WKH UHIULJHUDWRU LV RSHUDWHG EHIRUH WKH ZDWHU FRQQHFWLRQ is made to the icemaker, set the power switch in the OFF position.
Cleaning the Outside FINGERPRINT RESISTANT STAINLESS STEEL*, BLACK STAINLESS, SLATE, DARK SLATE, PAINTED - Outside surfaces, door handles, and trim DO NOT use Stainless Steel cleaners on the door surfaces. IMPORTANT: 7KH XVH RI LQFRUUHFW SURGXFWV PD\ GDPDJH WKH RXWHU ILQLVK RI )LQJHUSULQW 5HVLVWDQW 6WDLQOHVV DQG Black Stainless models. Please follow these instructions and use only the appropriate items below to clean your appliance surfaces.
CARE AND CLEANING Care and Cleaning Behind the Refrigerator Be careful when moving the refrigerator away from the wall. All types of floor coverings can be damaged, particularly cushioned coverings and those with embossed surfaces. Raise the leveling legs located at the bottom front of the refrigerator. Pull the refrigerator straight out and return it to position by pushing it straight in. Moving the refrigerator in a side direction may result in damage to the floor covering or refrigerator.
Refrigerator Questions? Call 800.GE.CARES (800.432.2737) or visit our Website at: GEAppliances.com In Canada, call 1.800.561.3344 or visit our Website at: GEAppliances.ca BEFORE YOU BEGIN TOOLS YOU MAY NEED Read these instructions completely and carefully. • • • • • • • IMPORTANT — Observe all governing codes and ordinances. Save these instructions for local inspector’s use. Note to Installer – Be sure to leave these instructions with the Consumer. Note to Consumer – .
INSTALLATION INSTRUCTIONS Installation Instructions APPLIANCE DIMENSIONS Single Door Models with Fresh Food and Freezer Doors (some models) Single Door Models with Drawer (some models) G C A F D H 90Û 155Û B I E French Door Models G C A H F D 155Û E B ,7(0 18/19 cuft models with french doors A* 69-7/8" (177.5 cm) B C** ' E 21 cuft models with single door 21 cuft models with french doors 25 cuft models with single door ´ (177.5 cm) ´ (177.5 cm) ´ (177.
INSTALLING THE REFRIGERATOR REFRIGERATOR LOCATION Ŷ 'R QRW LQVWDOO WKH UHIULJHUDWRU ZKHUH WKH WHPSHUDWXUH ZLOO JR EHORZ ) & EHFDXVH it will not run often enough to maintain proper temperatures. Ŷ 'R QRW LQVWDOO WKH UHIULJHUDWRU ZKHUH WKH WHPSHUDWXUH ZLOO JR DERYH ) & EHFDXVH LW will not perform properly. Ŷ 'R QRW LQVWDOO WKH UHIULJHUDWRU LQ D ORFDWLRQ H[SRVHG to water (rain, etc.) or direct sunlight. Ŷ ,QVWDOO LW RQ D IORRU VWURQJ HQRXJK WR VXSSRUW LW IXOO\ loaded.
INSTALLATION INSTRUCTIONS Installation Instructions INSTALLING THE REFRIGERATOR (Cont.) REMOVING FRENCH DOORS (on some models) WARNING )ROORZ DOO VWHSV ZKHQ UHYHUVLQJ 1 REMOVING RIGHT DOOR A. Remove the hinge cover on top of the right fresh food door by removing the screw using a Phillips screwdriver. WKH GRRU VZLQJ )DLOXUH WR IROORZ WKHVH LQVWUXFWLRQV leaving off parts, or overtightening screws, can lead to the door falling off and result in injury and property damage.
INSTALLING THE REFRIGERATOR (Cont.) 2 REMOVING LEFT DOOR (cont.) B. Remove the hinge cover on top of the left fresh food door by removing the screw using a Phillips screwdriver. For NON Ice and Water Models Only: Lift the hinge straight up to free the hinge pin from the socket in the top of the door and pass the wire through the slot in the hinge. For Ice and Water Models Only: Do not remove hinge from the door. E.
INSTALLATION INSTRUCTIONS Installation Instructions INSTALLING THE REFRIGERATOR (Cont.) REINSTALLING FRENCH DOORS (on some models) IMPORTANT NOTES 2 REHANGING THE RIGHT DOOR A. Lower the refrigerator door onto the right hinge pin. When replacing the french doors: • Read the instructions all the way through before starting. CAUTION Lifting Hazard. Single person lift can cause injury. Use assistance when handling, moving or lifting the refrigerator doors.
INSTALLING THE REFRIGERATOR (Cont.) REINSTALLING FRENCH DOORS (Cont.) (on some models) 3 REHANGING THE LEFT DOOR (Cont.) C. Make sure the door is aligned with the cabinet. Attach the hinge to the top of the cabinet loosely with bolts removed earlier. D. Make sure the gasket on the door is flush against the cabinet and is not folded. Tighten the bolts to 60 lb/in. (6.78 Nm). F. For Ice and Water Models Only: Put the water line into the hole and pass through the plastic port to the back of the refrigerator.
INSTALLATION INSTRUCTIONS Installation Instructions INSTALLING THE REFRIGERATOR (Cont.) REMOVING FREEZER DRAWER (on some models) IMPORTANT NOTES 2 REMOVE THE DRAWER FRONT A. Remove the screw on each side of the railing. :KHQ UHPRYLQJ IUHH]HU GUDZHU • Read the instructions all the way through before starting. • Provide a non-scratching work surface for the doors. Screw 1 REMOVE THE BASKETS A. 2SHQ WKH IUHH]HU GUDZHU XQWLO LW VWRSV B. Pull the top basket out until it stops.
INSTALLING THE REFRIGERATOR (Cont.) REMOVING FREEZER DRAWER (on some models) (Cont.) 3 REINSTALL FREEZER DRAWER FRONT A. Pull the rail assemblies to the maximum extension. B. Locate the slots on the inside of each slide. D. /RZHU WKH IURQW HQG RI WKH IUHH]HU GUDZHU assembly so the side tabs fit into the front slots on the rail assemblies. E. Replace the safety screws in both sides of the slide assemblies. C.
INSTALLATION INSTRUCTIONS Installation Instructions INSTALLING THE REFRIGERATOR (Cont.) REVERSING THE DOOR (on some models) WARNING )ROORZ DOO VWHSV ZKHQ UHYHUVLQJ WKH GRRU VZLQJ )DLOXUH WR IROORZ WKHVH LQVWUXFWLRQV leaving off parts, or overtightening screws, can lead to the door falling off and result in injury and property damage. 1 REMOVE THE REFRIGERATOR DOORS (Cont.) B. Remove right and left hinge covers on top of the refrigerator using a Phillips screwdriver.
INSTALLING THE REFRIGERATOR (Cont.) 1 REMOVE THE REFRIGERATOR DOORS (Cont.) H. Remove the button plugs on the left side of the cabinet across from where the hinge bracket was located and install in the holes where the bracket was removed. I. ) OLS WKH FHQWHU KLQJH bracket and install on the left side of the cabinet where the button plugs were removed. J. 8VLQJ D ´ $OOHQ wrench, install the hinge pin into the center hinge bracket. For Models With a Freezer DOOR: F.
INSTALLATION INSTRUCTIONS Installation Instructions INSTALLING THE REFRIGERATOR (Cont.) WARNING )ROORZ DOO VWHSV ZKHQ UHYHUVLQJ WKH GRRU VZLQJ )DLOXUH WR IROORZ WKHVH LQVWUXFWLRQV leaving off parts, or overtightening screws, can lead to the door falling off and result in injury and property damage. 2 REINSTALL FREEZER DOOR A. Using a Torx T-20 screwdriver, remove the bolts securing the door stop on the bottom right of the door. B.
INSTALLING THE REFRIGERATOR (cont.) 3 REINSTALL FRESH FOOD DOOR (Cont.) 3 REINSTALL FRESH FOOD DOOR (Cont.) H. ,QVHUW WKH WRS KLQJH SLQ LQVLGH WKH KROH LQ WKH top left of the fresh food door. Make sure the door is aligned with the cabinet. Attach the hinge to the top of the cabinet loosely with the bolts that were removed previously. Make sure the gasket on the door is flush against the cabinet and not folded.
INSTALLATION INSTRUCTIONS Installation Instructions INSTALLING THE REFRIGERATOR (cont.) CONNECTING TO THE HOUSE WATER LINE (Icemaker models only) A cold water supply is required for automatic icemaker RSHUDWLRQ ,I WKHUH LV QRW D FROG ZDWHU VXSSO\ \RX ZLOO QHHG WR SURYLGH RQH 6HH ,QVWDOOLQJ WKH :DWHU /LQH section. NOTES: • Before making the connection to the refrigerator, be sure the refrigerator power cord is not plugged into the wall outlet. ,I \RXU UHIULJHUDWRU GRHV QRW KDYH D ZDWHU ILOWHU we r
INSTALLING THE REFRIGERATOR (cont.) PUT THE REFRIGERATOR IN PLACE LEVEL THE REFRIGERATOR DOORS (on some models) Move the refrigerator to its final location. Remember a level refrigerator is necessary for JHWWLQJ WKH GRRUV SHUIHFWO\ HYHQ ,I \RX QHHG help, review the previous section on leveling the refrigerator.
INSTALLATION INSTRUCTIONS Installation Instructions Refrigerator suggested assembly (cont.) Shelves shown in the location for best energy efficiency. GNE21D, GNE21F, PNE21K, PNE21N 21 cuft. Models French Door with Freezer Drawer ,FHPDNHU LQ WKH door is available for all 24 and 26 french door models. GDE21D, GDE21E, PDE21K, GDE25E 21, 25 cuft. Models Single Door with Freezer Drawer GFE24J, PFE24J, CFE24S, PFE24H 24 cuft.
INSTALLING THE WATER LINE BEFORE YOU BEGIN WHAT YOU WILL NEED 5HFRPPHQGHG FRSSHU ZDWHU VXSSO\ NLWV DUH :; ; :; ; RU :; ; GHSHQGLQJ RQ WKH DPRXQW RI tubing you need. Approved plastic water supply lines are SmartConnect™ Refrigerator Tubing :; ; :; ; DQG :; ; When connecting your refrigerator to a GE Appliances Reverse Osmosis Water System, the only DSSURYHG LQVWDOODWLRQ LV ZLWK D *( $SSOLDQFHV 59.LW )RU RWKHU UHYHUVH RVPRVLV ZDWHU V\VWHPV IROORZ WKH manufacturer’s recommenda
INSTALLATION INSTRUCTIONS Installation Instructions INSTALLING THE WATER LINE (cont.) WHAT YOU WILL NEED (cont.) NOTE: The only GE Appliances approved plastic tubing is that supplied in SmartConnect™ 5HIULJHUDWRU 7XELQJ NLWV 'R QRW XVH DQ\ RWKHU SODVWLF water supply line because the line is under pressure at all times. Certain types of plastic will crack or rupture with age and cause water damage to your home.
INSTALLING THE WATER LINE (cont.) 4 FASTEN THE SHUTOFF VALVE )DVWHQ WKH VKXWRII YDOYH WR WKH FROG ZDWHU SLSH with the pipe clamp. Pipe Clamp Vertical Cold Water Pipe Saddle-Type Shutoff Valve NOTE: Commonwealth of Massachusetts Plumbing Codes 248CMR shall be adhered to. Saddle valves are illegal and use is not permitted in Massachusetts. Consult with your licensed plumber.
TROUBLESHOOTING TIPS: Normal Operating Conditions 38 Normal Operating Conditions. Newer refrigerators sound different from older refrigerators. Modern refrigerators have more features and use newer technology. Do you hear what I hear? These conditions are normal. HUMMM... WHOOSH... Ŷ T he new high efficiency compressor may run faster and longer than your old refrigerator and you may hear a high-pitched hum or pulsating sound while it is operating. Ŷ
Save time and money! Review the charts on the following pages first and you may not need to call for service. Problem Possible Causes What to Do Refrigerator does not operate Refrigeratorin defrost cycle. Wait about 30 minutes for defrost cycle to end. (LWKHU RU ERWK FRQWUROV VHW WR 2)) Set the controls to a lower temperature setting. Refrigeratoris unplugged. Push the plug completely into the outlet. The fuse is blown/circuit breaker is tripped. Replace fuse or reset the breaker.
TROUBLESHOOTING TIPS Troubleshooting Tips... Before you call for service Problem Possible Causes What to Do ,FH FXEHV KDYH RGRU WDVWH ,FH VWRUDJH ELQ QHHGV FOHDQLQJ (PSW\ DQG ZDVK ELQ 'LVFDUG ROG FXEHV )RRG WUDQVPLWWLQJ RGRU WDVWH WR LFH FXEHV Wrap foods well. ,QWHULRU RI UHIULJHUDWRU QHHGV FOHDQLQJ See Care and Cleaning section. Small or hollow cubes Water filter clogged. Replace filter cartridge with new cartridge or with plug.
Save time and money! Review the charts on the following pages first and you may not need to call for service. Problem Possible Causes What to Do Hot air from bottom of refrigerator 1RUPDO DLU IORZ FRROLQJ PRWRU ,Q WKH refrigeration process, it is normal that heat be expelled in the area under the refrigerator. Some floor coverings are sensitive and will discolor at these normal and safe temperatures. This is normal. Refrigerator never shuts off but WKH WHPSHUDWXUHV DUH 2.
LIMITED WARRANTY GE Appliances Refrigerator Limited Warranty GEAppliances.com For US Customers, DOO ZDUUDQW\ VHUYLFH LV SURYLGHG E\ RXU )DFWRU\ 6HUYLFH &HQWHUV RU DQ DXWKRUL]HG &XVWRPHU &DUH® technician. To schedule service online, visit us at geappliances.com, or call GE Appliances at 800.GE.CARES (800.432.2737). Please have your serial number and your model number available when calling for service. In Canada, call 800.561.3344.
Contact us at geapplianceparts.com, or call 800.GE.CARES. For the period of GE Appliances will replace Thirty Days )URP WKH GDWH of the original purchase Any part of the water filter cartridge which fails due to a defect in materials or workmanship during this limited thirty-day warranty.* What GE Appliances will not cover: Ŷ Ŷ Ŷ Ŷ Ŷ Ŷ Service trips to your home to teach you how to use the product.
Performance Data Sheet SmartWater™ Filtration System—GE Appliances MWF Cartridge The concentration of the indicated substances in water entering the system was reduced to a concentration less than or equal to the SHUPLVVLEOH OLPLW IRU ZDWHU OHDYLQJ WKH V\VWHP DV VSHFLILHG LQ 16) $16, 6WDQGDUG DQG 6WDQGDUG 6\VWHP WHVWHG DQG FHUWLILHG E\ 16) ,QWHUQDWLRQDO DJDLQVW 16) $16, 6WDQGDUG DQG 6WDQGDUG IRU WKH UHGXFWLRQ RI VXEVWDQFHV OLVWHG EHORZ Capacity 300 Gallons (1,135 Liters).
Performance Data Sheet Model: GE Appliances XWF Ŷ 6\VWHP FHUWLILHG E\ ,$302 5 7 DJDLQVW 16) $16, 6WDQGDUGV IRU WKH UHGXFWLRQ RI FODLPV VSHFLILHG RQ WKH SHUIRUPDQFH GDWD VKHHW and at iapmort.org. Ŷ $FWXDO SHUIRUPDQFH PD\ YDU\ ZLWK ORFDO ZDWHU FRQGLWLRQV Substance Tested for Reduction ,QIOXHQW FKDOOHQJH Maximum permissible concentration product water (mg/L) concentration (mg/L) Avg % Reduction Chlorine Taste and Odor 2.0 mg/L +/- 10% N/A 96.9 Chloramine Taste and Odor 3.
Notes 46 49-60805 Rev.
Notes 49-60805-1 Rev.
GE Appliances Website Have a question or need assistance with your appliance? Try the GE Appliances Website 24 hours a day, any day of the year! You can also shop for more great GE Appliances products and take advantage of all our on-line support services designed for \RXU FRQYHQLHQFH ,Q WKH 86 GEAppliances.com ,Q &DQDGD GEAppliances.
à congélateur inférieur RÉFRIGÉRATEUR CONSIGNES DE SÉCURITÉ . . . . . .3 CONSIGNES D’UTILISATION Fonctions . . . . . . . . . . . . . . . . . . . . . . . . . .5 Commandes . . . . . . . . . . . . . . . . . . . . . . . . . .7 Distributeur . . . . . . . . . . . . . . . . . . . . . . . . . . .9 Filtre à eau - MWF . . . . . . . . . . . . . . . . . . . . 10 Filtre à eau - XWF . . . . . . . . . . . . . . . . . . . . 11 Tablettes et balconnets . . . . . . . . . . . . . . . 12 Bacs . . . . . . . . . . . . . . . .
NOUS VOUS REMERCIONS D’ACCUEILLIR GE APPLIANCES CHEZ VOUS Que vous ayez grandi avec GE Appliances ou qu’il s’agisse de votre première acquisition, nous sommes heureux de vous accueillir dans notre famille. Nous sommes fiers du savoir-faire, de l’innovation et de l’esthétique qui composent chaque appareil GE Appliances, et nous pensons que vous le serez aussi.
INFORMATION DE SÉCURITÉ INFORMATION DE SÉCURITÉ IMPORTANTES LISEZ TOUTES LES DIRECTIVES AVANT D'UTILISER L'APPAREIL Pour réduire le risque d’incendie, d’explosion, de choc électrique ou de blessures lorsque vous utilisez votre réfrigérateur, veuillez suivre ces consignes de sécurité : Ŷ Afin de prévenir les accidents graves ou la mort, les &H UpIULJpUDWHXU GRLW rWUH FRUUHFWHPHQW LQVWDOOp conformément aux instructions d'installation avant toute enfants ne doivent pas se tenir ni jouer dans ou sur utilisa
INFORMATION DE SÉCURITÉ INFORMATION DE SÉCURITÉ IMPORTANTES LISEZ TOUTES LES DIRECTIVES AVANT D'UTILISER L'APPAREIL BRANCHEMENTS ÉLECTRIQUES AVERTISSEMENT RISQUE DE CHOC ÉLECTRIQUE Branchez l’appareil dans une prise triple avec terre. Ne retirez pas la broche de terre. N’utilisez pas d’adaptateur. N’utilisez pas un cordon de rallonge. Le non-respect de ces instructions peut entraîner des risques d’incendies, des chocs électriques ou la mort.
Modèles à deux portes Machine à glaçons à faible encombrement (certains modèles) La machine à glaçons et le balconnet sont situés sur la porte pour offrir plus d’espace de rangement. Éclairage DEL Les lampes DEL du compartiment réfrigérateur sont situées dans le centre supérieur et sur les côtés gauche et droit des bacs climatisés. Des lampes DEL sont aussi situées dans le congélateur; voir les pages 13 et 14.
UTILISATION DU RÉFRIGÉRATEUR: Caractéristiques Caractéristiques Modèles à une porte Bac à collation mobile On peut le déplacer à différents endroits pour mieux répondre à vos besoins. Éclairage DEL Les lampes DEL du compartiment réfrigérateur sont situées dans le centre supérieur et sur les côtés gauche et droit des bacs climatisés. Des lampes DEL sont aussi situées dans le congélateur; voir les pages 13 et 14. Tablettes pleine largeur Ces tablettes peuvent recevoir les articles de taille supérieure.
Panneau de commande intérieur GBE21D, GBE21A Positions pour le réglage de température Réfrigérateur Figure A Remarque : N’obstruez pas la sortie d’air en plaçant des articles directement contre celle-ci. Autrement, cela peut gêner la régulation de température. Commande de température du compartiment congélateur Cette commande sert à régler la température du congélateur. La température est préréglée à l’usine à la position Colder (plus froid).
UTILISATION DU RÉFRIGÉRATEUR: Commandes/Modes Sabbath Commandes Panneau de commande extérieur GYE18J, PYE18H, GFE24J, PFE24J, CFE24S, PFE24H, GFE26J Figure C Commande de température du compartiment congélateur Cette commande sert à régler la température du congélateur. La température est préréglée à l’usine à la valeur 0 °F (-17,8 °C). Allouez 24 heures pour stabiliser la température à la valeur préréglée.
Distributeur d’eau et de glaçons Distributeur d’eau intérieur (Voir la section Commandes) (certains modèles) Plateau du distributeur Appuyez le verre délicatement contre le berceau du distributeur. La tablette antidébordement ne se draine pas automatiquement. Pour réduire les taches d’eau, elle doit être nettoyée régulièrement. Il se peut que de l’air soit présent dans la conduite d’eau si la distribution d’eau n’a pas eu lieu à la première installation du réfrigérateur.
UTILISATION DU RÉFRIGÉRATEUR: Filtre d’eau à cartouche - MWF 10 Filtre d’eau à cartouche - MWF (certains modèles) Filtre d’eau à cartouche Installation du filtre à cartouche Le filtre d’eau à cartouche se trouve dans le coin supérieur arrière droit du compartiment réfrigérateur. 5HPSOLVVH] OH ILOWUH DYHF GH O¶HDX GX URELQHW SRXU IDFLOLWHU l’écoulement depuis le distributeur immédiatement après l’installation. 2. Alignez la flèche sur la cartouche sur celle du support du filtre.
FILTRE D’EAU À CARTOUCHE Le support du filtre d’eau à cartouche est situé dans le coin supérieur arrière droit du compartiment réfrigérateur. QUAND REMPLACER LE FILTRE Si le distributeur est doté d’un indicateur de remplacement de filtre, un voyant de filtre rouge commencera à clignoter pour vous signaler la nécessité de remplacer le filtre bientôt. - Sur les modèles à commande extérieure, le voyant de filtre clignotera pendant la distribution jusqu’à ce que le filtre soit remplacé.
UTILISATION DU RÉFRIGÉRATEUR: 7DEOHWWHV HW EDOFRQQHWV 12 Tablettes et balconnets 7RXWHV OHV FDUDFWpULVWLTXHV QH VRQW SDV GLVSRQLEOHV VXU WRXV OHV PRGqOHV Disposition des tablettes du réfrigérateur Les tablettes du compartiment réfrigérateur sont réglables. Pour retirer les tablettes : 1. Pour retirer les tablettes : 2. Soulevez la tablette à l’avant. 3. Soulevez la tablette à l’arrière et faites-la sortir. Pour replacer les tablettes : 1.
7RXWHV OHV FDUDFWpULVWLTXHV QH VRQW SDV GLVSRQLEOHV VXU WRXV OHV PRGqOHV Bacs climatisés Conservez les fruits et les légumes dans des compartiments séparés pour faciliter l’accès. On doit essuyer l’excédent d’humidité pouvant s’accumuler dans le fond ou le dessous des tiroirs. Pour retirer un bac : Glissez le bac vers l’extérieur jusqu’à ce qu’il s’arrête, soulevez-le vers le haut en dépassant la position d’arrêt puis tirez-le vers l’avant.
UTILISATION DU RÉFRIGÉRATEUR: 7LURLU GX FRQJpODWHXU 14 Tiroir du congélateur (certains modèles) 7RXWHV OHV FDUDFWpULVWLTXHV QH VRQW SDV GLVSRQLEOHV VXU WRXV OHV PRGqOHV PANIERS DU CONGÉLATEUR 1. Un bac à glace dans le panier supérieur (certains modèles). 2. Un panier pleine largeur supérieur. 3. Un panier pleine largeur inférieur (avec séparateur – certains modèles). REMARQUE : Ne remplissez pas les paniers au-delà de leur bord. Ils pourraient se coincer en les ouvrant ou fermant.
7RXWHV OHV FDUDFWpULVWLTXHV QH VRQW SDV GLVSRQLEOHV VXU WRXV OHV PRGqOHV TABLETTE ET PANIER DU CONGÉLATEUR 1. Une clayette (en broche) fixe pleine grandeur. 2. Un panier en plastique coulissant pleine grandeur. REMARQUE : Ne remplissez pas les paniers au-delà de leur bord. 1 Ils pourraient se coincer en les ouvrant ou fermant. 2 Retrait du panier Pour retirer le panier coulissant pleine grandeur sur les modèles à porte de congélateur : 7LUH] OH SDQLHU MXVTX¶j VD SOHLQH H[WHQVLRQ 2.
UTILISATION DU RÉFRIGÉRATEUR: Machine à glaçons automatique 16 Machine à glaçons automatique Un réfrigérateur nouvellement installé prendra de 12 à 24 heures pour commencer à fabriquer de la glace. Machine à glaçons automatique (certains modèles) La machine à glaçons produira sept cubes par cycle, soit environ 100 à 130 cubes pendant une période de 24 heures, selon la température du congélateur, la température ambiante, le nombre d’ouvertures de porte et d’autres conditions d’emploi.
Nettoyage de l’extérieur ACIER INOXYDABLE RÉSISTANT AUX EMPREINTES DIGITALES*, ACIER INOXYDABLE NOIR, ARDOISE, ARDOISE FONÇÉE, SURFACE PINTE - Directives pour nettoyer les surfaces extérieures, les poignées de porte et les garnitures N’utilisez PAS de nettoyants pour acier inoxydable sur les surfaces de porte. IMPORTANT : L’utilisation de produits inappropriés peut endommager le fini extérieur de l’acier inoxydable résistant aux empreintes digitales et de l’acier inoxydable noir.
ENTRETIEN ET NETTOYAGE Entretien et nettoyage Derrière le réfrigérateur Prenez un soin particulier lorsque vous éloignez le réfrigérateur GX PXU 7RXV OHV W\SHV GH UHYrWHPHQW GH VRO SHXYHQW rWUH endommagés, en particulier ceux qui sont coussinés ou dont la surface est gaufrée. Soulevez les pieds de nivellement situés dans le bas à l’avant du réfrigérateur. Déplacez le réfrigérateur en ligne droite pour l’éloigner ou le repousser à sa place.
Réfrigérateur Questions? Composez le 800.GE.CARES (800.432.2737) ou visitez notre site Web : GEAppliances.com Au Canada, composez le 1.800.561.3344 ou visitez notre site Web : electromenagersge.ca AVANT DE COMMENCER Veuillez lire toutes les directives attentivement • OUTILS DONT VOUS POUVEZ AVOIR BESOIN IMPORTANT — Conservez ces LQVWUXFWLRQV SRXU O¶LQVSHFWHXU ORFDO 5HVSHFWH] WRXWHV les ordonnances et les codes locaux.
INSTRUCTIONS D’INSTALLATION Instructions d’installation DIMENSIONS DE L’ÉLECTROMÉNAGER Modèles à une porte avec portes réfrigérateur et congélateur (certains modèles) Modèles à une porte avec tiroir (certains modèles) G C A F D H 90Û 155Û B I E Modèles à deux portes G C A H F D 155Û E B $57 Modèles 2 portes 18/19 pi.cu. A* 177,5 cm (69-7/8 po) B 90Û Modèles 1 porte 21 pi.cu. I Modèles 2 portes 21 pi.cu. Modèles 1 porte 25 pi.cu. Modèles 2 portes 24/25 pi.cu.
INSTALLATION DU RÉFRIGÉRATEUR EMPLACEMENT DU RÉFRIGÉRATEUR • N’installez pas votre réfrigérateur dans un emplacement R OD WHPSpUDWXUH DPELDQWH VHUD LQIpULHXUH j & (60° F). Il ne se mettra pas en marche suffisamment souvent pour maintenir des températures convenables. • N’installez pas votre réfrigérateur dans un emplacement R OD WHPSpUDWXUH DPELDQWH VHUD VXSpULHXUH j & (100° F). Il ne fonctionnera pas bien. • N’installez pas votre réfrigérateur à un endroit exposé à l’eau (pluie, etc.
INSTRUCTIONS D’INSTALLATION Instructions d’installation INSTALLATION DU RÉFRIGÉRATEUR (Suite) ENLÈVEMENT DES PORTES D’UN MODÈLE À DEUX PORTES (modèles à deux portes) 1 ENLÈVEMENT DE LA PORTE DROITE A. Enlevez le couvercle de charnière dans le haut de la porte du compartiment réfrigérateur en retirant la vis à l’aide d’un tournevis cruciforme. AVERTISSEMENT Suivez toutes les étapes lors du changement d’ouverture de la porte.
INSTALLATION DU RÉFRIGÉRATEUR (Suite) 2 ENLÈVEMENT DE LA PORTE GAUCHE (Suite) B. Enlevez le couvercle de charnière dans le haut de la porte gauche en retirant la vis à l’aide d’un tournevis cruciforme. Modèles SANS distributeur d’eau et de glace seulement : Soulevez la charnière en ligne droite pour dégager l’axe de charnière de la douille dans le haut de la porte et acheminez le fil dans la fente de la charnière. Modèles à distributeur d’eau et de glace seulement : N’enlevez pas la charnière de la porte.
INSTRUCTIONS D’INSTALLATION Instructions d’installation INSTALLATION DU RÉFRIGÉRATEUR (Suite) RÉINSTALLATION DES PORTES (modèles à deux portes) REMARQUES IMPORTANTES Avant de replacer les portes : 2 RACCROCHAGE DE LA PORTE DROITE A. Abaissez la porte dans l’axe de la charnière droite. • Lisez les instructions jusqu’au bout avant de commencer. ATTENTION Soulèvement de poids lourd. Une seule personne risque de se blesser à soulever un tel poids.
INSTALLATION DU RÉFRIGÉRATEUR (Suite) RÉINSTALLATION DES PORTES (modèles à deux portes) 3 RACCROCHAGE DE LA PORTE GAUCHE (Suite) C. Assurez-vous que la porte est alignée sur la carrosserie. Fixez lâchement la charnière sur le haut de la carrosserie à l’aide des boulons retirés précédemment. D. Assurez-vous que le joint d’étanchéité de la porte s’appuie totalement contre la carrosserie, sans plis. Serrez les boulons avec un couple serrage de (6,78 Nm). F.
INSTRUCTIONS D’INSTALLATION Instructions d’installation INSTALLATION DU RÉFRIGÉRATEUR (Suite) ENLÈVEMENT DES TIROIRS DU CONGÉLATEUR (certains modèles) REMARQUES IMPORTANTES 2 ENLEVER LE DEVANT DU TIROIR A. 5HWLUH] OD YLV GHV JOLVVLqUHV GH FKDTXH F{Wp Avant d’enlever le tiroir du congélateur : • Lisez les instructions jusqu’au bout avant de commencer. Vis • Placez le devant du tiroir sur une surface de travail qui ne les rayera pas. 1 ENLEVER LES PANIERS A.
INSTALLATION DU RÉFRIGÉRATEUR (Suite) ENLÈVEMENT DES TIROIRS DU CONGÉLATEUR (certains modèles) (Suite) 3 RÉINSTALLER LE DEVANT DU TIROIR DU CONGÉLATEUR A. 7LUH] OHV UDLOV j OHXU H[WHQVLRQ PD[LPDOH B. 5HSpUH] OHV IHQWHV VXU O¶LQWpULHXU GH FKDTXH JOLVVLqUH D. Abaissez l’extrémité avant du tiroir de façon que les languettes latérales s’insèrent dans les fentes avant des rails. E. 5HSODFH] OHV YLV GH VpFXULWp GDQV OHV GHX[ F{WpV des glissières et rails. C.
INSTRUCTIONS D’INSTALLATION Instructions d’installation INSTALLATION DU RÉFRIGÉRATEUR (Suite) INVERSION DE LA PORTE (certains modèles) AVERTISSEMENT Suivez toutes les étapes lors du changement d’ouverture de la porte. La porte risque de tomber en plus de causer des blessures ou des dommages si vous ne respectez pas ces instructions, oubliez des pièces ou effectuez un serrage excessif des vis. 1 ENLEVER LES PORTES DU RÉFRIGÉRATEUR (Suite) B.
INSTALLATION DU RÉFRIGÉRATEUR (Suite) 1 ENLEVER LES PORTES DU RÉFRIGÉRATEUR (Suite) H. 5HWLUH] OHV ERXFKRQV VXU OD JDXFKH GH OD FDUURVVHULH GX F{Wp RSSRVp GH O¶HQGURLW R OH support de charnière se trouvait, et posez-les dans les trous laissés libres par le retrait du support. I. 5 HWRXUQH] OH VXSSRUW GH charnière central et posez-le sur le côté gauche de OD FDUURVVHULH Oj R OHV bouchons ont été retirés. J. À l’aide d’une clé hexagonale ¼ po, posez l’axe dans le support de charnière central.
INSTRUCTIONS D’INSTALLATION Instructions d’installation INSTALLATION DU RÉFRIGÉRATEUR (Suite) AVERTISSEMENT Suivez toutes les étapes lors du changement d’ouverture de la porte. La porte risque de tomber en plus de causer des blessures ou des dommages si vous ne respectez pas ces instructions, oubliez des pièces ou effectuez un serrage excessif des vis. 2 RÉINSTALLER LA PORTE DU CONGÉLATEUR A.
INSTALLATION DU RÉFRIGÉRATEUR (Suite) 3 RÉINSTALLER LA PORTE DU COMPARTIMENT RÉFRIGÉRATEUR (Suite) H. Insérez l’axe de charnière supérieur dans le trou dans le haut de la porte du compartiment réfrigérateur, à droite. Assurez-vous l’aligner la porte sur la carrosserie. Fixez lâchement la charnière sur le haut de la carrosserie à l’aide des boulons retirés précédemment. Assurez-vous que le joint d’étanchéité s’appuie totalement contre la carrosserie, sans plis.
INSTRUCTIONS D’INSTALLATION Instructions d’installation INSTALLATION DU RÉFRIGÉRATEUR (Suite) RACCORDEMENT DU RÉFRIGÉRATEUR À LA CONDUITE D’EAU DE LA MAISON (modèles avec machine à glaçons seulement) Une alimentation en eau froide est nécessaire pour le fonctionnement de la machine à glaçons. Si elle est absente, vous devez en installer une. Consultez la section Installation de la conduite d’eau. Une des illustrations ci-dessous ressemble au raccord sur votre réfrigérateur.
INSTALLATION DU RÉFRIGÉRATEUR (Suite) METTRE LE RÉFRIGÉRATEUR EN PLACE Placez le réfrigérateur à son emplacement final. METTRE LE RÉFRIGÉRATEUR DE NIVEAU Les pieds de nivellement aux coins avant du réfrigérateur doivent être réglés de façon que le réfrigérateur repose solidement sur le plancher, et que l’avant soit légèrement surélevé, juste assez pour que la porte se referme aisément lorsqu’elle est ouverte à mi-parcours.
INSTRUCTIONS D’INSTALLATION Instructions d’installation Montage du réfrigérateur suggéré (suite) 7DEOHWWHV GDQV OD SRVLWLRQ GH PHLOOHXUH HIILFDFLWp pQHUJpWLTXH GNE21D, GNE21F, PNE21K, PNE21N 21 cuft. Modèles à deux portes avec tiroir de congélateur La machine à glaçons dans la porte est offerte pour tous les 24 , 26 modèles à deux portes. GDE21D, GDE21E, PDE21K, GDE25E 21, 25 cuft. Modèles à une porte avec tiroir de congélateur GFE24J, PFE24J, CFE24S, PFE24H 24 cuft.
INSTALLATION DE LA CONDUITE D’EAU AVANT DE COMMENCER Nous recommandons les trousses de tuyauterie en cuivre WX8X2, WX8X3, WX8X4, selon la longueur dont vous avez besoin. Nous approuvons les tuyaux en plastique de OD WURXVVH GH WX\DXWHULH SRXU UpIULJpUDWHXU 6PDUW&RQQHFW (WX08X10006, WX08X10015 et WX08X10025). Si vous installez un système d’eau par osmose inverse GE Appliances dans votre réfrigérateur, la seule installation DSSURXYpH HVW FHOOH GH OD WURXVVH *( $SSOLDQFHV 59.
INSTRUCTIONS D’INSTALLATION Installation Instructions INSTALLATION DE LA CONDUITE D’EAU (Suite) CE DONT VOUS AUREZ BESOIN (Suite) REMARQUE : Les seuls tuyaux en matière plastique approuvés par GE Appliances sont ceux qui font fournis dans les trousses de tuyauterie pour réfrigérateur 6PDUW&RQQHFW 1¶XWLOLVH] MDPDLV XQ DXWUH WX\DX HQ plastique, car le tuyau d’alimentation d’eau est tout le temps sous pression.
INSTALLATION DE LA CONDUITE D’EAU (Suite) 4 FIXER LE ROBINET DE 7 RACCORDER LE TUYAU AU SECTIONNEMENT ROBINET DE SECTIONNEMENT Fixez le robinet de sectionnement au tuyau d’eau froide à l’aide du collier de serrage. Placez un écrou à compression et une bague (manchon) à l’extrémité du tuyau et posez-les sur le robinet de sectionnement. Assurez-vous que le tuyau est bien inséré dans le robinet. Serrez fort l’écrou à compression.
CONSEILS DE DÉPANNAGE: Bruits de fonctionnement normaux 38 Bruits de fonctionnement normaux Les réfrigérateurs plus récents font des bruits différents de ceux des anciens. Les réfrigérateurs modernes présentent plus de fonctions et sont plus avancés sur le plan technologique. Entendez-vous ce que j’entends ? Ces bruits sont HUMMM... WHOOSH...
CONSEILS DE DÉPANNAGE Conseils de dépannage... Avant d’appeler un réparateur eFRQRPLVH] GX WHPSV HW GH O¶DUJHQW &RQVXOWH] G¶DERUG OHV WDEOHDX[ TXL VXLYHQW HW YRXV SRXUUH] SHXW rWUH pYLWHU GH IDLUH DSSHO j un réparateur. Problème Causes possibles Que faire Le réfrigérateur ne fonctionne pas Le cycle de dégivrage est en cours. Attendez environ 30 minutes afin que le cycle de dégivrage se termine. Une des commandes ou les deux est sur la position OFF (arrêt).
CONSEILS DE DÉPANNAGE Conseils de dépannage... Avant d’appeler un réparateur eFRQRPLVH] GX WHPSV HW GH O¶DUJHQW &RQVXOWH] G¶DERUG OHV WDEOHDX[ TXL VXLYHQW HW YRXV SRXUUH] SHXW rWUH pYLWHU GH IDLUH DSSHO j un réparateur. Problème Causes possibles Que faire Petits glaçons ou glaçons creux à l’intérieur Le filtre à eau est bouché. 5HPSODFH] OH ILOWUH j FDUWRXFKH SDU XQ QHXI RX SDU le bouchon. Formation lente des glaçons La porte est restée ouverte. Vérifiez si l’emballage garde la porte ouverte.
Problème Causes possibles Que faire Air chaud à la base du réfrigérateur Courant d’air normal provenant du moteur. Pendant le processus de réfrigération, il est normal que de la chaleur soit expulsée à la base du réfrigérateur. Certains revêtements de sol sont sensibles et peuvent se décolorer sous l’effet de cette température de fonctionnement normale qui est sans danger. C’est normal.
GARANTIE LIMITÉE GE Appliances garantie limitée du réfrigérateur electromenagersge.ca 7RXWHV OHV UpSDUDWLRQV HQ YHUWX GH OD JDUDQWLH VRQW IRXUQLV SDU QRV &HQWUH GH 6HUYLFH G¶8VLQH RX SDU XQ WHFKQLFLHQ DXWRULVp &XVWRPHU Care®. Pour prévoir une réparation, consultez notre site electromenagersge.ca/fr/soutien/demande-de-service ou appelez le 800.561.3344. Veuillez avoir votre numéro de série et votre numéro de modèle à portée de main lorsque vous appelez pour obtenir un service.
Communiquez avec nous sur Electromenagersge.ca/fr/produits/filtres-et-accessoires,or ou appelez le 800.561.3344 Pendant la période de garantie de : Nous remplacerons gratuitement : Trente jours A compter de la date d'achat initial Toute pièce de la cartouche filtrante qui s’avère défectueuse en raison d’un défaut de matériau ou de fabrication pendant cette période de garantie de trente jours.* Ce qui n’est pas couvert : Ŷ Les déplacements à votre domicile pour vous expliquer l’utilisation de ce produit.
Fiche technique de performance Système de filtration SmartWater™ - Cartouche MWF de GE Appliances La concentration des substances indiquées dans l’eau entrant dans le système a été réduite à une concentration inférieure ou égale à la limite autorisée pour l'eau quittant le système selon les spécifications des normes 42 et 53 de la NSF/ANSI. Ce système a été testé et certifié par la NSF International d’après les normes 42 et 53 de la NSF/ANSI relatives à la réduction des substances indiquées ci-dessous.
Fiche technique de performance Modèle : GE Appliances XWF Ŷ 6\VWqPH FHUWLILp SDU O¶,$302 5 7 HQ YHUWX GHV QRUPHV GH OD 16) $16, UHODWLYHV j OD UpGXFWLRQ GHV DOOpJDWLRQV VSpFLILpHV VXU OD fiche technique de rendement et le site iapmort.org. Ŷ /H UHQGHPHQW UpHO SHXW YDULHU VHORQ OHV FRQGLWLRQV ORFDOHV GH O¶HDX Substance testé e pour réduction Concentration d’essai de l’influent (mg/L) Concentration max. admissible dans l’eau du produit (mg/L) 5pGXFWLRQ moy. (%) Goût et odeur chlore 2.
SOUTIEN AU CONSOMMATEUR Soutien au consommateur Site Web de GE Appliances Vous avez une question ou vous avez besoin d’aide pour votre appareil électroménager? Visitez le site Web de GE Appliances KHXUHV SDU MRXU WRXV OHV MRXUV GH O¶DQQpH 9RXV SRXYH] DXVVL \ WURXYHU G¶DXWUHV IRUPLGDEOHV SURGXLWV *( $SSOLDQFHV HW WLUHU DYDQWDJH GH WRXV QRV VHUYLFHV G¶DVVLVWDQFH HQ OLJQH $X[ eWDWV 8QLV GEAppliances.com Au Canada : electromenagersGE.
REFRIGERADORES Congelador Inferior INSTRUCCIONES DE SEGURIDAD . . . . . . . . . . . . . . . 3 INSTRUCCIONES DE FUNCIONAMIENTO Funciones . . . . . . . . . . . . . . . . . . . . . . . . 6 Controles . . . . . . . . . . . . . . . . . . . . . . . . . 9 Dispensador* . . . . . . . . . . . . . . . . . . . . . 13 Filtro de Agua - MWF . . . . . . . . . . . . . 10 Filtro de Agua - XWF . . . . . . . . . . . . . . 11 Estantes y Recipientes . . . . . . . . . . . . 12 Cajones. . . . . . . . . . . . . . . . . . . . . .
GRACIAS POR HACER QUE GE APPLIANCES SEA PARTE DE SU HOGAR. Ya sea que haya crecido usando GE Appliances, o que ésta es su primera vez, nos complace tenerlo en la familia. Sentimos orgullo por el nivel de arte, innovación y diseño de cada uno de los electrodomésticos de GE Appliances, y creemos que usted también. Entre otras cosas, el registro de su electrodoméstico asegura que podamos entregarle información importante del producto y detalles de la garantía cuando los necesite.
LEA TODAS LAS INSTRUCCIONES ANTES DE USAR ADVERTENCIA A fin de reducir el riesgo de incendio, explosión, descargas eléctricas o lesiones al usar su refrigerador, siga estas precauciones básicas de seguridad: Ŷ ( VWH UHIULJHUDGRU VH GHEHUi LQVWDODU \ XELFDU adecuadamente de acuerdo con las Instrucciones de Instalación antes de ser usado. Ŷ 'HVHQFKXIH HO UHIULJHUDGRU DQWHV GH KDFHU UHSDUDFLRQHV R hacer una limpieza.
INFORMACIÓN DE SEGURIDAD INFORMACIÓN IMPORTANTE DE SEGURIDAD LEA TODAS LAS INSTRUCCIONES ANTES DE USAR CONEXIÓN DE LA ELECTRICIDAD ADVERTENCIA RIESGO DE DESCARGA ELÉCTRICA Enchufe en un tomacorriente con conexión a tierra de 3 cables. 1R HOLPLQH HO FDEOH GH FRQH[LyQ D WLHUUD 1R XVH XQ DGDSWDGRU 1R XVH H[WHQVLyQ HOpFWULFD Si no se siguen estas instrucciones se podrá producir a muerte, incendios o descargas eléctricas.
Modelos de Puerta Francesa Máquina de hielos con ahorro de espacio (en algunos modelos) La máquina de hielos y el anaquel están ubicados en la puerta, creando un espacio de almacenamiento con mayor uso. Iluminación LED /DV OXFHV /(' GHO FRPSDUWLPLHQWR GH UHIULJHUDGRU HVWiQ ubicadas en la parte central superior y los costados izquierdo y derecho sobre las cajones del área con clima regulado. /DV OXFHV /(' WDPELpQ HVWiQ XELFDGDV HQ HO congelador; consulte las páginas 13 y 14.
OPERACIÓN DEL REFRIGERADORE: )XQFLRQHV Funciones Modelos con Una Puerta Cajón de refrigerios flotante Cajones con clima regulado Se puede ubicar en diferentes lugares para cubrir mejor sus necesidades. Recipientes aparte para almacenar productos alimenticios. Iluminación LED Filtro de carbón (en algunos modelos) /D OX] /(' HVWi XELFDGD HQ OD SDUWH VXSHULRU GHO FRPSDUWLPLHQWR GH UHIULJHUDGRU /DV OXFHV /(' WDPELpQ están ubicadas en el congelador; consulte las páginas 13 y 14.
Control Interno GBE21D, GBE21A Guía de Temperatura de las Posiciones de la Perilla Refrigerador Figure A NOTA: 1R EORTXHH OD VDOLGD GHO DLUH FRORFDQGR SURGXFWRV FRPHVWLEOHV directamente contra ésta. Se podrán generar temperaturas erráticas. Control de Temperatura del Compartimiento del Congelador Ajuste la temperatura del compartimiento del congelador. La temperatura del congelador está preconfigurada de fábrica en la posición Colder.
OPERACIÓN DEL REFRIGERADORE: Controles/Modos Sabáticos Controles Control Externo de GYE18J, PYE18H, GFE24J, PFE24J, CFE24S, PFE24H, GFE26J Figure C Control de Temperatura del Compartimiento del Congelador Ajuste la temperatura del compartimiento del congelador. La temperatura del congelador está configurada previamente de fábrica en 0º F (-17.8º C). Espere 24 horas hasta que la temperatura se estabilice en los ajustes de configuración previa recomendados.
Dispensador de Agua y Hielo Dispensador de Agua Interno HQ DOJXQRV PRGHORV &RQVXOWH OD VHFFLyQ &RQWUROHV El dispensador de agua está ubicado en la pared izquierda dentro del compartimiento del refrigerador. Para dispensar agua: 1. Sostenga el vaso contra el hueco. 2. Presione el botón dispensador de agua. 'LVSHQVHU Tray 3. Sostenga el vaso debajo del dispensador entre 2 y 3 segundos luego de liberar el botón del dispensador.
OPERACIÓN DEL REFRIGERADORE: $FHUFD GHO FDUWXFKR GHO ILOWUR GH DJXD 0:) 10 Acerca del cartucho del filtro de agua MWF HQ DOJXQRV PRGHORV Cartucho del Filtro de Agua Instalación del Cartucho del Filtro El cartucho del filtro de agua está ubicado en el extremo superior trasero derecho del compartimiento del refrigerador. 1. Llene el cartucho de reemplazo con agua del grifo para permitir un mejor flujo desde el dispensador inmediatamente después de la instalación. 2.
CARTUCHO DEL FILTRO DE AGUA El cartucho del filtro de agua está ubicado en el extremo superior trasero derecho del compartimiento de comida fresca del refrigerador. CUÁNDO REEMPLAZAR EL FILTRO Si existe una luz indicadora de reemplazo del cartucho del filtro de agua en el dispensador, una luz roja del filtro comenzará a parpadear a fin de indicar que es necesario reemplazar el filtro pronto.
OPERACIÓN DEL REFRIGERADORE: Estantes y Recipientes 12 Estantes y Recipientes 1R WRGDV ODV IXQFLRQHV FRUUHVSRQGHQ D WRGRV ORV PRGHORV Reorganización de Los Estantes del Refrigerador Los estantes del compartimiento del refrigerador son ajustables. Para retirar los estantes: Para reemplazar los estantes: 1. Retire todos los productos del estante. 2. Incline el estante hacia arriba en la parte frontal. 3. Levante el estante desde la parte trasera y retire el mismo. 1.
1R WRGDV ODV IXQFLRQHV FRUUHVSRQGHQ D WRGRV ORV PRGHORV Cajones con Clima Regulado Mantenga las frutas y verduras organizadas en compartimientos separados para un fácil acceso. El exceso de agua que se puede acumular en la parte inferior de los cajones o debajo de los mismos se deberá limpiar. Para retirar la cajón: 'HVOLFH OD FDMRQ KDFLD IXHUD GH OD SRVLFLyQ GH GHWHQFLyQ levante la misma hasta la posición de detención y empuje hacia delante.
OPERACIÓN DEL REFRIGERADORE: Cajón del congelador 14 Cajón del congelador HQ DOJXQRV PRGHORV 1R WRGDV ODV IXQFLRQHV FRUUHVSRQGHQ D WRGRV ORV PRGHORV CANASTAS DEL CONGELADOR 8QD FXEHWD HQ OD FDQDVWD VXSHULRU HQ DOJXQRV PRGHORV 8QD FDQDVWD VXSHULRU 8QD FDQDVWD LQIHULRU FRQ GLYLVRU ± en algunos modelos) NOTA: 1R VXSHUH HO ERUGH DO OOHQDU las canastas. Esto podrá hacer que las canastas se claven o atasquen al abrirlas o cerrarlas.
1R WRGDV ODV IXQFLRQHV FRUUHVSRQGHQ D WRGRV ORV PRGHORV ESTANTE Y CANASTA DEL COMPARTIMENTO CONGELADOR 8Q HVWDQWH GH DODPEUH DMXVWDGR DO DQFKR FRPSOHWR 8QD FDQDVWD GH SOiVWLFR deslizable de ancho completo NOTA: 1R VXSHUH HO ERUGH DO 1 llenar las canastas. Esto podrá hacer que las canastas se claven o atasquen al abrirlas o cerrarlas. 2 Retiro de la Canasta Para retirar la canasta deslizable de ancho completo en los modelos con puerta de congelador: 1.
OPERACIÓN DEL REFRIGERADORE: )DEULFD GH +LHORV $XWRPiWLFD Fabrica de Hielos Automática Puede llevar entre 12 y 24 horas que un refrigerador recién instalado comience a fabricar hielo.
Nettoyage de l’extérieur ACERO INOXIDABLE RESISTENTE A MARCAS TÁCTILES*, ACERO INOXIDABLE NEGRO, LOSA, LOSA OSCURA, PINTADO - Instrucciones para la Limpieza de Superficies Exteriores, Manijas de Puertas y Bordes NO use limpiadores para Acero Inoxidable sobre las superficies de las puertas. IMPORTANTE: El uso de productos inadecuados podrá dañar el acabado exterior de los modelos de Acero Inoxidable 5HVLVWHQWH D 0DUFDV 'DFWLODUHV \ GH $FHUR ,QR[LGDEOH 1HJUR 3RU IDYRU VLJD HVWDV LQVWUXFFLRQHV \ XVH VyOR ORV
CUIDADO Y LIMPIEZA Cuidado y limpieza Detrás del Refrigerador Tenga cuidado al alejar el refrigerador de la pared. Cualquier tipo de cobertura de piso puede ser dañada, particularmente las coberturas acolchonadas y aquellas con superficies con relieves. Empuje el refrigerador hacia afuera de forma recta y regrese el mismo a su posición empujándolo hacia dentro. Mover el refrigerador hacia una ubicación lateral podrá ocasionar daños sobre la cobertura del piso o el refrigerador.
Refrigerador ¿Preguntas? Llame al 800.GE.CARES (800.432.2737) o visite nuestro sitio web en: GEAppliances.com En Canadá, llame al 1.800.561.3344 o visite nuestro sitio Web en: www.GEAppliances.ca ANTES DE COMENZAR Lea estas instrucciones en su totalidad y atentamente • HERRAMIENTAS QUE PUEDE NECESITAR IMPORTANTE — Cumpla con todos los códigos y ordenanzas gubernamentales. Guarde estas instrucciones para uso del inspector local.
INSTRUCCIONES DE INSTALACIÓN Instrucciones de Instalación DIMENSIONES DEL ELECTRODOMÉSTICO Modelos con Una Sola Puerta con Puertas de Refrigerador y del Congelador (en algunos modelos) Modelos con Una Sola Puerta y Cajón (en algunos modelos) G C A F D H 90Û 155Û B E I Modelos de Puerta Francesa G C A H F D 155Û 90Û E B I $57Ë&8/2 0RGHORV GH Modelos de 21 Modelos de 21 0RGHORV GH 0RGHORV GH 0RGHORV GH pies cúb. con pies cúb. con una pies cúb. con pies cúb.
INSTALACIÓN DEL REFRIGERADOR UBICACIÓN DEL REFRIGERADOR 1 R LQVWDOH HO UHIULJHUDGRU GRQGH OD WHPSHUDWXUD OOHJXH D VHU LQIHULRU D ORV ) & \D TXH QR VH DFWLYDUi FRQ la frecuencia necesaria para mantener las temperaturas apropiadas. 1R LQVWDOH HO UHIULJHUDGRU GRQGH OD WHPSHUDWXUD VHD VXSHULRU D ORV ) & \D TXH QR IXQFLRQDUi GH forma correcta.
INSTRUCCIONES DE INSTALACIÓN Instrucciones de Instalación INSTALACIÓN DEL REFRIGERADOR &RQW RETIRO DE LAS PUERTAS FRANCESAS HQ DOJXQRV PRGHORV ADVERTENCIA 1 RETIRO DE LA PUERTA DERECHA A. Retire la tapa de la bisagra en la parte superior de la puerta de refrigerador derecha, retirando el tornillo y usando un destornillador Phillips. Siga todos los pasos al invertir la dirección de apertura de la puerta.
INSTALACIÓN DEL REFRIGERADOR &RQW 2 RETIRO DE LA PUERTA IZQUIERDA (cont.) B. Retire la tapa de la bisagra en la parte superior de la puerta de refrigerador izquierda, retirando el tornillo con un destornillador Phillips. Para Modelos que NO son con Hielo y Agua Únicamente: levante la bisagra de forma recta hacia arriba para liberar el perno de la bisagra desde el anclaje en la parte superior de la puerta, y pase el cable a través de la ranura de la bisagra..
INSTRUCCIONES DE INSTALACIÓN Instrucciones de Instalación INSTALACIÓN DEL REFRIGERADOR &RQW REINSTALACIÓN DE LAS PUERTAS FRANCESAS (en algunos modelos) NOTAS IMPORTANTES 2 REINSTALACIÓN DE LA PUERTA DERECHA A. %DMH OD SXHUWD GHO UHIULJHUDGRU VREUH HO SHUQR GH OD bisagra derecha. Al retirar las puertas francesas: • Lea las instrucciones completamente antes de comenzar. • Las manijas están incluidas dentro del refrigerador.
INSTALACIÓN DEL REFRIGERADOR &RQW REINSTALACIÓN DE LAS PUERTAS FRANCESAS (en algunos modelos) (Cont.) 3 REINSTALACIÓN DE LA PUERTA IZQUIERDA (Cont.) C. Asegúrese de que la puerta esté alineada con el gabinete. Adhiera la bisagra a la parte superior del gabinete sin apretar, habiendo retirado los tornillos antes. D. Asegúrese de que la junta de la puerta esté nivelada contra el gabinete y que no esté doblada. $MXVWH ORV WRUQLOORV D OE SXOJ 1P F.
INSTRUCCIONES DE INSTALACIÓN Instrucciones de Instalación INSTALACIÓN DEL REFRIGERADOR &RQW RETIRO DEL CAJÓN DEL CONGELADOR HQ DOJXQRV PRGHORV NOTAS IMPORTANTES 2 RETIRE EL FRENTE DEL CAJÓN A. Retire el tornillo que está a cada lado de los rieles. Al retirar el cajón del congelador: • Lea las instrucciones completamente antes de comenzar. tornillo • Cuente con una superficie de trabajo donde las puertas no se rayen. 1 RETIRE LAS CANASTAS A. Abra el cajón del congelador hasta que se detenga. B.
INSTALACIÓN DEL REFRIGERADOR &RQW RETIRO DEL CAJÓN DEL CONGELADOR HQ DOJXQRV PRGHORV &RQW 3 REINSTALACIÓN DEL FRENTE DEL CAJÓN DEL CONGELADOR A. Empuje los ensambles de los rieles hasta la extensión máxima. B. 8ELTXH ODV UDQXUDV HQ OD SDUWH LQWHUQD GH FDGD ULHO D. %DMH HO H[WUHPR IURQWDO GHO HQVDPEOH GHO FDMyQ del congelador, de modo que las lengüetas laterales coincidan con las ranuras frontales de los ensambles de las correderas. E.
INSTRUCCIONES DE INSTALACIÓN Instrucciones de Instalación INSTALACIÓN DEL REFRIGERADOR &RQW INVERSIÓN DE LA PUERTA HQ DOJXQRV PRGHORV ADVERTENCIA Siga todos los pasos al invertir la dirección de apertura de la puerta. Si no se siguen estas instrucciones, dejando piezas sin uso o ajustando tornillos en exceso, esto podrá hacer que la puerta se caiga y producir lesiones y daños sobre la propiedad. 1 RETIRO DE LAS PUERTAS DEL REFRIGERADO (Cont.) B.
INSTALACIÓN DEL REFRIGERADOR &RQW 1 RETIRO DE LAS PUERTAS DEL REFRIGERADO (Cont.) H. Retire los enchufes inferiores del lado izquiedo del gabinete a través del área por donde el soporte de la bisagra estaba ubicado e instale los agujeros donde el soporte fue retirado. K. 8VDQGR XQD OODYH GH tubo/ destornillador de ´ UHWLUH ORV WRUQLOORV que aseguran la bisagra central al gabinete. L. 8ELTXH ORV HQFKXIHV GHO botón en el kit e instale los mismos del lado opuesto de la bisagra central. I.
INSTRUCCIONES DE INSTALACIÓN Instrucciones de Instalación INSTALACIÓN DEL REFRIGERADOR &RQW ADVERTENCIA Siga todos los pasos al invertir la dirección de apertura de la puerta. Si no se siguen estas instrucciones, dejando piezas sin uso o ajustando tornillos en exceso, esto podrá hacer que la puerta se caiga y producir lesiones y daños sobre la propiedad. 3 VUELVA A INSTALAR LA PUERTA DE REFRIGERADOR A.
INSTALACIÓN DEL REFRIGERADOR &RQW 3 VUELVA A INSTALAR LA PUERTA DE REFRIGERADOR &RQW H. Inserte el perno de la bisagra inferior en el agujero de la parte superior izquierda de la puerta de refrigerador. Asegúrese de que la puerta esté alineada con el gabinete. Adhiera la bisagra a la parte superior del gabinete sin apretar, con los tornillos que fueron retirados previamente. Asegúrese de que la junta de la puerta esté nivelada contra el gabinete y que no esté doblada.
INSTRUCCIONES DE INSTALACIÓN Instrucciones de Instalación INSTALACIÓN DEL REFRIGERADOR &RQW CONEXIÓN DEL REFRIGERADOR AL SUMINISTRO DE AGUA DEL HOGAR (Modelos con máquina de hielo únicamente) Se requiere un suministro de agua fría para el funcionamiento de la máquina de hielos automática. Si no se cuenta con un suministro de agua fría, se deberá proveer uno. Consulte la sección de Instalación del Suministro de Agua.
INSTALACIÓN DEL REFRIGERADOR &RQW COLOQUE EL REFRIGERADOR EN SU POSICIÓN NIVELACIÓN DE LAS PUERTAS DEL REFRIGERADOR (en algunos Mueva el refrigerador hasta su posición final. modelos) NIVELE EL REFRIGERADOR Recuerde que es necesario que el refrigerador esté nivelado para que las puertas estén perfectamente apoyadas. Si necesita ayuda, revise la sección previa sobre la nivelación del refrigerador.
INSTRUCCIONES DE INSTALACIÓN Instrucciones de Instalación Ensamble sugerido del refrigerador (cont.) Se muestran los estantes en la ubicación para una mayor eficiencia energética. Modelos GNE21D, GNE21F, PNE21K, PNE21N 21 cuft. Puerta Francesa con Cajón del Congelador La máquina de hielos en la puerta está disponible en ORV \ PRGHORV con puerta francesa. Modelos GDE21D, GDE21E, PDE21K, GDE25E 21, 25 cuft. Una Sola Puerta con Cajón del Congelador Modelos GFE24J, PFE24J, CFE24S, PFE24H 24 cuft.
INSTALACIÓN DE LA TUBERÍA DE AGUA ANTES DE COMENZAR LO QUE NECESITARÁ Al conectar su refrigerador a un Sistema de Agua por Ósmosis Inversa de GE Appliances, la única instalación DSUREDGD HV FRQ HO .LW *( $SSOLDQFHV 59 &RQ RWURV sistemas de agua por ósmosis inversa, siga las recomendaciones del fabricante. • Kit de Tubería para Refrigerador de Cobre o SmartConnectTM de ¼” de diámetro externo para conectar el refrigerador al suministro de agua.
INSTRUCCIONES DE INSTALACIÓN Instrucciones de Instalación INSTALACIÓN DE LA TUBERÍA DE AGUA &RQW LO QUE NECESITARÁ cont.) NOTA: La única tubería plástica de GE Appliances aprobada es aquella provista con los Kits de Tuberías SDUD 5HIULJHUDGRU GH 6PDUW&RQQHFW70 1R XVH QLQJ~Q otro suministro de agua plástico, ya que el suministro se encuentra bajo presión en todo momento. Ciertos tipos de plásticos podrán sufrir fisuras o roturas con el paso del tiempo y ocasionar problemas con el agua en su hogar.
INSTALACIÓN DE LA TUBERÍA DE AGUA FRQW 4 AJUSTE LA VÁLVULA DE CIERRE CONECTE LA TUBERÍA A LA VÁLVULA Ajuste la válvula de cierre de la tubería de agua fría con la abrazadera de la tubería Abrazadera de la tubería Coloque la tuerca de compresión y la abrazadera de UHIXHU]R PDQJD SDUD FRORFDU OD WXEHUtD GH FREUH en el extremo de la tubería y conecte la misma a la válvula de cierre. Asegúrese de que la tubería esté completamente insertada en la válvula.
CONSEJOS PARA LA SOLUCIÓN DE PROBLEMAS: Condiciones de funcionamiento normal Condiciones de funcionamiento normal El sonido de los refrigeradores nuevos es diferente al de aquellos más antiguos. Los refrigeradores modernos cuentan con más funciones y utilizan una tecnología más nueva. ¿Escuchas lo que yo escucho? Estos sonidos son normales. HUMMM... WHOOSH...
¡Ahorre tiempo y dinero! Primero revise los cuadros que aparecen en las siguientes páginas y es posible que no necesite solicitar reparaciones. Problema Posibles causas Qué hacer El refrigerador no funciona El refrigerador se encuentra en el ciclo de descongelamiento Espere unos 30 minutos hasta que el ciclo de descongelamiento finalice. 8QR R DPERV FRQWUROHV VH HQFXHQWUDQ FRQILJXUDGRV HQ 2)) $SDJDGR Ajuste los controles en una configuración de temperatura inferior.
CONSEJOS PARA LA SOLUCIÓN DE PROBLEMAS 40 Consejos para la Solución de Problemas... Antes de solicitar el servicio técnico Problema Posibles causas Qué hacer Cubos pequeños o huecos )LOWUR GH DJXD REVWUXLGR Reemplace el cartucho del filtro por un cartucho nuevo con el enchufe. Congelamiento lento de los cubos de hielo Se dejó la puerta abierta. Controle que no haya paquetes que impidan que la puerta se cierre. Controle que no haya paquetes que impidan que la puerta se cierre.
¡Ahorre tiempo y dinero! Primero revise los cuadros que aparecen en las siguientes páginas y es posible que no necesite solicitar reparaciones. Problema Posibles causas Qué hacer Aire caliente de la parte de abajo del refrigerador )OXMR GH DLUH TXH HVWi HQIULDQGR DO PRWRU En el proceso de refrigeración, es normal que salga calor de la parte inferior del refrigerador. Algunas cubiertas de piso son sensibles y se decolorarán ante estas temperaturas normales y seguras. Esto es normal.
GARANTÍA LIMITADA GE Appliances Garantía Limitada del Refrigerador GEAppliances.com 7RGR HO VHUYLFLR GH JDUDQWtD HV SURYLVWR SRU QXHVWURV &HQWURV GH 6HUYLFLR GH )DEULFDFLyQ R XQ WpFQLFR DXWRUL]DGR GH 6HUYLFLR DO &OLHQWH &XVWRPHU &DUH 3DUD SURJUDPDU XQD YLVLWD GHO VHUYLFLR WpFQLFR YLVtWHQRV HQ *($SSOLDQFHV FRP R FRPXQtTXHVH DO *( &$5(6 &XDQGR OODPH SDUD VROLFLWDU HO VHUYLFLR WHQJD ORV Q~PHURV GH VHULH \ PRGHOR GLVSRQLEOHV Para realizar el servicio técnico de su refrigerador se p
Comuníquese con nosotros en geapplianceparts.com R OODPH DO *( &$5(6 Por el Período de: Reemplazaremos, Sin Costo: Treinta Días 'HVGH la fecha de compra original. Cualquier parte del cartucho del filtro de agua que falle debido a un defecto en los materiales o la fabricación durante esta garantía limitada de treinta días.* Qué No Está Cubierto: 9LDMHV GHO WpFQLFR GHO VHUYLFLR D VX KRJDU SDUD HQVHxDUOH VREUH FyPR XVDU HO SURGXFWR • Instalación inadecuada.
)LFKD 7pFQLFD GH )XQFLRQDPLHQWR 6LVWHPD GH )LOWUDFLyQ 6PDUW:DWHU²&DUWXFKR *( $SSOLDQFHV 0:) La concentración de las sustancias indicadas en el agua que ingresa al sistema fue reducida a la concentración menor que o igual al límite SHUPLVLEOH SDUD HO DJXD TXH GHMD HO VLVWHPD FRPR VH HVSHFLILFD HQ 16) $16, (VWiQGDU \ (VWiQGDU 6LVWHPD HYDOXDGR \ FHUWLILFDGR SRU 16) ,QWHUQDWLRQDO FRQWUD 16) $16, (VWiQGDU \ (VWiQGDU SDUD OD UHGXFFLyQ GH ODV VXVWDQFLDV TXH ILJXUDQ D FRQWLQXDFLyQ Capacidad de 300
Ficha Técnica de Funcionamiento del Modelo: GE Appliances XWF Ŷ 6LVWHPD FHUWLILFDGR SRU ,$302 5 7 FRQWUD ORV (VWiQGDUHV GH 16) $16, SDUD OD UHGXFFLyQ GH GHPDQGDV HVSHFLILFDGDV HQ OD ILFKD WpFQLFD GH rendimiento y en iapmort.org. Ŷ (O UHQGLPLHQWR UHDO SRGUi YDULDU HQ UHODFLyQ D ODV FRQGLFLRQHV ORFDOHV GHO DJXD Sustancia Evalu ada para la Reducción *XVWR \ 2ORU D &ORUR *XVWR \ 2ORU D &ORUDPLQD Partícula, Clase I Partícula, Clase I Plomo Mercurio Mercurio Toxafeno 92& TXtPLFR VXVWLWXWR GHO clo
SOPORTE PARA EL CONSUMIDOR Soporte para el Consumidor Sitio Web de GE Appliances ¢'HVHD UHDOL]DU XQD FRQVXOWD R QHFHVLWD D\XGD FRQ VX HOHFWURGRPpVWLFR" £,QWHQWH D WUDYpV GHO 6LWLR :HE GH *( $SSOLDQFHV ODV KRUDV GHO GtD FXDOTXLHU GtD GHO DxR 8VWHG WDPELpQ SXHGH FRPSUDU PiV HOHFWURGRPpVWLFRV PDUDYLOORVRV GH *( $SSOLDQFHV \ aprovechar todos nuestros servicios de soporte a través de Internet, diseñados para su conveniencia. (Q (( 88 GEAppliances.