GE Consumer & Industrial Appliances Installation Instructions Built-In Dishwasher If you have questions, call 800.GE.CARES (800.432.2737) or visit our website at: www.ge.com BEFORE YOU BEGIN Read these instructions completely and carefully. IMPORTANT – Observe all governing codes and ordinances. Stop Sign • Note to Installer – Be sure to leave these instructions for the consumer’s and local inspector’s use. • Note to Consumer – Keep these instructions with your Owner’s Manual for future reference.
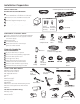
Installation Preparation PARTS SUPPLIED IN INSTALLATION PACKAGE: Side and Top Trim Pieces on some models ■ Two #8-18 x 5/8" Phillips special head screws, to secure dishwasher to underside of countertop.
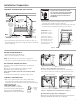
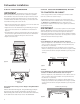
Installation Preparation PREPARE DISHWASHER ENCLOSURE 34-1/2"1/4" Underside of Countertop to Floor This Wall Area must be Free of Pipes or wires 5" 4" 5" 4" #282 French 6" Figure A To reduce the risk of electric shock, fire, or injury to persons, the installer must ensure that the dishwasher is completely enclosed at the time of installation. • The dishwasher must be installed so that drain hose is no more than 10' in length for proper drainage.
Installation Preparation PREPARE ELECTRICAL WIRING WARNING FOR PERSONAL SAFETY: Remove house fuse or open circuit breaker before beginning installation. Do not use an extension cord or adapter plug with this appliance. Alternate Receptacle Location 18" 18" 6" Electrical Requirements • This appliance must be supplied with 120V, 60 Hz., and connected to an individual properly grounded branch circuit, #282 French by a 15 or 20 ampere circuit breaker or time delay protected fuse.
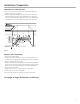
Installation Preparation PREPARE HOT WATER LINE • The line may enter from either side, rear or floor within the shaded area shown in Figure F. • The line may pass through the same hole as the electrical cable and drain hose. Or, cut an additional 1-1/2" diameter hole to accommodate the water line. If power cord with plug is used, water line must not pass through power cord hole. 4" 1-1/2" Dia.
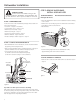
Dishwasher Installation STEP 3: REMOVE WOOD BASE, INSTALL LEVELING LEGS CAUTION Do not remove wood base until you are ready to install the dishwasher. The dishwasher will tip over when the door is opened if base is removed.
Dishwasher Installation STEP 5: INSTALL POWER CORD Skip this step if dishwasher will be permanently connected to the house electrical system. In this step you will need the junction box cover and the #10 x 1/2" hex head screw from the screw kit set aside in Step 1. The power cord and connections must comply with the National Electrical Code, Section 422 and/or local codes and ordinances. Maximum power cord length is 6 feet.
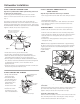
Dishwasher Installation STEP 8: POSITION WATER LINE AND HOUSE WIRING • Position water supply line and house wiring on the floor of the opening to avoid interference with base of dishwasher and components under dishwasher. STEP 10: SLIDE DISHWASHER THREE-FOURTHS OF THE WAY INTO CABINET IMPORTANT – Do not push against front panel with knees. Damage will occur. • Grasp the sides of the front panel and slide dishwasher into the opening a few inches at a time.
Dishwasher Installation STEP 12: INSTALL GPF65 SIDE-MOUNT BRACKETS STEP 13: PUSH DISHWASHER INTO FINAL POSITION Skip this step if underside of countertop is wood or wood-like material. • Install side-mount brackets if underside of countertop is granite or similar material that will not accept wood screws. Note: The brackets are available for purchase if needed. Obtain a GPF65 kit from your authorized GE Appliance Dealer.
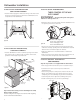
Dishwasher Installation STEP 14: LEVEL DISHWASHER IMPORTANT – Dishwasher must be level for proper dish rack operation, wash performance and door operation. The dishwasher must be leveled left to right and front to back. This assures the dish racks will not roll in or out on their own, circulation water will flow to the pump inlet, and the door will close without hitting the side of the tub. • Remove the lower dish rack and place a level on the door and lower rack track as shown in Figure R.
Dishwasher Installation STEP 16: CONNECT WATER SUPPLY Connect water supply line to 90° elbow. • Slide compression nut, then ferrule over end of water line. • Insert water line into 90° elbow. • Slide ferrule against elbow and secure with compression nut. • Connect drain line to air gap, waste tee or disposer using the previously determined method. Secure hose with a screw type clamp.
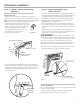
Dishwasher Installation STEP 18: CONNECT POWER SUPPLY STEP 19: PRETEST CHECK LIST If a power cord with plug is already installed proceed to Step 19. Review this list after installing your dishwasher to avoid charges for a service call that is not covered by your warranty. ■ Check to be sure power is OFF. WARNING If house wiring is not 2-wire with ground, a ground must be provided by the installer.
Dishwasher Installation STEP 20: DISHWASHER WET TEST STEP 21: REPLACE TOEKICK ■ Turn on power supply or plug power cord into outlet, if equipped. • Place toekick against the legs of the dishwasher. ■ Latch door. ■ Push “Rinse Only” pad. ■ Push Start/Reset pad one time. Dishwasher should start. ■ Check to be sure that water enters the dishwasher. If water does not enter the dishwasher, check to be sure that water and power are turned on. ■ Check for leaks under the dishwasher.
Notes
Notes 14
SPECIFICATIONS SUBJECT TO CHANGE WITHOUT NOTICE GE Consumer & Industrial General Electric Company Louisville, Kentucky 40225 ������������������� ge.com © 2005 General Electric Company Pub. No. 31-30217 Dwg. No.