system Water Softening GEAppliances.com Safety Information . . . . . . . . . . . . .2 Water Softening System Installation Instructions . . . .3–13 Step-by-step instructions . . . . . . . .6–13 Operating Instructions Breaking a salt bridge . . . . . . . . . . . . .15 Cleaning the nozzle and venturi assembly . . . . . . . . . . . . . . . . . .15 Features . . . . . . . . . . . . . . . . . . . . . . . . . .16 Service . . . . . . . . . . . . . . . . . . . . .14, 17–19 Water softener system . . . . . . . .
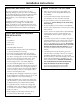
IMPORTANT SAFETY INFORMATION. READ ALL INSTRUCTIONS BEFORE USING. WARNING! For your safety, the information in this manual must be followed to minimize the risk of electric shock, property damage or personal injury. SAFETY PRECAUTIONS ■ Check and comply with your state and local codes. You must follow these guidelines. ■ Use care when handling the water softening system. Do not turn upside down, drop, drag or set on sharp protrusions.
Installation Instructions Water Softening System Model GXSF40H Questions? Call 800.GE.CARES (800.432.2737) or Visit our Website at: GEAppliances.com In Canada, call 1.800.561.3344 or visit www.GEAppliances.ca WARNING: Read entire manual. Failure to follow all guides and rules could cause personal injury or property damage. • Check with your state and/or local public works department for plumbing codes. You must follow their guides as you install the Water Softening system.
Installation Instructions UNPACKING AND INSPECTION WHERE TO INSTALL THE SOFTENER Be sure to check the entire softener for any shipping damage or parts loss. Also note damage to the shipping cartons. Contact the transportation company for all damage and loss claims. The manufacturer is not responsible for damages in transit. • Place the softener as close as possible to a sewer drain, or other acceptable drain point or standpipe.
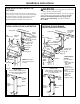
Installation Instructions PLAN HOW YOU WILL INSTALL THE SOFTENER WARNING: Use only lead-free solder and flux to prevent lead poisoning. You must first decide how to run in and out pipes to the softener. Look at the house main water pipe at the point where you will connect the softener. Is the pipe soldered copper, glued plastic or threaded galvanized? What is the pipe size? See Typical Installation Illustration. Use this as a guide when planning your particular installation.
Installation Instructions BEFORE YOU BEGIN 2 MOVE THE SOFTENER ASSEMBLY INTO INSTALLATION POSITION • Turn off the gas or electric supply to the water heater, in the possibility that the water heater may be drained while draining pipes. Before sliding softener in position, be sure the installation surface is level and smooth. Sharp objects under the tank may puncture it. If needed, place the tank on a section of 3/4″ thick (minimum) plywood.
Installation Instructions 3 PLUMB “IN” AND “OUT” PIPES TO AND FROM SOFTENER 4 CONNECT AND RUN THE VALVE DRAIN HOSE CAUTION: Observe all of the following • Use the provided drain hose (20′ length included) to attach to the valve drain fitting. To keep water pressure from blowing the hose off, use supplied spring clamp to secure in place. Cut the necessary length and use the remainder in Step 5. cautions as you connect inlet and outlet plumbing. See Typical Installation Illustration.
Installation Instructions 4 CONNECT AND RUN THE VALVE DRAIN HOSE (CONT.) 5 INSTALL THE BRINE TANK OVERFLOW FITTINGS AND HOSE • Elevating the drain hose may cause back pressure that could reduce the brine draw during recharge. If raising the drain line overhead is required to get to the drain point, measure the inlet water pressure to the softener first. For inlet pressures between 20 and 50 psi, do not raise higher than 8′ above the floor.
Installation Instructions 6 INSTALL GROUNDING CLAMP 7 FLUSH PIPES, EXPEL AIR FROM SOFTENER AND TEST YOUR INSTALLATION FOR WATER LEAKS (CONT.) DANGER: Failure to properly attach ground clamp could result in electrical shock. If plumbing is metal, to maintain electrical ground continuity in the house cold water piping, install the included ground clamp as shown. • Place bypass valve in the “service” position EXACTLY as follows. KEEP SOFT WATER FAUCETS OPEN.
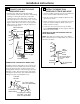
Installation Instructions 9 CONNECT TO ELECTRICAL POWER To gain access to the transformer/power cord assembly, remove the salt hole cover from the softener. Unclip the tabs on the rear of the top cover and rotate the cover upward to remove. DO NOT PULL OR DISCONNECT WIRING. • The softener works on 24 volt-60Hz electric power. The included transformer changes standard 120-volt AC house power to 24 volts. Plug the transformer into a 120-volt outlet only.
Installation Instructions SET WATER HARDNESS NUMBER (CONT.) SET SALT LEVEL 3. When the display shows your water hardness (in grains per gallon), press MODE to accept. 1. Press the MODE button until arrow points to SALT LEVEL. NOTE: If there is clear water iron in your water supply, you will need to increase the hardness setting by 5 for each 1 ppm of clear water iron in your water supply. 2.
Installation Instructions OPTIONAL CONTROL SETTINGS SIGNALS The controller display has several options and features. LOST TIME SIGNAL LOW SALT ALARM If time is lost on the display due to power interruption, the blue indicator light will flash 4 times every second, until the present time of day is entered. SALT LEVEL The LOW SALT ALARM, when enabled, will sound the beeper when the DAYS TO EMPTY value is 15 days or less. To change this setting, press and hold the MODE button for 3 seconds.
Installation Instructions SANITIZING PROCEDURES water softener, and out the drain. This process takes approximately 2 hours. To complete the installation, do the following sanitizing procedures. 4. If, after sanitization, water from the house faucet tastes salty or has a slight color, this is a preservative from the resin tank. Turn on the cold soft water faucets and drain for a few minutes or until clear. Care is taken at the factory to keep your water softener clean and sanitary.
About the water softener system. Service When the water softening system is providing soft water, it is called “Service.” During service, hard water flows from the house main water pipe into the water softening system. Inside the water softening system resin tank is a bed made up of thousands of tiny, plastic resin beads. As hard water passes through the bed, each bead attracts and holds the hard minerals. This is called ion-exchanging. It is much like a magnet attracting and holding metals.
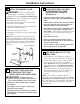
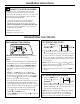
GEAppliances.com Breaking a Salt Bridge Sometimes, a hard crust or salt bridge forms in the salt storage area. It is usually caused by high humidity or the wrong kind of salt. When the salt bridges, an empty space forms between the water and salt. Then salt will not dissolve in the water to make brine. Push tool into salt bridge to break 1″–2″ If the brine tank is full of salt, it is hard to tell if you have a salt bridge. Salt is loose on top, but the bridge is under it.
About the water softener system. Normal Operation, Control Displays During normal operation, the present time of day and AM or PM and DAYS TO EMPTY show in the control display area. When the demand computer determines a recharge is needed, RECHARGE TONIGHT begins to flash in the display along with the present time. RECHARGE TONIGHT flashes until the next recharge start time, then changes to RECHARGE, which flashes until the recharge is over.
GEAppliances.com Service: Electronic Demand Time Features and Service ERROR CODE DISPLAYED ERR 01 POSSIBLE DEFECT ERR 02 ERR 03 ERR 04 • Motor inoperative •Position switch •Motor inoperative or wiring harness •Position switch or wiring harness • Wiring harness or connection to switch •Control •Control •Control ERR 05 •Control • Position switch • Control To remove an error code: 1. Unplug transformer. 2. Correct defect. 3. Plug transformer in. 4. Wait for at least 6 minutes.
About the water softener system. Service: Manually Initiated Electronics Diagnostics 1. To enter diagnostics, press and hold the MODE button for 3 seconds until the Low Salt Alarm screen shows. SALT LEVEL 2. Press the MODE button 2 times to advance through Low Salt Alarm and Salt Efficiency options. See Programming the Control for details on these two options. SALT LEVEL 3.
GEAppliances.com Service: Manually Advance Recharge Check NOTE: The control display must show a steady time (not flashing). 1. Press the RECHARGE button and hold in for three seconds. RECHARGE begins to flash as the water softening system enters the fill cycle of recharge. Remove the brinewell cover and, using a flashlight, observe fill water entering the brine tank. If water does not enter the tank, look for an obstructed nozzle, venturi, fill flow plug or brine tubing.
Care and cleaning of the water softening system. Checking the Salt Storage Level and Refilling Brine (salt dissolved in water) is needed for each and every recharge. The water for making brine is metered into the salt storage area by the water softening system valve and control. However, you must keep the tank supplied with salt. When to refill with salt: If the blue indicator light and DAYS TO EMPTY are flashing, there is less than 15 days supply of salt. Refill with salt.
Before you call for service… GEAppliances.com Troubleshooting Tips Save time and money! Review the chart on the following pages first and you may not need to call for service. NO SOFT WATER – Most Common Problems: Check the following before calling for service: • Not enough salt—should be at least 1/3 full. • Bypass valve in “Bypass” position—knob should be in the “OUT” (service) position. • Hardness setting too low. Check hardness setting and adjust.
Before you call for service… Troubleshooting Tips Problem Possible Causes What To Do Water hard sometimes Using hot water while the water softening system is regenerating • Avoid using hot water during water softening system recharge because the water heater will refill with hard water. See Automatic Hard Water Bypass During Recharge section, page 14. Control HARDNESS number setting too low • Press the MODE button until arrow points to HARDNESS.
GEAppliances.com Problem Possible Causes What To Do Salty tasting or brown/yellow colored water after installation Unit not sanitized • Complete the Sanitization Procedures on page 13. • At completion of recharge cycle (approx. 2 hrs), run water from faucets to purge the salty water. Low water pressure Check pressure. • Drain height 8′ or less, pressure should be minimum of 20 psi. • Drain height above 8′, pressure should be minimum of 50 psi. Restricted drain hose • Clean and reconnect hose.
Notes.
Notes. GEAppliances.
Notes.
Parts list. GEAppliances.
Parts list.
Parts catalog. GEAppliances.com GENERAL ELECTRIC PARTS CATALOG G X S F 4 0 H REF. NO. PART NO.
Parts catalog. GENERAL ELECTRIC PARTS CATALOG G X S F 4 0 H REF. NO. PART NO.
GE Water Softening System Warranty. (For Customers in the United States) All warranty service provided by our SmartWater™ Authorized Servicer Network. To schedule service, call 800.952.5039 (U.S.) or 866.777.7627 (Canada). Please have serial number and model number available when calling for service. Staple your receipt here. Proof of the original purchase date is needed to obtain service under the warranty.
GE Water Softening System Warranty. (For Customers in Canada) All warranty service provided by our Factory Service Centers or an authorized technician. For service, call toll free 1.866.777.7627. Please have serial number and model number available when calling for service. For The Period Of: We Will Replace: One Year From the date of the original purchase Any part of the Water Softening System which fails due to a defect in materials or workmanship.
Información de seguridad . . . .34 Instrucciones de instalación . . . . . . . . . . . . . . .35–45 Instrucciones paso por paso . . . .38–45 Instrucciones de operación Cómo limpiar la ensambladura de la boquilla y el Venturi . . . . . . . . . .48 Cómo romper un puente de sal . . . . .47 Funciones . . . . . . . . . . . . . . . . . . . . . . . . .49 Servicio . . . . . . . . . . . . . . . . . . . .46, 50–52 Sistema de descalcificación de agua . . . . . . . . . . . . . . . . . . . . . . .
INFORMACIÓN IMPORTANTE DE SEGURIDAD. LEA TODAS LAS INSTRUCCIONES ANTES DEL USO. ADVERTENCIA Por su seguridad, se debe seguir la información en este manual con el fin de reducir el riesgo de una descarga eléctrica, daños a la propiedad o daños personales. PRECAUCIONES DE SEGURIDAD ■ Revise y cumpla con todos los códigos estatales y locales. Observe las pautas aquí presentadas. ■ Tenga cuidado al manipular el sistema de descalcificación de agua.
Instrucciones Sistema Suavizante de Agua Modelo GXSF40H de instalación ¿Preguntas? Llame 800.GE.CARES (800.432.2737) o Visite nuestra página en la red en: GEAppliances.com ADVERTENCIA: Lea este manual en su totalidad. No seguir todas las pautas y normas podría causar lesiones personales o daños a la propiedad. • Consulte con la autoridad de obras públicas estatal/local para los códigos de plomería. Deberá seguir estas pautas para instalar el sistema de filtración de agua.
Instrucciones de instalación DESEMPACADO E INSPECCIÓN DONDE INSTALAR EL DESCALCIFICADOR Cerciórese de inspeccionar completamente el descalcificador en busca de daños durante el envío o partes que puedan haberse perdido. También revise en busca de daños en la caja de envío. Póngase en contacto con la compañía de transporte para cualquier reclamo por daño o pérdida. El fabricante no es responsable por daños sufridos durante el tránsito.
Instrucciones de instalación PLANIFIQUE LA INSTALACIÓN DEL DESCALCIFICADOR Lo primero que debe decidir es cómo instalar las tuberías que entran y salen del descalcificador. Fíjese en la tubería de agua en el punto donde conectará el descalcificador. ¿La tubería está soldada con cobre, pegada con plástico, o roscada galvanizada? ¿Cuál es el tamaño de la tubería? ADVERTENCIA: Use solamente fundente y soldadura sin plomo para evitar envenenamiento de plomo. Consulte la Ilustración de instalación normal.
Instrucciones de instalación ANTES DE COMENZAR 2 MUEVA LA ENSAMBLADURA DEL DESCALCIFICADOR HACIA SU POSICIÓN DE INSTALACIÓN • Suspenda el suministro de gas o de energía eléctrica que alimenta el calentador de agua, en la posibilidad de que el calentador pueda drenarse mientras usted drena las tuberías. • Desconecte el suministro de agua hacia los tubos que han de ser cortados y drene las tuberías de agua de la casa. • Abra los grifos de agua caliente y los de agua fría en una ubicación baja.
Instrucciones de instalación 3 CONECTE LAS TUBERÍAS QUE ENTRAN Y SALEN DEL DESCALCIFICADOR 4 CONECTE Y HAGA FUNCIONAR LA MANGUERA DE DRENAJE DE LA VÁLVULA PRECAUCIÓN: Siga todas las precauciones siguientes mientras conecta la plomería de entrada y salida. Vea la ilustración de instalación normal. • Use la manguera de drenaje (se ha incluido una de 20 pies) para adherirla al accesorio de drenaje de la válvula.
Instrucciones de instalación 4 CONECTE Y HAGA FUNCIONAR LA MANGUERA DE DRENAJE DE LA VÁLVULA 5 INSTALE LOS ACCESORIOS DE SOBREFLUJO DEL TANQUE DE SALMUERA Y LA MANGUERA (CONT.) • Elevar la manguera de drenaje podría causar una presión negativa que podría reducir la toma del contenido de sal durante las regeneraciones.
Instrucciones de instalación 6 INSTALE LA ABRAZADERA DE TIERRA 7 PURGUE LAS TUBERÍAS, SAQUE EL AIRE DEL DESCALCIFICADOR Y PRUEBE SU INSTALACIÓN EN BÚSQUEDA DE FUGAS DE AGUA (CONT.) PELIGRO: No adherir apropiadamente la abrazadera de tierra podría resultar en una descarga eléctrica. • Coloque la válvula de bypass en la posición de “servicio”, en la forma EXACTA como le especificamos a continuación. MANTENGA LOS GRIFOS DE AGUA DESCALCIFICADA ABIERTOS.
Instrucciones de instalación 9 CONECTAR A LA FUENTE ELÉCTRICA Para lograr acceso al transformador/ensambladura del cable eléctrico, remueva la cubierta del agujero de sal del descalcificador. Desengrape las orejillas en la parte posterior de la cubierta superior y rote la cubierta hacia arriba para remover. NO TIRE O DESCONECTE LOS ALAMBRES. • El descalcificador funciona con suministro eléctrico de 24 voltios-60 Hz. El transformador incluido cambia de 120 voltios AC, normal en las residencias, a 24 voltios.
Instrucciones de instalación AJUSTE EL NIVEL DE DUREZA DEL AGUA (CONT.) AJUSTE EL NIVEL DE SAL 3. Cuando la pantalla muestre el nivel de dureza del agua deseado (en granos por galón), oprima MODE (modo) para aceptar. 1. Presione el botón MODE (modo) hasta que la flecha señale SALT LEVEL (nivel de sal). 2. Determine el nivel de sal en el tanque de salmuera utilizando un indicador amarillo en el costado del depósito de salmuera, dentro del tanque de salmuera (vea la ilustración de la página 37). 3.
Instrucciones de instalación AJUSTES OPCIONALES DE CONTROL SEÑALS La pantalla del controlador ofrece varias opciones y características. SEÑAL DE HORA PERDIDA ALARMA DE BAJO NIVEL DE SAL Si la hora se pierde en la pantalla debido a una interrupción en el suministro eléctrico, la luz indicadora azul se enciende cuatro veces intermitentemente cada segundo, hasta que se ingrese la hora actual del día.
Instrucciones de instalación PROCEDIMIENTOS DE DESINFECCIÓN través del descalcificador de agua. Este proceso dura aproximadamente 2 horas. Para completar la instalación, siga los procedimientos de desinfección siguientes. 4. Si después de la desinfección, el agua de la llave de la casa tiene un sabor salado o tiene un color ligero, esto es un preservativo del tanque de resina. Abra los grifos de agua fría descalcificada por unos minutos hasta que el agua se aclare.
Sobre el sistema de descalcificación de agua. Servicio Cuando el sistema descalcificador de agua está proporcionando agua descalcificada, a esto se le llama “Servicio”. Durante el servicio, el agua dura fluye desde la tubería de agua principal de la casa hacia el sistema de descalcificación de agua. En el interior del tanque de resina del sistema de descalcificación de agua hay una película o capa compuesta de miles de resinas plásticas diminutas.
GEAppliances.com Cómo romper un puente de sal A veces, una capa dura de sal o puente de sal se forma en el área de almacenamiento de la sal. Esto generalmente se debe a la humedad alta o al uso de algún tipo de sal equivocada. Cuando la sal forma puente, un espacio vacío se forma entre el agua y la sal. Entonces la sal no se disuelve en el agua para hacer la salmuera. Si el tanque de la sal está lleno de sal, es difícil saber si existe o no un puente de sal.
Sobre el sistema de descalcificación de agua. Cómo limpiar la ensambladura de la boquilla y el Venturi Es necesario que la boquilla y el Venturi estén limpios para que el sistema de descalcificación de agua funcione apropiadamente. Esta pequeña unidad ejecuta la succión para mover la salmuera del área de almacenamiento de sal hacia el tanque de resina durante la recarga. Si está atascada con sal, sucia, etc., el sistema de descalcificación de agua no funcionará y usted solamente tendrá agua dura.
GEAppliances.com Operación normal, Pantalla de control Durante la operación normal, la hora actual del día y AM o PM y DAYS TO EMPTY (días hasta vacío) se muestra en el área de la pantalla de control. Cuando la computadora de demanda determina que una recarga es necesaria, el mensaje RECHARGE TONIGHT (recargue esta noche) comienza a parpadear en la pantalla con la hora actual.
Sobre el sistema de descalcificación de agua.
GEAppliances.com Servicio: Diagnóstico electrónico iniciado manualmente 1. Para entrar a la función de diagnóstico, oprima y mantenga oprimido el botón MODE (modo) por tres segundos hasta que aparezca la pantalla de Low Salt Alarm (alarma de bajo nivel de sal). 2. Presione el botón MODE (modo) 2 veces para avanzar a las opciones Low Salt Alarm (alarma de bajo nivel de sal) y Salt Efficiency (eficiencia de la sal). Vea la sección Programación del control para detalles sobre estas dos opciones.
Sobre el sistema de descalcificación de agua. Servicio: Configurar el código del modelo (F o H) 1. Para cambiar o revisar el código del modelo, presione primero y sostenga el botón MODE (modo) por tres segundos hasta que aparezca la pantalla de la LOW SALT ALARM (alarma de bajo nivel de sal). 2. Presione y sostenga el botón MODE (modo) nuevamente por tres segundos. En la parte superior de la pantalla aparece la palabra SALT LEVEL . 3.
Cuidado y limpieza del sistema de descalcificación de agua. GEAppliances.com Inspeccione el nivel de almacenamiento de la sal y el rellenado Se necesita salmuera (sal disuelta en agua) para cada recarga. El agua para hacer la salmuera es medida cuando entra al área de almacenamiento de la sal a través de la válvula del sistema de descalcificación de agua y el control. Sin embargo, usted debe mantener el tanque con sal.
Antes de llamar para solicitar servicio… Consejos para la identificación y solución de averías ¡Ahorre tiempo y dinero! Revise la tabla en esta página primero y quizás no tenga que llamar para solicitar servicio. NO HAY AGUA DESCALCIFICADA – Problemas más comunes: Inspeccione lo siguiente antes de llamar para solicitar servicio: • No hay suficiente sal—debe estar por lo menos lleno hasta 1/3. • La válvula de bypass está en la posición de “Bypass”—el indicador debe estar en la posición “OUT” (servicio).
GEAppliances.com Problema Posible causa Qué hacer A veces el agua está dura Usar agua caliente mientras el descalcificador de agua está en el proceso de regeneración • Evite usar agua caliente mientras el descalcificador de agua está en el proceso de recarga porque el calentador de agua se rellenará con agua dura. Consulte la sección Circunvalación del agua dura automática durante la recarga, página 46.
Antes de llamar para solicitar servicio… Problema Posible causa Nivel alto/excesivo de agua en el tanque de la salmuera La válvula de drenaje de la manguera está • Cualquier restricción en la manguera de drenaje podría evitar la doblada y eso la está obstruyendo, o está operación apropiada de la boquilla y el Venturi y reduce o evita demasiado elevada, o su flujo está obstruido que se descargue la salmuera durante la recarga.
Notas. GEAppliances.
Lista de partes.
GEAppliances.
Catálogo de partes. CATÁLOGO DE PARTES DE GENERAL ELECTRIC G X S F 4 0 H NO. REFER. NO.
GEAppliances.com CATÁLOGO DE PARTES DE GENERAL ELECTRIC G X S F 4 0 H NO. REFER. NO.
Garantía GE para el Sistema de Descalcificación de Agua. Todos los servicios de garantía son proporcionados por nuestra red de proveedores de servicios autorizados SmartWater.™ Para programar un servicio, llame al 800.GE.CARES (800.952.5039). Cuando llame para solicitar servicio, por favor tenga a mano el número de serie y el número de modelo. Pegue su recibo aquí. La prueba de la fecha de la compra original es necesaria para recibir el servicio bajo la garantía.
Soporte al Consumidor. Página Web de GE Appliances GEAppliances.com ¿Tiene alguna pregunta sobre su electrodoméstico? ¡Pruebe la página Web de GE Appliances 24 horas al día, cualquier día del año! Para mayor conveniencia y servicio más rápido, ya puede descargar los Manuales de los Propietarios o pedir piezas en línea. Solicite una reparación GEAppliances.com El servicio de expertos GE está a tan sólo un paso de su puerta. Llame al 800.GE.CARES (800.432.
Consumer Support. GE Appliances Website GEAppliances.com Have a question or need assistance with your appliance? Try the GE Appliances Website 24 hours a day, any day of the year! For greater convenience and faster service, you can now download Owner’s Manuals or order parts online. Schedule Service GEAppliances.com Expert GE repair service is only one step away from your door. Schedule your service at your convenience by calling 800.GE.CARES (800.432.2737) during normal business hours.