Electric Coil & Radiant Ranges GEAppliances.com For a Spanish version of this manual, visit our Website at GEAppliances.com. Para consultar una version en español de este manual de instrucciones, visite nuestro sitio de internet GEAppliances.com. Safety Instructions . . . . . . . . 2–6 Operating Instructions Features . . . . . . . . . . . . . . . . . . . . . 13-16 Oven . . . . . . . . . . . . . . . . . . . . . . . . 10-12 Oven Thermostat . . . . . . . . . . . . . . . 19 Sabbath Feature . . . . . . . .
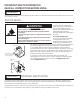
IMPORTANT SAFETY INFORMATION. READ ALL INSTRUCTIONS BEFORE USING. WARNING Read all safety instructions before using the product. Failure to follow these instructions may result in fire, electric shock, serious injury or death. ANTI-TIP DEVICE WARNING To reduce the risk of tipping the range, the range must be secured Tip-Over Hazard by a properly installed anti-tip bracket. See installation instructions A child or adult can tip the range and be killed.
GEAppliances.com WARNING GENERAL SAFETY INSTRUCTIONS ■ Use this appliance for its intended purpose as described in this Owner’s Manual. ■ Be sure your appliance is properly installed and grounded by a qualified installer in accordance with the provided installation instructions. ■ Do not attempt to repair or replace any part of your range unless it is specifically recommended in this manual. All other servicing should be referred to a qualified technician.
IMPORTANT SAFETY INFORMATION. READ ALL INSTRUCTIONS BEFORE USING. WARNING IN THE EVENT OF A FIRE, TAKE THE FOLLOWING STEPS TO PREVENT THE FIRE FROM SPREADING: ■ Do not use water on grease fires. Never pick up a flaming pan. Turn the controls off. Smother a flaming pan on a surface unit by covering the pan completely with a well-fitting lid, cookie sheet or flat tray. Use a multi-purpose dry chemical or foam-type fire extinguisher.
GEAppliances.com WARNING RADIANT COOKTOP SAFETY INSTRUCTIONS (Some models) ■ Use care when touching the cooktop. The glass surface of the cooktop will retain heat after the controls have been turned off. ■ Do not cook on a broken cooktop. If glass cooktop should break, cleaning solutions and spillovers may penetrate the broken cooktop and create a risk of electric shock. Contact a qualified technician immediately. ■ Avoid scratching the glass cooktop.
IMPORTANT SAFETY INFORMATION. READ ALL INSTRUCTIONS BEFORE USING. WARNING SELF-CLEANING OVEN SAFETY INSTRUCTIONS (Some models) The self-cleaning feature operates the oven at temperatures high enough to burn away food soils in the oven. Follow these instructions for safe operation. ■ Before operating the self-clean cycle, remove pans, shiny metal oven racks and other utensils from the oven. Only gray or black porcelain-coated oven racks and drip pans may be left in the oven.
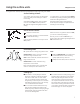
Using the surface units. GEAppliances.com Throughout this manual, features and appearance may vary from your model. Surface Cooking Controls Your surface units and controls are designed to give you a variety of heat settings for surface unit cooking. In a quiet kitchen, you may hear slight clicking sounds during cooking, indicating heat settings selected are being maintained.
Using the surface units. (on some models) Throughout this manual, features and appearance may vary from your model. Indicator Lights (on radiant glass models only) Min Min Max Max Burner On A Hot indicator light will glow when any radiant element is hot and will remain on (even after the unit is turned off) until the surface is cool enough to touch. A Burner On indicator light will glow when any surface unit is on. Hot Using the radiant surface units.
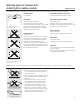
Selecting types of cookware for radiant glass cooktop models. GEAppliances.com The following information will help you choose cookware which will give good performance on glass cooktops. Check pans for flat bottoms by using a straight edge. Stainless Steel: Porcelain Enamel on Cast Iron: recommended recommended if bottom of pan is coated Aluminum: Porcelain Enamel on Steel: heavy weight recommended Good conductivity.
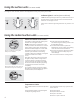
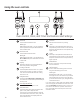
Using the oven controls. Oven Control, Clock, and Timer and Features and Settings Bake Pad Touch to select the bake function. Start Pad Must be touched to start any cooking. Bake Light - Pad Flashes while in edit mode - you can change the oven temperature at this point. Glows when the oven is in bake mode Broil Hi/Lo Pad Short taps to this pad will decrease the time or temperature by small amounts. Touch and hold the pad to decrease the time or temperature by larger amounts.
Using the oven for broiling. GEAppliances.com Clock and Timer (on some models) TIME Pad Touch this pad to select the timer feature. CLOCK Pad Touch this pad before setting the clock. Display Shows the time of day and the time set for the timer, cook time or start time. Appearance may vary. OVEN TEMP SET +/- Pads These pads allow you to set the clock and timer. Oven Temperature Knob (on some models) Turn this knob to the setting you want.
Using the oven. How to Set the Oven for Baking Touch the Bake pad. Touch the + or – pads to set the desired temperature. Touch the Start pad. Check food for doneness at minimum time on recipe. Cook longer if necessary. Touch the Clear/Off pad when cooking is complete. Preheating and Pan Placement Preheat the oven if the recipe calls for it. To preheat, set the oven at the correct temperature. Preheating is necessary for good results when baking cakes, cookies, pastries and breads.
Using the clock and timer. GEAppliances.com Not all features are on all models. To Set the Clock Clock The clock must be set to the correct time of day for the automatic oven timing functions to work properly. The time of day cannot be changed during a delayed cooking or a delayed selfcleaning cycle. Touch the Clock pad twice. Start On Make sure the clock is set to the correct time of day. Touch the + or – pads.
Using the timed baking and roasting features. (on some models) NOTE: )RRGV WKDW VSRLO HDVLO\³VXFK DV PLON HJJV ILVK VWXIILQJV SRXOWU\ DQG SRUN³VKRXOG QRW EH DOORZHG WR VLW IRU PRUH than 1 hour before or after cooking. Room temperature promotes the growth of harmful bacteria. Be sure that the oven light is off because heat from the bulb will speed harmful bacteria growth. How to Set an Immediate Start and Automatic Stop Bake The oven will turn on immediately and cook for a selected length of time.
Special features of your oven control. GEAppliances.com Your new touch pad control has additional features that you may choose to use. The following are the features and how you may activate them. The special feature modes can only be activated while the display is showing the time of day. They remain in the control’s memory until the steps are repeated. When the display shows your choice, touch the Start/On pad. The special features will remain in memory after a power failure.
Special features of your oven control. Tones at the End of a Timed Cycle At the end of a timed cycle, 3 short beeps will sound followed by one beep every 6 seconds until the Clear/Off pad is touched. This continuous 6 second beep may be canceled. To cancel the 6 second beep: Touch the Bake and Broil Hi/Lo pads at the same time for 3 seconds until the display shows SF. Touch the Broil Hi/Lo pad. The display shows Con Beep (continuous beep). Touch the Broil Hi/Lo pad again. The display shows Beep.
Using the Sabbath feature. (on some models) (Designed for use on the Jewish Sabbath and Holidays) GEAppliances.com The Sabbath feature can be used for baking only. It cannot be used for broiling, self-cleaning, convection baking, steam cleaning or delay start cooking. NOTE: The oven light comes on automatically (on some models) when the door is opened and goes off when the door is closed. The bulb may be removed. See the Oven Light Replacement section.
Using the Sabbath feature. (on some models) (Designed for use on the Jewish Sabbath and Holidays) How to Exit the Sabbath Feature Touch the Clear/Off pad. If the oven is cooking, wait for a random delay period of approximately 30 seconds to 1 minute, until only " is in the display. Touch and hold both the Bake and Broil Hi/Lo pads, at the same time, until the display shows SF. Tap the Delay/Start pad until 12 shdn or no shdn appears in the display.
$GMXVW WKH RYHQ WKHUPRVWDW³(DV\ WR GR \RXUVHOI GEAppliances.com You may find that your new oven cooks differently than the one it replaced. Use your new oven for a few weeks to become more familiar with it. If you still think your new oven is too hot or too cold, you can adjust the thermostat yourself. Do not use thermometers, such as those found in grocery stores, to check the temperature setting of your oven. These thermometers may vary 20–40°F.
Using the self-cleaning oven. (on some models) Before a Clean Cycle The oven must be cool in order to set the selfclean cycle. We recommend venting your kitchen with an open window or using a ventilation fan or hood during the first self-clean cycle. Wipe up heavy soil on the oven bottom. Remove broiler pan, broiler grid, all cookware and any aluminum foil from the oven.
The oven door must be closed and all controls must be set correctly for the cycle to work properly. How to Delay the Start of Cleaning Touch the Self Clean pad. Using the + or – pads, enter the desired clean time. Touch the Delay Start pad. Using the + or – pad, enter the time of day you want the clean cycle to start. The door locks automatically. The display will show the start time.
Care and cleaning of the range. Be sure electrical power is off and all surfaces are cool before cleaning any part of the range. WARNING Tip-Over Hazard A child or adult can tip the range and be killed. Verify the anti-tip bracket has been properly installed and engaged. Ensure the anti-tip bracket is re-engaged when the range is moved. Do not operate the range without the anti-tip bracket in place and engaged. Failure to follow these instructions can result in death or serious burns to children or adults.
GEAppliances.com Porcelain Enamel Cooktop The porcelain enamel finish is sturdy but breakable if misused. This finish is acidresistant. However, any acidic foods spilled (such as fruit juices, tomato or vinegar) should not be permitted to remain on the finish. If acids spill on the cooktop while it is hot, use a dry paper towel or cloth to wipe it up right away. When the surface has cooled, wash with soap and water. Rinse well.
Care and cleaning of the range. Control Panel and Knobs It’s a good idea to wipe the control panel after each use of the oven. Use a damp cloth to clean or rinse. For cleaning, use mild soap and water or a 50/50 solution of vinegar and water. For rinsing, use clean water. Polish dry with a soft cloth. Pull the knob straight off the stem.
GEAppliances.com Surface Units (on some models) Surface unit Be sure all the controls are turned to OF and the surface units are cool before attempting to remove them. Receptacle Drip pan To clean the surface units, turn the control to the highest setting for a minute. The coils will burn off any soil. To replace a surface unit: Replace the drip pan into the recess in the cooktop. Make sure the opening in the pan lines up with the receptacle.
Care and cleaning of the range. Oven Vent On glass cooktop models, the oven vent is located behind the right-rear surface unit. Never cover the opening with aluminum foil or any other material. On coil cooktop models, the oven is vented through an opening under the right-rear surface unit. Painted Surfaces (on some models) Painted surfaces include the sides of the range and the sides of the door trim. To clean the painted surfaces, use a hot, damp cloth with a mild detergent suitable for these surfaces.
Cleaning the glass cooktop. (on some models) GEAppliances.com Normal Daily Use Cleaning Clean your cooktop after each spill. Use CERAMA BRYTE® Ceramic Cooktop Cleaner. ONLY use CERAMA BRYTE® Ceramic Cooktop Cleaner on the glass cooktop. Other creams may not be as effective. Shake the cleaning cream well. Apply a few drops of CERAMA BRYTE® Ceramic Cooktop Cleaner directly to the cooktop.
Cleaning the glass cooktop. (on some models) GEAppliances.com Metal Marks and Scratches Be careful not to slide pots and pans across your cooktop. It will leave metal markings on the cooktop surface. These marks are removable using the CERAMA BRYTE® Ceramic Cooktop Cleaner with the CERAMA BRYTE® Cleaning Pad for Ceramic Cooktops. If pots with a thin overlay of aluminum or copper are allowed to boil dry, the overlay may leave black discoloration on the cooktop.
Installation Instructions 24" GE Electric Ranges Questions? Call 800.GE.CARES (800.432.2737) or Visit our Website at: GEAppliances.com BEFORE YOU BEGIN FOR YOUR SAFETY: Read these instructions completely and carefully. To reduce the risk of burns or fire when reaching over hot surface elements, cabinet storage space above the cooktop should be avoided.
Installation Instructions PREPARE TO INSTALL THE RANGE TOOLS YOU WILL NEED 2 PREPARE THE OPENING • Allow 2s spacing from the range to adjacent vertical Drill with 1/8” Bit walls above the cooktop surface. Allow 30s minimum clearance between the surface units and the bottom of unprotected wood or metal top cabinet, and 15s minimum between the countertop and adjacent cabinet bottom.
Installation Instructions ELECTRICAL CONNECTIONS ELECTRICAL REQUIREMENTS Use only a 3-conductor or a 4-conductor UL-listed range cord. These cords may be provided with ring terminals on wire and a strain relief device. WARNING: For personal safety, do not use an extension cord with this appliance. Remove house fuse or open circuit breaker before beginning installation. A range cord rated at 40 amps with 125/250 minimum volt range is required.
Installation Instructions ELECTRICAL CONNECTIONS (CONT.) C 3 POWER CORD AND STRAIN RELIEF INSTALLATION A Remove the wire cover (on the back of the range) by removing two (2) screws using a Phillips screw driver. Do not discard these screws. For power cord installations only (see the next step if using conduit), assemble the strain relief in the hole. Insert the power cord through the strain relief and tighten. Allow enough slack to easily attach the cord terminals to the terminal block.
Installation Instructions 4 3-WIRE POWER CORD INSTALLATION 5 4-WIRE POWER CORD INSTALLATION WARNING: The neutral or ground wire WARNING: The neutral wire of the of the power cord must be connected to the neutral terminal located in the center of the terminal block. The power leads must be connected to the left and the right terminals of the terminal block. A supply circuit must be connected to the neutral terminal located in the center of the terminal block.
Installation Instructions ELECTRICAL CONNECTIONS (CONT.) 6 3-WIRE CONDUIT INSTALLATION 7 4-WIRE CONDUIT INSTALLATION A A Loosen the 3 lower terminal screws from the terminal block. Insert the center bare wire (white/ neutral) tip through the bottom center terminal block opening. On certain models, the wire will need to be inserted through the ground strap opening and then into the bottom center block opening.
Installation Instructions INSTALL THE RANGE 10 REMOVE STORAGE DRAWER 9 ANTI-TIP DEVICE INSTALLATION Pull the drawer out all the way. WARNING Lift the front of the drawer until the stops clear the guide. Tip-Over Hazard • A child or adult can tip the range and be killed. • Install the anti-tip bracket to the wall or floor. • Engage the range to the anti-tip bracket by sliding the range back so the anti-tip arm slides under the anti-tip bracket. • Re-engage the anti-tip bracket if the range is moved.
Installation Instructions INSTALL THE RANGE 12 REPLACE THE STORAGE DRAWER 14 OPERATION CHECKLIST Place the drawer rail on the guides. • Turn on one of the surface units to observe that the element glows within 60 seconds. Turn the unit off when glow is detected. If the glow is not detected within the time limit, recheck the range wiring connections. If change is required, retest again. If no change is required, have building wiring checked for proper connections and voltage.
Before You Call For Service… GEAppliances.com Troubleshooting Tips Save time and money! Review the chart on this page first and you may not need to call for service. Problem Radiant Cooktops Possible Causes What To Do Surface units will not maintain a rolling boil or cooking is not fast enough Improper cookware being used. • Use pans which are flat and match the diameter of the surface unit selected. Surface units not work properly A fuse in your home may be blown or the circuit breaker tripped.
Before You Call For Service… Troubleshooting Tips Problem Possible Causes What To Do Oven light does not work Light bulb is loose or defective. • Tighten or replace the bulb. Switch operating light is broken. • Call for service. Oven will not work Plug on range is not completely inserted in the electrical outlet. • Make sure electrical plug is plugged into a live properly grounded outlet. A fuse in your home may be blown, or the circuit breaker tripped.
GEAppliances.com Problem Possible Causes What To Do Oven temperature too hot or too cold Oven thermostat needs adjustment. • See the Adjust the oven thermostat - Easy to do yourself! section. Clock and timer do not work Plug on rang is not completely inserted in the electrical outlet. • Make sure electrical plug is plugged into a live, properly grounded outlet. A fuse in your home may be blown or the circuit breaker tripped. • Replace fuse or reset circuit breaker. Oven controls improperly set.
Before You Call For Service… Troubleshooting Tips Problem Possible Causes What To Do The oven temperature is too high to set a self-clean operation • Allow the range to cool to room temperature and reset the controls. Oven controls improperly set. • See the Using the self-cleaning oven section. Oven door is not in the locked position. Make sure the door is closed. Oven starts a selfclean cycle when you wanted to bake, roast or broil. Oven door locked during cooking.
Accessories. Looking For Something More? (Not all accessories are available for all models.) You can find these accessories and many more at GEAppliances.com (U.S.) or www.GEAppliances.ca (Canada), or call 800.626.2002 (U.S.) or 800.661.1616 (Canada) (during normal business hours). Have your model number ready.
Notes.
Electric Range Warranty. GEAppliances.com All warranty service provided by our Factory Service Centers, or an authorized Customer Care® technician. To schedule service, on-line, 24 hours a day, visit us at GEAppliances.com, or call 800.GE.CARES (800.432.2737). Please have serial number and model number available when calling for service. Staple your receipt here. Proof of the original purchase date is needed to obtain service under the warranty.
Consumer Support. GE Appliances Website GEAppliances.com Have a question or need assistance with your appliance? Try the GE Appliances Website 24 hours a day, any day of the year! For greater convenience and faster service, you can now download Owner’s Manuals, order parts or even schedule service on-line. Schedule Service GEAppliances.com Expert GE repair service is only one step away from your door. Get on-line and schedule your service at your convenience 24 hours any day of the year! Or call 800.
eléctricas independientes, empotrables y encastrables Estufas GEAppliances.com En Canadá: www.GEAppliances.ca Instrucciones de Seguridad. . . . . . . . . . . . . . . . . . . 2–6 Manual de Usuario Instrucciones de Funcionamiento e Instrucciones de Funciones . . . . . . . . . . . . . . . . . . . . . . . . . . . . . . . . . . . . . . . . . . . . . . 13-16 Instalación Horno . . . . . . . . . . . . . . . . . . . . . . . . . . . . . . . . . . . . . . . . . . . . . . 10–12 Termostato del Horno. . . . . . . .
INFORMACIÓN IMPORTANTE DE SEGURIDAD. LEA TODAS LAS INSTRUCCIONES ANTES DE SU USO. ADVERTENCIA Lea todas las instrucciones de seguridad antes de utilizar este producto. No seguir estas instrucciones puede generar un incendio, una descarga eléctrica, lesiones corporales o la muerte. DISPOSITIVO ANTI-VOLCADURAS Para reducir el riesgo de volcar la cocina, ésta debe sujetarse mediante un soporte antiRiesgo de Volcaduras volcaduras con una adecuada Un niño o adulto pueden volcar la cocina y morir. instalación.
GEAppliances.com ADVERTENCIA INSTRUCCIONES GENERALES DE SEGURIDAD Use este aparato sólo con el objetivo para el que fue creado, como se describe en este Manual del Propietario. Asegúrese de que un técnico calificado realice una correcta instalación y puesta a tierra del artefacto de acuerdo con las instrucciones de instalación provistas. No intente reparar o cambiar ninguna pieza de su cocina a menos que esté específicamente recomendado en este manual.
INFORMACIÓN IMPORTANTE DE SEGURIDAD. LEA TODAS LAS INSTRUCCIONES ANTES DE SU USO. ADVERTENCIA EN CASO DE INCENDIO, SIGA LOS SIGUIENTES PASOS PARA EVITAR LA PROPAGACIÓN DEL FUEGO: No utilice agua en incendios de grasa. Nunca levante una sartén en llamas. Apague los controles. Apague una sartén en llamas sobre una unidad de superficie cubriendo la sartén por completo con una tapa que ajuste bien, una plancha para galletas o una bandeja plana.
GEAppliances.com ADVERTENCIA INSTRUCCIONES DE SEGURIDAD DE LA ESTUFA RADIANTE (algunos modelos) Tenga cuidado al tocar la estufa. La superficie de vidrio de la estufa retendrá calor después de que los controles se hayan apag ado. No cocine sobre una estufa rota. Si la estufa se rompe, las soluciones de limpieza y los derrames pueden penetrar en la estufa rota y crear un riesgo de descarga eléctrica. Comuníquese con un técnico calificado de inmediato. Evite rayar la estufa de vidrio.
INFORMACIÓN IMPORTANTE DE SEGURIDAD. LEA TODAS LAS INSTRUCCIONES ANTES DE SU USO. ADVERTENCIA INSTRUCCIONES DE SEGURIDAD DEL HORNO AUTO-LIMPIANTE (algunos modelos) La característica de auto-limpieza funciona en el horno a temperaturas lo suficientemente elevadas como para quemar los restos de alimentos que quedaron dentro del horno. Siga estas instrucciones para una operación segura.
Cómo usar los quemadores superiores GEAppliances.com A lo largo de este manual, las características y la apariencia pueden variar de su modelo. Control de los Quemadores Superiores Los quemadores superiores y las perillas para controlarlos están diseñados para darle una variedad de rangos de temperatura para cocinar. En ambas posiciones LO y HI, usted escuchará un pequeño sonido “click”. HI representa la máxima temperatura alcanzada; LO representa la mínima temperatura.
Uso de los quemadores superiores. (Sólo en algunos modelos) A lo largo de este manual, las características y la apariencia pueden variar de su modelo. Luces Indicadoras (sólo en modelos de cubierta radiante) Min Min Max Burner On Max Un indicador HOT encenderá cuando alguno de los elementos radiantes este caliente y permanecerá encendido (incluso después de que el elemento este apagado) hasta que la superficie este suficientemente fría al tacto.
Elección de los tipos de recipientes de cocción para modelos de estufa de vidrio. GEAppliances.com La siguiente información lo ayudará a elegir los recipientes de cocción que brindan un buen desempeño en estufas de vidrio. Acero inoxidable: Recomendado Aluminio: Verifique que los recipientes tengan bases planas utilizando una regla. Se recomienda de capa gruesa Buena conductividad. Los residuos de aluminio a veces parecen rayones sobre la estufa pero pueden quitarse si se los limpia de inmediato.
Cómo usar los controles del horno. Control de las características y configuraciones del Horno, Reloj y Temporizador. Bake Pad (Botón de Hornear) Toque este botón para seleccionar la función de horneado. Bake Light (Luz de Hornear) Parpadea cuanto está en la modalidad editar puede cambiar la temperatura del horno en este punto. Brilla cuando el horno esta en la modalidad de hornear. Broil Hi/Lo Pad (Botón Asar Alto / Bajo ) Toque este botón para acceder a la función de asar.
Cómo usar el horno. GEAppliances.com Reloj y Cronómetro (en ciertos modelos) TIME Pad (Cronómetro) Toque este botón para seleccionar la función de cronómetro. CLOCK Pad (Reloj) Toque este botón antes de establecer la hora del reloj. La apariencia puede variar OVEN TEMP Pantalla Muestra la hora del día y el tiempo establecido para el cronómetro, tiempo de cocción o el tiempo de inicio. SET +/- Pads (Botones de +/-) Estos botones le permiten establecer la hora del día y el tiempo del cronómetro.
Cómo usar el horno. Cómo preparar el horno para rostizar u hornear. Toque el botón de BAKE (hornear) Toque el botón de + ó - para establecer la temperatura deseada. Toque el botón de START (Inicio). Revise el cocimiento de sus alimentos cuando haya transcurrido el mínimo de tiempo estipulado en su receta. Cocine por más tiempo si es necesario. Toque el botón de CLEAR/OFF (Borrar/Apagar) cuando el cocimiento haya terminado.
Cómo usar el reloj y el cronómetro. GEAppliances.com No todos los modelos cuentan con todas las características. Cómo usar el reloj. Clock El reloj debe de estar fijado a la hora correcta del día para que el temporizador del horno funcione correctamente. La hora no puede ser modificada cuando el horno esta funcionando o durante el ciclo de Auto-limpieza. de CLOCK (Reloj), la pantalla mostrará la hora original. Si esto sucede, toque el botón de CLOCK (Reloj) e ingrese la hora correcta.
Cómo usar las funciones de horneado y rostizado (para ciertos modelos) NOTA: Los alimentos muy perecederos- como la leche, huevos, pescado, embutidos, pollo y puerco- no deben de permanecer a temperatura ambiente por más de una hora antes o después de cocinados. La temperatura ambiente promueve el crecimiento de bacterias nocivas. Asegúrese de que la luz del horno permanezca apagada pues el calor del foco acelera el crecimiento de bacterias.
Funciones especiales del panel de control de su horno. GEAppliances.com Su nuevo panel digital tiene funciones adicionales que puede elegir utilizar. Las siguientes son las funciones y como puede activarlas. Las modalidades de funciones especiales solo pueden ser activadas cuando la pantalla muestre la hora del día. Permanecen en la memoria del control hasta que los pasos sean repetidos. Cuando la pantalla muestre su elección, toque el botón de START (Inicio).
Funciones especiales del panel de control de su horno. Timbre al finalizar un ciclo programado Al finalizar un ciclo programado, sonarán 3 timbres cortos seguidos de un timbre cada 6 segundos hasta que el botón de CLEAR/OFF (Borrar/ Apagar) sea tocado. Esta función de timbre cada 6 segundos puede ser cancelada. Para cancelar la función de timbre cada 6 segundos: Toque los botones de BAKE (Hornear) y BROIL HI/LO (Asar Alto/Bajo) simultáneamente durante 3 segundos hasta que la pantalla muestre el mensaje SF.
Cómo usar la función de Sabbath. (para ciertos modelos) (Diseñado para su uso durante el Sabbath Judío y otras fechas religiosas.) GEAppliances.com La función de Sabbath puede ser usada para hornear/rostizar solamente. No puede ser utilizada para asar, auto -limpieza o la función de Retrasar Inicio. NOTA: La luz del horno se enciende automáticamente (en ciertos modelos) cuando la puerta se encuentra abierta y se apaga cuando la puerta se cierra. El foco puede ser removido.
Cómo usar la función de Sabbath. (para ciertos modelos) (Diseñado para su uso durante el Sabbath Judío y otras fechas religiosas.) Cómo salir de la función de Sabbath Toque el botón de CLEAR/OFF (Borrar/Apagado). Si el horno esta funcionando, espere por un lapso de tiempo aleatorio de entre 30 segundos y un minuto, hasta que solo el símbolo ? se vea en la pantalla.
Ajuste el termostato del horno- Hágalo usted mismo! GEAppliances.com Puede que su nuevo horno cocine de manera distinta al horno que ha reemplazado. Use su nuevo horno por algunas semanas para familiarizarse con éste. Si le parece que las temperaturas de su horno son demasiado altas o demasiado bajas, usted mismo puede ajustar el termostato.
Cómo usar la función de Auto-limpieza. (para ciertos modelos) Antes del ciclo de Auto-limpieza El horno debe de estar frío para poner en marcha el ciclo de auto-limpieza. Le recomendamos abrir una ventana o usar un ventilador o campana para ventilar su cocina durante el proceso de auto-limpieza. Limpie suciedad acumulada en el piso del horno con un trapo (la apariencia puede variar) Retire la charola para asar, la rejilla para asar, cualquier otro traste o trozo de papel aluminio del horno.
La puerta del horno debe permanecer cerrada y todos los controles deben de estar programados correctamente para que el ciclo funcione apropiadamente. Cómo retrasar el inicio de la función de SELF CLEAN (auto-limpieza): Toque el botón de SELF CLEAN (Autolimpieza). Toque el botón de DELAY START (Retrasar Inicio). La puerta se bloquea automáticamente. La pantalla mostrará la hora de inicio.
Cuidado y aseo de la estufa. Asegúrese de que el horno no esté conectado y de que las superficies se encuentren a temperatura ambiente antes de asear cualquier parte de la estufa. ADVERTENCIA Riesgo de Volcaduras Un niño o adulto pueden volcar la cocina y morir. Instale el soporte anti-volcaduras sobre la pared o el piso. Asegure la estufa al soporte anti-volcaduras deslizando la estufa de vuelta de tal manera que el brazo anti-volcaduras se deslice por debajo del soporte anti-volcaduras.
GEAppliances.com Cubierta con esmalte de porcelana El acabado de esmalte de porcelana es resistente pero se puede romper por uso inadecuado. El acabado es resistente al ácido. Sin embargo, cualquier derrame de alimentos que contienen ácidos (como jugos de frutas, tomate y vinagres) no debe permanecer en el acabado. Si se derraman ácidos en la cubierta mientras esta está caliente, use una toalla de papel o un trapo para limpiarlo inmediatamente. Cuando la superficie esté fresca, lave con agua y jabón.
Cuidado y aseo de la estufa. Frente de Perillas y Perillas Es una buena idea limpiar el frente de perillas después de cada uso del horno. Use un trapo húmedo para asear o enjuagar. Para limpiar, use una mezcla de agua y jabón o una solución de una parte de agua por cada parte de vinagre. Para enjuagar, use agua. Pula con un trapo seco. Jale la perilla hasta desprenderla del vástago.
GEAppliances.com Resistencia Eléctrica tipo serpentín Resistencia Eléctrica tipo Serpentín (en ciertos modelos) Asegúrese de que todas las perillas se encuentren en apagado y que las resistencias eléctricas estén a temperatura ambiente antes de intentar retirarlas. Receptáculo charola para derrames Para asear las resistencias eléctricas, encienda a la máxima temperatura por un minuto. La espiral quemará cualquier suciedad.
Cuidado y aseo del aparato. Ventilación del Horno En los modelos con cubierta de vidrio, el horno es ventilado a través de una apertura en la parte de atrás de la cubierta. Nunca cubra la apertura con papel aluminio o cualquier otro material. En modelos con cubierta de espiral, el horno es ventilado a través de una apertura debajo de la resistencia eléctrica trasera derecha.
Cómo limpiar la cubierta de vidrio. (en ciertos modelos) GEAppliances.com Limpieza normal de uso diario SÓLO utilice el limpiador de estufas cerámicas CERAMA BRYTE® en la estufa de vidrio. Otras cremas pueden no ser tan efectivas. Para mantener y proteger la superficie de su estufa de vidrio, siga estos pasos: Limpie la estufa después de cada derrame. Utilice el limpiador de estufas cerámicas CERAMA BRYTE®.
Cómo limpiar la cubierta de vidrio. (en ciertos modelos) GEAppliances.com Marcas de metal y rayones Tenga cuidado de no deslizar ollas y sartenes a través de su estufa. Dejará marcas de metal sobre la superficie de la estufa. Estas marcas pueden quitarse utilizando limpiador de estufas cerámicas CERAMA BRYTE® con el paño de limpieza CERAMA BRYTE® para estufas cerámicas. Si se permite que ollas con una capa fina de aluminio o cobre hiervan en seco, la capa puede dejar una decoloración negra en la estufa.
Instrucciones de Instalación Aparatos Eléctricos GE 24” ¿Preguntas? Llame a 800.GE.CARES (800.432.2737) o visite nuestra página: www. GEAppliances.com POR SU SEGURIDAD: ADVERTENCIA Antes de Comenzar Para reducir el riesgo de quemaduras o incendios cuando se extienda el brazo sobre superficies calientes, evite almacenar objetos o alimentos por encima de la cubierta.
Instrucciones de Instalación PREPÁRESE PARA INSTALAR EL APARATO. HERRAMIENTAS QUE NECESITARÁ 2 PREPARE LA APERTURA • Permita 2” de espacio entre el aparato y paredes Taladro con broca de 1/8” adyacentes por encima de la superficie de la cubierta. Permita 30” de espacio mínimo entre las unidades de superficie (quemadores) y el fondo de la alacena de madera o metal, y 18” mínimo entre la encimera y el fondo adyacente de la alacena.
Instrucciones de Instalación CONEXIONES ELÉCTRICAS REQUISITOS ELÉCTRICOS Use solamente cables especificados por UL del tipo 3-hilos o 4- hilos conductores. Estos cables pueden ser suministrados con terminaciones tipo arillo y un dispositivo para reducir la tensión. Se requiere un cable para estufa especificado para 40 amperes y 125/250 volts cómo mínimo. PRECAUCIÓN: Para su seguridad, no utilice una extensión eléctrica con este aparato.
Instrucciones de Instalación CONEXIONES ELÉCTRICAS (CONT.) C 3 INSTALACIÓN DEL CABLE Y DISPOSITIVO PARA REDUCIR TENSIÓN. A Retire la cubierta del cable (parte trasera del aparato) removiendo dos (2) tornillos con un desarmador de caja de 1/4”. No deseche estos tornillos. Solo para instalaciones de cable (vea el siguiente paso si está usando tubo porta cable (conduit), ensamble el reductor de tensión en el hueco. Inserte el cable a través del reductor de tensión y apriete.
Instrucciones de Instalación CONEXIONES ELÉCTRICAS (CONT.) 4 INSTALACIÓN DE CABLE DE 3 HILOS 5 INSTALACIÓN DE CABLE DE 4 HILOS ADVERTENCIA: El hilo de tierra o ADVERTENCIA: El cable neutro del neutral del cable debe ser conectado a la terminal neutral que se encuentra en el centro del bloque para terminales eléctricas. Los cables con corriente deben ser conectados a los terminales derecha e izquierda del bloque de terminales eléctricas.
Instrucciones de Instalación CONEXIONES ELÉCTRICAS (CONT.) 7 INSTALACION CON TUBO PORTACABLE (CONDUIT) DE 4-HILOS 6 INSTALACION CON TUBO PORTACABLE (CONDUIT) DE 3-HILOS A A Afloje los tres tornillos inferiores del bloque de conexiones. Inserte la punta del cable pelado (Blanco/Neutro) a través del oricio de la terminal central del bloque de conexiones. En ciertos modelos, el cable necesitará ser insertado a través de la placa de tierra y después al oricio de la terminal central del bloque de conexiones.
Instrucciones de Instalación INSTALE LA ESTUFA 10 RETIRE O REMUEVA EL CAJON DE ALMACENAMIENTO 9 INSTALACIÓN DE DISPOSITIVO ANTIVOLCADURAS Jale el cajón hasta que pare. ADVERTENCIA Riesgo de Caída • Un niño o adulto pueden volcar la cocina y morir. • Instale el soporte anti-volcaduras sobre la pared o el piso. • Asegúrese la estufa al soporte anti-volcaduras deslizando la unidad hacia atras de tal manera que la pata niveladora sea enganchada.
Instrucciones de Instalación INSTALE LA ESTUFA 12 VUELVA A COLOCAR EL CAJON DE ALMACENAMIENTO 14 LISTA FINAL DE VERIFICACION DE OPERACIÓN • Encienda una de las resistencias eléctricas de la cubierta para observar qué la resistencia enciende dentro de los primeros 60 segundos. Apagué la resistencia cuando detecte qué haya encendido. Si no detecta qué la resistencia encendió dentro del tiempo especificado, vuelva a revisar las conexiones eléctricas.
Antes de que llame para pedir servicio... GEAppliances.com Consejos para resolver problemas Ahorre tiempo y dinero! Revise los estatutos de las siguientes páginas primero y puede que no necesite llamar para pedir servicio. Problema Posible Causa Cubiertas Radiantes Solución Los quemadores radiantes no mantienen un hervor o no cocinan rápido. Se están usando ollas inapropiadas. • Use sartenes que sean planos y que queden al tamaño del quemador seleccionado.
Antes de que llame para pedir servicio... Guía de solución de Problemas Problema Posible Causa Solución HORNO-TODOS LOS MODELOS La luz del horno no funciona El foco está flojo o defectuoso • Apriete o reemplace el foco. El interruptor de luz está roto. • LLame para servicio. El horno no funciona El cable no está bien conectado a la corriente eléctrica. • Asegúrese qué el cable este conectado a un contacto aterrizado a tierra.
GEAppliances.com Problema Posible Causa Solución La temperatura del horno demasiado fría o demasiado caliente El termostato del horno necesita reajuste. • Vea la sección ajuste de termostato del Horno. Hágalo Usted mismo. El reloj y el cronómetro no funcionan El enchufe de la estufa no está bien insertado en el contacto eléctrico. • Asegúrese que el enchufe esté bien insertado a una salida con tierra. Un fusible en su casa puede estar quemado o el interruptor bajado.
Antes de que llame para pedir servicio... Guía de solución de Problemas Problema Posible Causa Solución Modelos con Auto-Limpieza El horno no inicia el ciclo de auto-limpieza La temperatura del horno es demasiado alta para poner en operación el ciclo de autolimpieza. • Deje que la estufa se enfríe a temperatura ambiente y vuelva a Intentar.. Control del horno mal operado • Vea la sección, uso de hornos con auto-limpieza La puerta del horno no está en posición de cerrada.
Accesorios. GEAppliances.com ¿Desea algo más? (No todos los accesorios se encuentran disponibles para todos los modelos.) Usted puede encontrar estos accesorios y muchos más en GEAppliances.com, o llame al 800.626.2002 (en horario de trabajo normal). Tenga listo el número de modelo.
Notas 42
Garantía de la Estufa Eléctrica Todos los servicios de garantía los proporcionan nuestros Centros de Reparación de Fábrica o nuestros técnicos Customer Care® autorizados. Para concertar una cita de reparación, visítenos en línea en GEAppliances.com, o llame al 800.GE.CARES (800.432.2737). Cuando llame para solicitar servicio, por favor tenga a mano el número de serie y el número de modelo. Pegue aquí su recibo.
Ayuda al cliente. Página Web de GE Appliances GEAppliances.com ¿Tiene alguna pregunta sobre su electrodoméstico? ¡Pruebe la página Web de GE Appliances 24 horas al día, cualquier día del año! Para mayor conveniencia y servicio más rápido, ya puede descargar los Manuales de los Propietarios, pedir piezas o incluso hacer una cita en línea para que vengan a realizar una reparación. Solicite una reparación GEAppliances.com El servicio de expertos GE está a tan sólo un paso de su puerta.