GE Appliances Electric Range Owner’s Manual JBS07PI Standard Clean–Coil Top JBP46WI Self-Clean–Coil Top JBP76WI Self-Clean–Glass Top Part No. 164D3333P072 Rev. 1 Pub. No.
Safety Instructions Safety Information Operating Instructions Operating Instructions Safety Precautions . . . . . . . 3–6 Oven . . . . . . . . . . . . . . . . . . . 4, 5 Surface Cooking Units . . . . . 5, 6 Radiant Surface Units . . . . . . . 6 Using the Surface Units . . . 7–9 Using the Oven . . . . . . . . 10–17 Using the Clock and Timer . . 14 Timed Baking and Roasting . . 15 Oven Thermostat . . . . . . . . . . 16 Congratulations! You Are Now Part of the GE Family Welcome to the GE family.
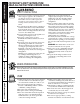
Safety Instructions IMPORTANT SAFETY INFORMATION. READ ALL INSTRUCTIONS BEFORE USING. WARNING! For your safety, the information in this manual must be followed to minimize the risk of fire or explosion, electric shock, or to prevent property damage, personal injury, or loss of life. WARNING ANTI-TIP DEVICE All ranges can tip and injury could result. Operating Instructions To prevent accidental tipping of the range, attach it to the wall and floor by installing the Anti-Tip device supplied.
WARNING! SAFETY PRECAUTIONS ■ Never wear loose-fitting or hanging garments while using the appliance. Be careful when reaching for items stored over the range. Flammable material could be ignited if brought in contact with hot surface units or heating elements and may cause severe burns. ■ Use only dry pot holders—moist or damp pot holders on hot surfaces may result in burns from steam. Do not let pot holders touch hot surface units or heating elements. Do not use a towel or other bulky cloth.
■ Before self-cleaning the oven, remove the broiler pan, grid and other cookware. ■ Be sure to wipe up excess spillage before starting the self-cleaning operation. ■ If the self-cleaning mode malfunctions, turn the oven off and disconnect the power supply. Have it serviced by a qualified technician. SURFACE COOKING UNITS 5 Troubleshooting Tips ■ When flaming foods are under the hood, turn the fan off. The fan, if operating, may spread the flame.
WARNING! RADIANT SURFACE UNITS Use care when touching the cooktop. The glass surface of the cooktop will retain heat after the controls have been turned off. ■ Avoid scratching the glass cooktop. The cooktop can be scratched with items such as sharp instruments, rings or other jewelry and rivets on clothing. Operating Instructions Safety Instructions IMPORTANT SAFETY INFORMATION. READ ALL INSTRUCTIONS BEFORE USING. ■ Do not operate the radiant surface units if the glass is broken.
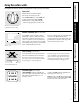
Safety Instructions Using the surface units. Throughout this manual, features and appearance may vary from your model. How to Set Push the knob in and turn in either direction to the setting you want. At both OFF and HI the control clicks into position. You may hear slight clicking sounds during cooking, indicating the control is keeping the power level you set. Surface Cookware Tips (on some models) 1² For best cooking results, pans should be flat on the bottom.
Safety Instructions Operating Instructions Care and Cleaning Installation Instructions Troubleshooting Tips Using the surface units. About the radiant surface units… (glass cooktops) SURFACE COOKING ,,,,,,,,,,,,, ,,,,,,,,,,,, , ,,,, ,,, ,, ,,,,,,,, Never cook directly on the glass. Always use cookware. OFF CENTER ,,,,,,,,,,, ,,,,,,,,,,, , ,,,, ,,, ,,,,,,,,,,, , ,,,, ,,, ,the center of Always place the pan in The radiant cooktop features heating units beneath a smooth glass surface.
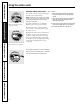
The following information will help you choose cookware which will give good performance on glass cooktops. Stainless Steel: Glass-ceramic: recommended usable, but not recommended Poor performance. May scratch the surface. Aluminum: Stoneware: usable, but not recommended Poor performance. May scratch the surface. Copper Bottom: Care and Cleaning recommended Copper may leave residues which can appear as scratches. The residues can be removed, as long as the cooktop is cleaned immediately.
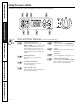
Throughout this manual, features and appearance may vary from your model. Operating Instructions Safety Instructions Using the oven controls. Care and Cleaning Clock and Timer Features (on self-clean models only) TEMP RECALL Press this pad and then press the HOUR and MIN. pads to set the amount of time you want your food to cook. Turn the Oven Temperature knob to the desired temperature. The oven will shut off when the Cook Time has run out.
Safety Instructions Oven Control Settings (on self-clean models only) OVEN ON Light CLEAN Light Glows when the oven is in the self-clean cycle. After the self-clean cycle, the light will flash. Unlatch the door and turn the Oven Temperature knob to OFF. PREHEATED Light Glows when the oven reaches your selected temperature. Oven Temperature Knob Turn this knob to the setting you want. The temperature will be displayed to indicate setting. Display will change back to time after a few seconds.
Safety Instructions To avoid possible burns, place the shelves in the desired position before you turn the oven on. Before you begin… The shelves have stop-locks, so that when placed correctly on the supports, they will stop before coming completely out, and will not tilt. When placing and removing cookware, pull the shelf out to the bump on the shelf support. To replace, place the end of the shelf (stoplocks) on the support, tilt up the front and push the shelf in.
Safety Instructions How to Set the Oven for Broiling Place the meat or fish on the broiler grid in the broiler pan. Follow suggested shelf positions in the Broiling guide. Operating Instructions Turn the Oven Temperature knob to BROIL. Leave the door open to the broil stop position. The door stays open by itself, yet the proper temperature is maintained in the oven. Broiling Guide Food Bacon Quantity and/ or Thickness Arrange in single layer. C 10 7 Space evenly.
Safety Instructions Using the clock and timer. (on self-clean models only) Not all features are on all models. To Set the Clock The clock must be set for the automatic oven timing functions to work properly. The time of day cannot be changed during a timed baking or self-cleaning cycle. Press the CLOCK pad. Press the HOUR and MIN. pads. To Set the Timer Press the TIMER ON/OFF pad. The timer is a minute timer only. The timer does not control oven operations.
Do not latch the oven door during timed cooking. The latch is used for self-cleaning only. NOTE: Foods that spoil easily, such as milk, eggs, fish, stuffings, poultry and pork, should not be allowed to sit for more than 1 hour before or after cooking. Room temperature promotes the growth of harmful bacteria. Be sure that the oven light is off because heat from the bulb will speed harmful bacteria growth.
Safety Instructions Adjust the oven thermostat—Do it yourself! You may find that your new oven cooks differently than the one it replaced. Use your new oven for a few weeks to become more familiar with it. If you still think your new oven is too hot or too cold, you can adjust the thermostat yourself. Do not use thermometers, such as those found in grocery stores, to check the temperature setting of your oven. These thermometers may vary 11–22°C. (20–40°F).
Never force the latch handle. Forcing the handle will damage the door lock mechanism. Before a Clean Cycle The range must be completely cool in order to set the self-clean cycle. We recommend venting with an open window or using a ventilation fan or hood during the first self-clean cycle. Wipe up heavy soil on the oven bottom. The oven shelves can be self-cleaned, but they will darken, lose their luster and become hard to slide. The enamel grid and broiler pan may be cleaned in the self-cleaning oven.
Safety Instructions Operating Instructions Care and cleaning of the range. If your range is removed for cleaning, servicing or any reason, be sure the anti-tip device is re-engaged properly when the range is replaced. Failure to take this precaution could result in tipping of the range and cause injury. Control Panel and Knobs Clean up spatters with a damp cloth. Remove heavier soil with warm, soapy water. Do not use abrasives of any kind on the control panel.
With proper care, the porcelain enamel finish on the inside of the oven—top, bottom, sides, back and inside of the door— will stay new-looking for years. Soap and water will normally do the job. Heavy spattering or spillovers may require cleaning with a mild abrasive cleaner. Soapy, wet metal pads may also be used. Do not allow food spills with a high sugar or acid content (such as milk, tomatoes, sauerkraut, fruit juices or pie filling) to remain on the surface.
Safety Instructions Operating Instructions Lift-Off Oven Door Troubleshooting Tips The oven door is removable for cleaning. To clean the inside of the door: Do not lift the door by the handle. (on standard clean models) To remove the door, open it to the special stop position. Grasp firmly on each side and lift the door straight up and off the hinges. ■ Soap and water will normally do the job. Heavy spattering or spillovers may require cleaning with a mild abrasive cleaner.
CAUTION: Before replacing your oven light bulb, disconnect the electrical power to the range at the main fuse or circuit breaker panel. Place it into groove of the light receptacle. Pull wire forward to the center of the cover until it snaps into place. Connect electrical power to the range. To remove the cover: Hold a hand under the cover so it doesn’t fall when released. With fingers of the same hand, firmly push back the wire cover holder. Lift off the cover.
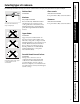
Safety Instructions Care and cleaning of the range. Be sure the controls are turned to OFF and the surface units are cool before attempting to remove them. Surface Units (on some models) Surface unit To clean the surface units, turn the control to the highest setting for a minute. The coils will burn off any soil. To remove a surface unit: Drip pan Operating Instructions Receptacle To remove the drip pans for cleaning, the surface units must be removed first. Lift the surface unit about 2.
Clean the glass surface with cleaning cream before you use the cooktop for the first time. Also, clean the glass surface after each use. This helps protect the top and makes clean-up easier. To clean the cooktop seal, let a wet cloth rest on it for a few minutes, then wipe clean. Use a mild detergent if needed. Do not use a knife or any sharp object on the seal because it will cut or damage it. Safety Instructions Cleaning the glass cooktop.
Read these instructions completely and carefully. Before You Begin Operating Instructions Safety Instructions International Installation Instructions. (220–240, 50/60Hz, 2-wire) NOTE TO INSTALLER: Leave these instructions with the appliance after installation is completed. IMPORTANT: OBSERVE ALL GOVERNING CODES AND ORDINANCES. NOTE TO CONSUMER: Keep this Owner’s Manual and Installation Instructions for future use. NOTE: This appliance must be properly grounded.
Preparing the Opening Allow 3.81 cm (11⁄2²)spacing from the range to adjacent vertical walls above cooktop surface. Allow 76.2 cm (30² )minimum clearance between surface units and bottom of unprotected wood or metal top cabinet, and 38.1 cm (15²) minimum between countertop and adjacent cabinet bottom. EXCEPTION: Installation of a listed microwave oven or cooking appliance over the cooktop shall conform to the installation instructions packed with that appliance.
Read these instructions completely and carefully. Flooring Under the Range Your range, like many other household items, is heavy and can settle into soft floor coverings such as cushioned vinyl or carpeting. When moving the range on this type of flooring, it should be installed on a 6 mm (1/4²) thick sheet of plywood (or similar material) as follows: Operating Instructions Safety Instructions International Installation Instructions.
Safety Instructions Read these instructions completely and carefully. 2-Wire Power Cord Installation Before WARNING: RANGE FRAME MUST BE GROUNDED PROPERLY TO AVOID POTENTIAL ELECTRICAL SHOCK. Remove the 2 screws from the connector block. Remove the grounding screw and strap from the connector block middle location and the screw connecting it to the frame of the range.
Read these instructions completely and carefully. Anti-Tip Bracket Installation An Anti-Tip bracket is supplied with instructions for installation in a variety of locations. The instructions include a template, a parts list and a list of tools necessary to complete the installation. Read the Important Safety Information and the instructions that fit your situation before beginning installation. Bracket Operating Instructions Safety Instructions International Installation Instructions.
Safety Instructions Problem Solver… Troubleshooting Tips Save time and money! Review the charts on the following pages first and you may not need to call for service. Problem Possible Causes What To Do Surface units will not maintain a rolling boil or cooking is not fast enough Improper cookware being used. •Use pans which are absolutely flat and match the diameter of the surface unit selected. Surface units do not work properly A fuse in your home may be blown or the circuit breaker tripped.
Safety Instructions Operating Instructions Care and Cleaning Installation Instructions Troubleshooting Tips Problem Solver… Troubleshooting Tips Save time and money! Review the charts on the following pages first and you may not need to call for service. Problem Possible Causes What To Do The display goes blank or indicator lights come on when range is not in use Power surge. •Disconnect power at the fuse box or circuit breaker for at least 10 seconds. Turn power on and power up your range.
Safety Instructions Oven temperature too hot or too cold Oven thermostat needs adjustment. •See the Adjust the oven thermostat—Do it yourself! section. Clock and timer do not work Plug on range is not completely inserted in the electrical outlet. • Make sure electrical plug is plugged into a live, properly grounded outlet. A fuse in your home may be may be blown or the circuit breaker tripped. • Replace fuse or reset circuit breaker. Oven controls improperly set.
Safety Instructions Operating Instructions Troubleshooting Tips Save time and money! Review the charts on the following pages first and you may not need to call for service. Problem Possible Causes What To Do Oven door is crooked The door is out of position. •Because the oven door is removable, it sometimes gets out of position during installation. To straighten the door, push down on the high corner.
Safety Instructions Notes Operating Instructions Care and Cleaning Installation Instructions Troubleshooting Tips 33
Troubleshooting Tips Installation Instructions Care and Cleaning Operating Instructions Safety Instructions Notes 34
Safety Instructions Notes Operating Instructions Care and Cleaning Installation Instructions Troubleshooting Tips 35