Xl#TM Gas Range Safe* instructions ............,.......2-5 Problem Anti-Tip Device ............................2, 3,29, 39 Thermostat Adjustment– Do It Solver Yourself ..,....................45, 46 . ..........46 More questions ?...call Operating Instructions, Tips GE Answer Center”80~626.2000 Aluminum Foil ...................................5, 16, 19 Features ........................................................6, 7 Oven . . . . . . . . . . . . . . . . . . . . . . . . . . . . . . . . . .
~LP US ~LP YOU... Read this book carefully. If you received a damaged range... It is intended to help you operate and maintain your new range properly. Keep it handy for answers to your questions. If you don’t understand something or need more help, write (include your phone number): Consumer Affairs GE Appliances Appliance Park Louisville, KY 40225 Immediately contact the dealer (or builder) that sold you the range. Save time and money. Before you request service . . .
IMPORTANT SAFETY NOTICE . The California Safe Drinking Water and Toxic Enforcement Act requires the Governor of California to publish a list of substances known to the state to cause cancer, birth defects or other reproductive harm, and requires businesses to warn customers of potential exposure to such substances.
WORTANT SAFETY ~STRUCTIONS (continued) ● Do not allow anyone to cfimb, stand or hang on ● the door, storage or brotier drawer (on some modek) or range top. They could damage the range and even tip it over, causing severe personal injury. Adjust top burner flame size so it does not extend beyond the edge of the cookware. Excessive flame is hazardous, ● . Let the burner grates and other surfaces cool before touching them or leaving them where children can reach them.
● ● Use proper pan siz+Avoid pans that are unstable or easily tipped. Select cookware having flat bottoms large enough to properly contain food and avoid boilovers and spillovers and large enough to cover burner grate. This will both save cleaning time and prevent hazardous accumulations of food, since heavy spattering or spillovers left on range can ignite. Use pans with handles that can be easily grasped and remain cool. When using glass cookware, make sure it is designed for top-of-range cooking.
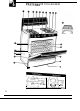
FEATu~s OF YOUR RANGE L-i:;: ----s~ ‘“’”’ B’S’ m p+i;e’d &.
Feature Index (Not all models have all features. Appearance of features varies.
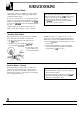
SU~ACE COO~G Electric Ignition Models Your surface burners are lighted by electric ignition, eliminating the need for standing pilot lights with constantly burning flames. In case of a power failure, you can light the surface burners on your range with a match. Hold a lighted match to the burner, then turn the knob to the LITE position. Use etireme caution when lighting burners this way. Surface burners in use when an electrical power failure occurs will continue to operate normally.
Before Lighting a Burner If drip pans are supplied with your range, they should be used at all times. c Make sure all grates on the range are in place before using any burner. ● To Light a Surface Burner Electric Ignition Models: Push the control knob in and turn it to LITE. You will hear a little “clicking” noise—the sound of the electric spark igniting the burner. After the burner ignites, turn the knob to adjust the flame size.
SU~ACE COO~G (continued) How to Select Flame Size Watch the flame, not the knob, as you reduce heat. The flame size on a gas burner should match the cookware you are using. FOR SAFE HANDLING OF COOKWARE NEVER LET THE FLAME EXTEND 3 UP THE SIDES OF THE COOKWARE. Any flame larger than the bottom of the cookware is wasted and only serves to heat the handle. Top-of-Range Cookware Aluminum: Medium-weight cookware is recommended because it heats quickly and evenly.
CLOCK Am TMR Follow the directions below if your range has the clock and timer shown at the right. The electronic range clock and timer allow you to set the timer up to 9 hours and 45 minutes. You have the choice of having the timer show the time counting down or the time of day. In either case, the timer will signal at the end of the timer period to alert you that the time is up.
CLOCK Am TMR (continued) 12 \\I\ OFF I Clock , /, 4 /, , %.*’O Follow these directions if your range has the clock and timer shown at - 3’. ‘ the right. To set the clock, push in the knob and turn it to the right. Let the 9 ~10 O 2.-<3 = 20 . knob out when the clock hands reach the correct time. Continue turning the ,“< so 1 \\\’ ~ knob to OFF. , \\ \ @ “’//,,,1 / 6 Timer The Timer has been combined with the range clock. Use it to time all your precise cooking operations.
Standing Pilot Models These ranges have standing pilots that must be lit initially. To light the oven pilot: 1. Be sure the OVEN CONTROL knob is in the OFF position. 2. Open the broiler door and remove the broiler pan and rack. This will make it easier for you to reach inside the broiler compartment. 3. Find the oven pilot port at the back of the broiler compartment. The long tube, running from front to back, is the oven burner. The pilot port is at the back about one inch below the burner. 4.
US~G YOUR OVEN (continued) Shelf Positions Oven Moisture The oven has 5 shelf supports for normal baking and roasting identified in this illustration as A (bottom), B, C, D and E (top). It also has a special low shelf position (R) for roasting extra large items, such % / / II as a larg= turkey—the shelf is not designed to slide out at this position. Shelf positions for cooking are suggested on the Baking and Roasting pages.
How To Set Your Range For Baking To avoid possible burns, place the shelves in the correct position before you turn the oven on. 1. Close the oven door. If your model has a separate BAKE/BROIL switch, turn it to BAKE. Turn the OVEN CONTROL knob to the desired temperature. 2. Check food for doneness at minimum time on recipe. Cook longer if necessary. When cooking is finished, turn the OVEN CONTROL knob to OFF and remove food.
BA~G (continued) Baking Guides When using prepared baking mixes, follow package recipe or instructions for best baking results. Cookies Aluminum Foil When baking cookies, flat cookie sheets (without sides) produce better-looking cookies. Cookies : baked in a jelly roll pan (short sides all around) may have darker edge; and pale or light browning may occur. Do not use a cookie sheet so large that it touches the walls or the door of the oven. Never entirely cover a shelf with a large cookie sheet.
ROASTmG Roasting is cooking by dry heat. Tender meat or poultry can be roasted uncovered in your oven. Roasting temperatures, which should be low and steady, keep spattering to a minimum. The oven has a special 1low shelf (R) po~ition just above the oven bottom. Use it when extra cooking space is needed, for example, when roasting a large turkey. The shelf is not designed to slide out at this position. Roasting is really a baking procedure used for meats. Roasting is easy; just follow these steps: 1.
ROASTmG (continued) Questions and Answers Q. Is it necessary to check for doneness with a Q. Do I need to preheat my oven each time I cook a roast or poultry? meat thermometer? A. Checking the finished internal temperature at the completion of cooking time is recommended. Temperatures are shown in Roasting Guide. For roasts over 8 lbs., check with thermometer at half-hour intervals after half the time has passed. Q. Why is my roast crumbling when I try to carve it? A.
BROmmG How to Broil Broiling is cooking food by direct heat from above the food. Your range has either a broiler in the oven or a compartment below the oven for broiling. A specially designed broiler pan and rack allows dripping fat to drain away from the foods and be kept away from the high heat of the gas flame. Both the oven and broiIer compartment doors (on some models) should be closed during broiling.
BROmmG G~E Models without Broiler Compartment Food Quantity an~or Thickness Dven Shell 1st Side Position Minutes Models with Broiler Compartment 2nd Side Minutes Broiler Shel Position 1st Side Minute~ 2nd Side Minutes Comments Bacon 1/2 lb. (about 8 thin slices) c 3X 3 B 3% 3 Arrange in single layer. Ground Beef 1 lb. (4 patties) 1/2 to 314 in. thic c 10-11 4-5 A 10-11 4-5 Space evenly. Up to 9 patties take about same time. Beef Steaks Rare Medium Well Done 1 in.
Proper care and cleaning are important so your range will give you efficient and satisfactory service. Follow these directions carefully in caring for it to help assure safe and proper maintenance. BE SURE ELECTRICAL POWER IS DISCONNECTED BEFORE CLEANING ANY PART OF YOUR RANGE. CAUTION: DO NOT OPERATE THE BURNER WITHOUT ALL BURNER PARTS AND DRIP PANS (IF SO EQUIPPED) IN PLACE.
CAm Am CLEA~G (continued) Burner Heads (on sealed burners only) The holes in the burners of your range, and the spark electrodes, must be kept clean at all times for proper ignition and an even, unhampered flame. You shodd clean the burner heads routinely, especially after bad spillovers, which could clog these holes. Wipe off burner heads. If heavy spillover occurs, remove burner heads from range. Remove the burner grate and burner cap. Then lift the burner head straight up.
Burner Grates Lift out when cool. Grates should be washed regularly and, of course, after spillovers. Wash them in hot, soapy water and rinse with clean water. After cleaning, dry them thoroughly by putting them in a warm oven for a few minutes. Don’t put the grates back on the range while they are wet. When replacing the grates, be sure they’re positioned securely over the burners. To prevent rusting on cast iron grates, apply a light coating of cooking oil on the bottom of the grates.
CA~ Am CLEA~G (continued) Broiler Pan and Rack After broiling, remove the broiler pan and rack from the oven. Remove the rack from the pan. Carefully pour out the grease in the pan into a proper container. If food has burned on, sprinkle the rack with detergent while hot and cover with wet paper towels or a dishcloth. That way, burned-on foods will soak loose while the meal is being served. Wash; scour if necessary. Rinse and dry. The broiler pan and rack may also be cleaned in a dishwasher.
Oven Door The oven door is removable but it is heavy. You may need help removing and replacing the door. Do not lift the door by the handle. This can cause the glass to break or damage to the door. To remove the door, open it a few inches to the special stop position that will hold the 2 door open, & Grasp. firrnlv ~ . on each side and lift the door straight up and off the hinges. NOTE: Be careful not to place hands between the hinge and the oven door frame as the hinge could snap back and pinch fingers.
CAm Am CLEAN~G (continued) Special Care of Continuous-Cleaning Oven lnteriOr (on some models) The Continuous-Cleaning Oven cleans itself while cooking. The oven walls are finished with a special that cannot be cleaned in the usual manner with soap, detergents, steel wool pads, commercial oven cleaners, coarse abrasive pads or coarse brushes. Use of such cleansers andor the use of oven sprays will cause permanent damage.
Removable Storage Drawer (on some models) The storage drawer is a good place to store cookware and bakeware. Do not store plastics and flammable material in the drawer. Do not overload the storage drawer. If the drawer is too heavy, it may slip off the track when opened. The storage drawer may be removed for cleaning under the range. Clean the storage drawer with a damp cloth or sponge. Never use harsh abrasives or scouring pads. To remove storage drawer: 1. Pull the drawer straight out until it stops. 2.
FOR YOUR SAFETY lMPO~ANT If you smell gas: 1. Open windows. 2. Don’t touch electrical switches. 3. Efinguish any open flame. 4. Immediately call your gas supplier. Remove all pacting material and literature from oven before connecting gas and electrical supply to range. DIMENSIONS AND CLEARANCES FOR YOUR SAFETY Provide adequate clearances be~een the range and adjacent combustible surfaces.
IMWRTANT SAFETY INSTRUCTIONS Instigation of tiis range must conform titi local codes, or in the absence of local codes, titi tie National Fuel Gas Code, ANSI ~23.1, latest edition. h Canada, insMation must conform titi tie current Natural Gas InstaUation Code, CAN/CGA-B149.l or tie current Propane hstiation Code, CAN/CGAB149.2, and titi lod codes here appfimble. This range has been design-cert~led by the American Gas Association according to ANSI 221.
GENERAL . See Dimensions and Clearances in this section for all rough-in and spacing dimensions. These dimensions must be met for safe use of your range. The location of the electrical outlet and pipe opening (see Gas Pipe and Electric Outlet bcations) may be adjusted to meet specflc requirements. . The range may be placed with O“ clearance (flush) at the back wall and sidewalls of the range. TOOLS YOU WILL NEED Phillips and flat-blade screwdrivers ● Pencil and ruler ● Two pipe wrenches (one for backup) .
❑ PROVIDE ADEQUATE GAS SUPPLY Your range is designed to operate at a pressure of 4“ of water column on natural gas or, if designed for LP gas @ropane or butane), 10” of water column. Make sure you are supplying your range with the type of gas for which it is designed.
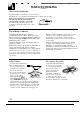
CONNECT THE WHGE TO GM (continued) Flexible Connector Hookup for Models Flexible Connector and Rigid Pipe Hookups for Models Equipped with Dual Burners Equipped witb Sealed Burners Pressure Regulator * Flexible Connector *= Rigid Pipe Hookup - 4m ,oOElbow—o (provided) 3 Flex t ~ Connector Adapter (6 ft. max.) Manifold Pipe # ~ Adapter ~l,,a:,,,,>: Gas Shut-off ~ Valve Rigid Pipe Hookup for Models Equipped with Sealed Burners Pressure + Regulator o 90°Elbow_ Q~Ü‹ -~~ (provided) t+ Nipple Union .
1. Install a manual gas line shut-off valve in the gas line in an easily accessed location outside of the range. Make sure everyone operating the range knows where and how to shut off the gas supply to the range. 2. Install male 1/2” flare union adapter to the 1/2” NPT internal thread elbow at inlet of regulator. On models equipped titi dud burners, install the male pipe thread end of the 1/2” flare union adapter to the 1/2” NPT internal thread at inlet of pressure regulator.
ELECTRl~L CONNECTIONS (continued) ❑ USage Sitiation.where Appliace Power Cord ~ be Disconnected I&equen@. An adapter maybe used only on a 15-amp circuit. Do not use an adapter on a 20-amp circuit. mere local codes permit, a ~MPOHY CONNE~ON may be made to a properly grounded two-prong wall receptacle by the use of a UL-listed adapter, available at most hardware stores.
❑ SEAL THE OPENINGS Adiust the Sutiace Burner Pilots if Necessary Seal any openings in the wall behind the range 1. Raise the cooktop. and in the floor under the range when hookups are completed. ❑ LIGHT THE PILO~ (for Models Equipped with Standing Pilots) The range should be installed in its permanent position before any pilots are lit or adjusted. Light the Surface Burner Pilots CA~ON: Make sure the surface burner control knobs are in the “OFF” positions before attempting to light the pilots. 1.
❑ LIGHT THE PILO~ (continued) a Heater Pilot Flame ~ 4. Turn the OWN CONTROL knob to a setting above 200° E The pilot flame will increase in size and impinge on the temperatureresponse element. The oven burner will light in 3090 seconds. The oven burner will operate until the set temperature is reached. The oven burner will continue to cycle on and off as necessary to maintain the oven at the temperature indicated by the OWN CONTROL knob.
❑ ADJUST BROILMD OVEN BURNER AIR ADJUSTMENT SHUTTERS ON A MODEL WITH A STORAGE DWWER, IF NECESSARY (See Step 9 if your range is equipped with a broiler drawer.) &r adjustment shutters for the top and bottom burners regulate the flow of air to the flames. To determine if the bottom burner flames are burning properly, remove the oven bottom and the burner baffle (see below).
❑ ADJUSTING THE AIR ADJUSTMENT SHUTTER ON A MODEL WITH A BROILER DRAWER, IF NECESSARY (See Step 8 if your range is equipped with a storage drawer.) To determine if the bottom burner flames are burning properly, first remove the oven bottom and the burner baffle (on some models ). Oven To remove tie oven bottom: 1. Remove knurled screws holding down rear of oven bottom. 2. Grasp oven bottom at finger slots on each side. 3. Lift rear of oven bottom enough to clear the lip of range frame, then pull out.
❑ LEVELING THE RANGE 1. Remove the storage drawer, broiler drawer or kick panel. 2. Use a 3/16” open-end or socket wrench to back out both rear leveling legs approximately two turns. 3. Use a 1’%” open-end or adjustable wrench to back out the front leveling legs two turns. 4. Install the oven shelves in the oven and position the range where it will be installed. 5. Check for levelness by placing a spirit level or a cup, partially filled with water, on one of the oven racks.
HOW TO CONVE~ THE RANGE FOR USE WITH 1P GM OR NATURAL GAS TOOLS REQUIRED: T-10 Torxdriver (for sealed burners) 1/2” and 3/4” open-end wrench Flat blade screwdriver (small) Nut drivers or wrenches: 7mm or 5/16” (depending on the size of the spuds) Is the e in a ation. (1) Turn off gas supp~ at tie wall. If it is this regulator: 1. Use a coin to remove the cap from the pressure regulator. 2. Turn the cap over and hook it into the slots.
❑ CONVERTING SURFACE BURNERS ON MODELS EQUIPPED WITH SEALED BURNERS (See Step 4 if range is equipped with dual burners.) Burnercap~ ❑ orifice for Spuds Conve~ingto LpGas: LP orifice spuds are in a small plastic bag packed with this Use and Care book. LP orifice spuds have a 2-digit number and the Letter “L” on one side. Each ofilce spud will also have 1 or 2 grooves on one side, denoting the location on the range where it is to be installed. mm 1. Remove grates, burner caps and burner heads. 2.
HOW TO CONVE~ THE RANGE FOR USE WITH 1P GAS OR NATURAL GAS (continued) 5. To prevent leakage, make sure the orifice spuds are securely screwed into the gas inlet tubes. Use a small wrench to hold the inlet tube hex to prevent it from twisting. 6. Put old ortice spuds back in the bag to save for possible future conversion. Note: If an orifice spud is accidentally dropped, the cooktop can be raised by .\fl – disengaging blade screwdriver.
❑ CONVERT THE OVEN BURNER ORIFICES Oven Burner 1. Remove oven door, storage drawer or broiler drawer, oven bottom and burner baffle. The lower burner orifice spud is located behind the storage drawer, broiler drawer or kick panel. (On some models, a metal shield must be removed to access the ortice.) 2. To convert to U gas, use a 1/2” wrench to turn the lower burner orifice spud clockwise. Tighten the spud only until it is snug. To prevent damage, do not overtighten the spud.
HOW TO CONVERT THE RANGE FOR USE WITH 1P GAS OR NATURAL GAS (continued) ❑ ADJUST THE SURFACE BURNER PILOYS (for models equipped with standing pilots) ❑ CONVERT TOP BURNER VALVES NOTE: Only valves with these types of knobs are adjustable. il I 1. Turn all top burners to LOW. 2. Remove all four knobs. 3. With a small flat blade screwdriver, turn the valve set screws clockwise to decrease flame size, counterclockwise to increase flame size.
PROBLEM POSSIBLE CAUSE OVEN WWLNOT WORK ● TOP BURNERS DO NOT LIGHT OR DO NOT BURN EVENLY Plug on range is not completely inserted in the electrical outlet. ● The circuit breaker in your house has been tripped, or a fuse has been blown. ● Oven controls not properly set, Make sure electrical plug is plugged into alive power outlet, ● Burner holes on the side or around the top of burner may be clogged.
QUESTIONS? USE THIS PROBLEM SOLVER PROBLEM POSSIBLE CAUSE SURFACE BURNERS LIGHT BUT OVEN DOES NOT (DUAL BURNER MODELS ONLY) * The oven gas shut off valve may have accidentally been moved during cleaning or moving. To check the oven gas shutoff valve raise the cooktop and look for the gas shut off lever either on the front large tube or at the extreme’ right rear corner. Make sure the lever is turned so that it is parallel to the gas tube. OVEN TEMPERATU~ TOO HOT OR TOO COLD .
We’ll Be There With the purchase ofyour new GE appliance, receive the assurance that ifyou ever need information or assistance from GE, we’ll be there. All you have to do is call—toll-free! lmHome RepakService 80ME4ARES(80M32-2737) AGE consumer service professional will provide expert repair service, scheduled at a time that’s convenient for you. Many GE Consumer Service company-operated locations offer you service today or tomorrow, or at your convenience (7:00 a.m. to 7:00 p.m. weekdays, 9:00 a.m.
YOUR GE GAS RANGE WARRANTY WHAT IS COVERED Staple sales slip or cancelled check here. Proof of original purchase date is needed to obtain service under warranty. FULL ONE-YEAR WARRANTY For one year from date of original purchase, we will provide, free of charge, parts and service labor in your home to repair or replace any pati of the range that fails because of a manufacturing defect.