Microwave Oven GEAppliances.com Safety Instructions . . . . . . . .2–9 Owner’s Manual Operating Instructions JVM6170 JNM6171 JVM6172 Convenience Features . . . . . . .19-21 Microwave Terms . . . . . . . . . . . . . . 26 Oven Features . . . . . . . . . . . . . .10-12 Other Features . . . . . . . . . . . . . .22-25 Power Levels . . . . . . . . . . . . . . . . . . . 13 Time Features . . . . . . . . . . . . . . .14-18 Care and Cleaning . . . . . .27-29 Troubleshooting Tips . . . . . .
IMPORTANT SAFETY INSTRUCTIONS. READ ALL INSTRUCTIONS BEFORE USING. WARNING! To reduce risk of burns, electric shock, fire, personal injury or exposure to excessive microwave energy. PRECAUTIONS TO AVOID POSSIBLE EXPOSURE TO EXCESSIVE MICROWAVE ENERGY (a) Do Not Attempt to operate this oven with the door open since open-door operation can result in harmful H[SRVXUH WR PLFURZDYH HQHUJ\ ,W LV LPSRUWDQW QRW WR defeat or tamper with the safety interlocks.
INSTRUCCIONES IMPORTANTES DE SEGURIDAD. LEA PRIMERO TODA LAS INSTRUCCIONES. ¡PRECAUCIÓN! GEAppliances.com Por su seguridad, la información contenida en este manual debe seguirse para minimizar el riesgo de incendio, explosión, descarga eléctrica, exposición a energía microondas. PRECAUCIONES PARA EVITAR POSIBLE EXPOSICIÓN A UNA EXCESIVA ENERGÍA DE MICROONDAS. (a) No Intente operar este horno con la puerta abierta ya TXH HVWR SRGUtD UHVXOWDU HQ XQD H[SRVLFLyQ D HQHUJtD microondas dañina.
IMPORTANT SAFETY INSTRUCTIONS. READ ALL INSTRUCTIONS BEFORE USING. WARNING! IMPORTANT SAFETY INSTRUCTIONS. Do not clean with metal scouring pads. Pieces can burn off the pad and touch electrical parts involving risk of electric shock. This microwave oven is UL listed for installation over both gas (less than 60,000BTU) and electric ranges. This over-the-range oven is designed for use over ranges no wider than 36”. It may be installed over both gas and electric cooking equipment. .
INSTRUCCIONES IMPORTANTES DE SEGURIDAD. LEA PRIMERO TODA LAS INSTRUCCIONES. GEAppliances.com ¡PRECAUCIÓN! INSTRUCCIONES IMPORTANTES DE SEGURIDAD. No limpie con almohadillas metálicas para fregar. Las piezas podrán quemar la almohadilla y tener contacto con partes eléctricas y producir riesgo de descargas eléctricas Este horno de microondas está listado por UL para ser instalado sobre estufas electricas y degas (memos de 60,000 BTU).
IMPORTANT SAFETY INFORMATION. READ ALL INSTRUCTIONS BEFORE USING. WARNING! Make sure all cookware used in your microwave oven is suitable for microwaving. Most glass casseroles, cooking dishes, measuring cups, custard cups, pottery or china dinnerware which does not have metallic trim or glaze with a metallic sheen can be used. Some cookware is labeled “suitable for microwaving.
INSTRUCCIONES IMPORTANTES DE SEGURIDAD. LEA PRIMERO TODA LAS INSTRUCCIONES. ¡PRECAUCIÓN! Asegúrese de que todos los utensilios de cocina que use en su horno sean aptos para microondas. Pueden usarse la mayoría de las cazuelas, platos para cocinar, tazas de medir, tazas de IODQHV \ ERWHV GH FULVWDO R ODV YDMLOODV GH SRUFHODQD TXH QR WLHQHQ decoraciones metálicas o barnices con brillo metálico. Algunos utensilios tienen la siguiente inscripción: “puede usarse en microondas.
IMPORTANT SAFETY INFORMATION. READ ALL INSTRUCTIONS BEFORE USING. GROUNDING INSTRUCTIONS WARNING³,PSURSHU XVH RI WKH JURXQGLQJ SOXJ FDQ UHVXOW LQ D ULVN RI HOHFWULF VKRFN This appliance must be grounded. In the event of an electrical short circuit, grounding reduces the risk of electric shock by providing an escape wire for the electric current.
INSTRUCCIONES IMPORTANTES DE SEGURIDAD. LEA PRIMERO TODA LAS INSTRUCCIONES. GEAppliances.com INSTRUCCIONES DE TOMA DE TIERRA ¡ADVERTENCIA! El uso indebido del enchufe de tierra puede resultar en riesgo de descarga eléctrica.. Este electrodoméstico debe estar conectado a tierra. Si se SURGXMHUD XQ FRUWRFLUFXLWR OD WRPD GH WLHUUD UHGXFH HO ULHVJR de descarga eléctrica al proveer un cable de escape para la corriente eléctrica.
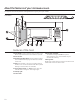
About the features of your microwave oven. Throughout this manual, features and appearance may vary from your model. 1000 Watts Features of the Oven 1 Door Handle. Pull to open the door. The door must be securely latched for the microwave to operate. 2 Door Latches. 3 Window with Metal Shield. Screen allows cooking WR EH YLHZHG ZKLOH NHHSLQJ PLFURZDYHV FRQ¿QHG in the oven. 4 Shelf (some models). Lets you microwave several foods at once.
About the features of your microwave oven. GEAppliances.com Optional Accessories Filler Panel Kits JX48WH - White JX48BL - Black JX81J (sales number) WB02X1124 (service number) When replacing a 36” range hood, filler panel kits fill in the additional width to provide a custom built-in appearance. For installation between cabinets only; not for end-of cabinet installation. Each kit contains two 3” wide filler panels. Two kits are needed for a 36” opening.
About the features of your microwave oven. You can microwave by time or with the convenience features. Not all features on all models. Express Cook 1 2 3 Add 30 Sec 4 5 6 Timer On/Off 7 8 9 Cook Time Power Level 0 Set Clock AM/PM Convenience Microwave Popcorn Beverage Potato Vegetable Reheat Weight/Time Clock Display Hold 3 Sec Cooking Controls Check the Convenience Guide before you begin.
GEAppliances.com Changing the Power Level Cook Time 1 2 3 The power level may be entered or changed immediately after entering the feature time for Cook Time, Time Defrost, Add 30 Sec or Express Cook. The power level may also be changed during the time countdown. 4 5 6 1. Press Cook Time. 7 8 9 Power Level 0 Set Clock Power Level Clock Display Start Pause 2. Enter cooking or defrosting time 3. Press Power Level. 4. Select desired power level 1-10. 3. Press Start/Pause.
About the time features. Cook Time 1 2 3 4 5 6 7 8 9 Power Level 0 Set Clock Clock Display Start Pause Cook Time I Cook Time II Allows you to microwave for any time up to 99 minutes and 99 seconds. Lets you change power levels automatically during cooking. Here’s how to do it: Power level 10 (high) is automatically set, but \RX PD\ FKDQJH LW IRU PRUH IOH[LELOLW\ 1. Press Cook Time. 1. Press Cook Time. 2. Enter cooking time. 3. Change power level if you don’t want full power.
GEAppliances.com Cooking Guide for Cook Time NOTE: Use power level 10 (High) unless otherwise noted. Vegetable Amount Time Comments Asparagus (fresh spears) 1 lb. In 11¼2-qt. oblong glass baking dish, place 1/4 cup water. Rotate dish after half of time. In 1-qt. casserole. (frozen spears) 10-oz. package 6 to 9 min., Med-High (7) 5 to 7 min. Beans (fresh green) (frozen green) (frozen lima) 1 lb. cut in half 10-oz. package 10-oz. package 9 to 11 min. 6 to 8 min. 6 to 8 min. In 11¼2-qt.
About the time features. Defrost Weight/Time 1 2 3 4 5 6 7 8 9 Power Level 0 Set Clock Clock Display Start Pause Time Defrost allows you to defrost for a selected length of time. See the Defrosting Guide for suggested times. (Weight Defrost is H[SODLQHG LQ WKH $XWR )HDWXUH VHFWLRQ 1. Press Defrost Weight/Time twice. 2. Enter defrosting time. 3. Press Start/Pause. 4. Turn food over when the oven signal. 5. Press Start/Pause.
GEAppliances.com Defrosting Guide Food Time Comments 1 min. WR PLQ 5HDUUDQJH DIWHU KDOI RI WLPH Breads, Cakes Bread, buns or rolls (1 piece) 6ZHHW UROOV DSSUR[ R] Fish and Seafood Fillets, frozen (1 lb.) Shellfish, small pieces (1 lb.) 6 to 8 min. 5 to 7 min. Place block in casserole. Turn over and break up after first half of time. Fruit 3ODVWLF SRXFK³ RU (10-oz. package) WR PLQ Meat Bacon (1 lb.) )UDQNV OE 2 to 5 min. WR PLQ Ground meat (1 lb.
About the time features. Express Cook 1 2 3 4 5 6 This is a quick way to set cooking time for 1–6 minutes. Press one of the Express Cook pads (from 1 to 6) for 1 to 6 minutes of cooking at power level 10. For H[DPSOH SUHVV WKH 2 pad for 2 minutes of cooking time. The power level can be changed as time is counting down. Press POWER LEVEL and enter 1–10. Add 30 Sec You can use this feature two ways: Add 30 Sec 18 It will add 30 seconds to the time counting down each time the pad is pressed.
About the convenience features. Popcorn 1 9 (less time) (more time) Use only with prepackaged microwave popcorn weighing 3.0 to 3.5 ounces To use the Popcorn feature: To use the Popcorn feature: 1. Follow package instructions, using Cook Time if the package is less than 3.0 ounces or larger than 3.5 ounces. Place the package of popcorn in the center of the microwave. 2. Press POPCORN. The oven starts immediately. Tap POPCORN to select the bag size you are cooking. GEAppliances.
About the convenience features. Reheat Reheat The Reheat feature reheats 1-3 servings of many previously cooked foods.. 1. Press REHEAT. 2. Select food type 1-6 for one serving (see Reheat Guide below). 3. Press 2 or 3 to reheat 2 or 3 servings. 4. Press START. Reheat Guide: Food Type Comments 1 Pasta Cover with lid or vented plastic wrap. 2 Meats, casseroles, pizza Cover with lid or vented plastic wrap. 3. Fruits and vegetables Cover with lid or vented plastic wrap. 4.
About the convenience features. Weight Defrost Defrost The Defrost Weight/Time feature gives you two ways to defrost food. Weight/Time 1 2 3 4 5 6 7 8 9 Power Level 0 Set Clock Clock Display Start Pause Press Defrost Weight/Time once for weight defrost or twice for Time Defrost. Use Weight Defrost for meat, poultry and fish up to 6 pounds. Use Time Defrost for most other frozen foods.
About other features. Cooking Complete Reminder To remind you that you have food in the oven, the oven will display “Food is Ready” and beep once a minute until you either open the oven door or press Cancel/Off. Set Clock Set Clock 1 2 3 4 5 6 7 8 9 0 Clock Display Start Pause Press to enter the time of day or to check the time of day while microwaving. 1. Press Set Clock. 2. Enter time of day. 2. Select AM/PM. 3. Press Start or Set Clock.
About other features. GEAppliances.com Vent Fan Vent Fan The vent fan removes steam and other vapors from surface cooking. Press Vent Fan once for high fan speed, twice for low fan speed or a third time to turn the fan off. Surface Light Surface Light On some models, there is a night light option. Press to turn the surface light on or off. Press Surface Light once for bright light, twice for the night light or three times to turn the light off.
About other features. Shelf (on some models) How to Use the Shelf when Microwaving Food microwaves best when placed on the turntable or on the shelf in the lower position. NOTICE: Only use microwave sehf when reheating on more than one level. DO NOT store the oven shelf in the microwave. WARNING ARCING: If you see arcing, press the Cancel/Off button and correct the problem. 0DNH VXUH WKH VKHOI LV positioned properly inside the microwave to prevent damage to the oven from arcing.
About other features. Switch places after 1/2 time. Switch places after 1/2 time. Shelf and Reheating To reheat on 2 levels or To reheat 2 dishes on the lower level: 1 Multiply reheat time by 11/2. 2 Switch places after 1/2 the time. To reheat on 3 levels (on some models) 1 Double the reheating time. 2 Switch places twice and give the dishes a 1/2 turn during reheating.
Microwave terms. Arcing Arcing is the microwave term for sparks in the oven. Arcing is caused by: 0HWDO VXFK DV WZLVW WLHV SRXOWU\ SLQV JROG rimmed dishes. 0HWDO RU IRLO WRXFKLQJ WKH VLGH RI WKH RYHQ 5HF\FOHG SDSHU WRZHOV FRQWDLQLQJ VPDOO metal pieces. )RLO WKDW LV QRW PROGHG WR IRRG XSWXUQHG edges act like antennas). 3ODWHV RU GLVKHV ZLWK D PHWDOOLF WULP RU JOD]H with a metallic sheen. Covering Covers hold in moisture, allow for more even heating and reduce cooking time.
Care and cleaning of the microwave oven. Helpful Hints An occasional thorough wiping with a solution of baking soda and water keeps the inside fresh. Unplug the cord before cleaning any part of this oven.
Care and cleaning of the microwave oven. Remove Screw. Screws. Filter Housing. Light Cover. Charcoal Filter (on some models) Cooktop Light/Night Light Replacement Replace the burned-out bulb with a 120 volt, 40-watt incandescent bulb (WB36X10003), available from your GE supplier. 1 To replace the bulb(s), first disconnect the power at the main fuse or circuit breaker panel or pull the plug. 2 Remove the screw at the left of the light cover and lower the cover.
Care and cleaning of the microwave oven. Removing and Cleaning the Filter To remove, slide it to the side using the tab. Pull it down and out. To clean the grease filter, soak it and then swish it around in hot water and detergent. Don’t use ammonia or ammonia products because it will darken the metal. Light brushing can be used to remove embedded dirt. Charcoal Filter (on some models) The charcoal filter cannot be cleaned. It must be replaced. Order Part No.
Troubleshooting Tips. GEAppliances.com Problem Possible Cause What to Do Oven will not start A fuse in your home may be blown or the circuit breaker tripped. 5HSODFH IXVH RU UHVHW FLUFXLW EUHDNHU Power surge. 8QSOXJ WKH PLFURZDYH RYHQ WKHQ SOXJ it back in. Plug not fully inserted wall outlet. 0DNH VXUH WKH SURQJ SOXJ RQ WKH into oven is fully inserted into wall outlet. Door not securely closed.
GE Microwave Oven Warranty. All warranty service provided by our Factory Service Centers, or an authorized Customer Care® technician during normal working hours. To schedule service, on-line, 24 hours a day, visit us at GEAppliances. com, or call 800.GE.CARES (800.432.2737). Please have serial and model numbers available when calling for service. Staple your receipt here. Proof of the original purchase date is needed to obtain service under the warranty.
Consumer Support. GE Appliances Website GEAppliances.com Have a question or need assistance with your appliance? Try the GE Appliances Website 24 hours a day, any day of the year! For greater convenience and faster service, you can now download Owner’s Manuals, RUGHU SDUWV FDWDORJV RU HYHQ VFKHGXOH VHUYLFH RQ OLQH
Horno Microondas GEAppliances.com Instrucciones de Seguridad . . . . . . . . . . . . .2–5 Instrucciones de Funcionamiento Funciones Convenientes . . . . . . . . 15 Términos del Microondas . . . . . . . 22 Funciones del Horno . . . . . . . . . 6-14 Otras Funciones. . . . . . . . . . . . .18-22 Niveles de Potencia . . . . . . . . . . . . . 9 Funciones del Sensor . . . . . . .16-18 Funciones del Temporizador. . . . . . . . . . . . .10-14 Manual del propietario JVM6170 JNM6171 JVM6172 Cuidado y Limpieza .
INSTRUCCIONES IMPORTANTES DE SEGURIDAD. LEA PRIMERO TODA LAS INSTRUCCIONES. ¡PRECAUCIÓN! Por su seguridad, la información contenida en este manual debe seguirse para minimizar el riesgo de incendio, explosión, descarga eléctrica, exposición a energía microondas . PRECAUCIONES PARA EVITAR POSIBLE EXPOSICIÓN A UNA EXCESIVA ENERGÍA DE MICROONDAS. (a) No Intente operar este horno con la puerta abierta ya que esto podría resultar en una exposición a energía microondas dañina.
INSTRUCCIONES IMPORTANTES DE SEGURIDAD. LEA PRIMERO TODA LAS INSTRUCCIONES. GEAppliances.com ¡PRECAUCIÓN! INSTRUCCIONES IMPORTANTES DE SEGURIDAD. No limpie con almohadillas metálicas para fregar. Las piezas podrán quemar la almohadilla y tener contacto con partes eléctricas y producir riesgo de descargas eléctricas Este horno de microondas está listado por UL para ser instalado sobre estufas electricas y degas (memos de 60,000 BTU).
INSTRUCCIONES IMPORTANTES DE SEGURIDAD. LEA PRIMERO TODA LAS INSTRUCCIONES. ¡PRECAUCIÓN! Asegúrese de que todos los utensilios de cocina que use en su horno sean aptos para microondas. Pueden usarse la mayoría de las cazuelas, platos para cocinar, tazas de medir, tazas de flanes y botes de cristal, o las vajillas de porcelana que no tienen decoraciones metálicas o barnices con brillo metálico. Algunos utensilios tienen la siguiente inscripción: “puede usarse en microondas.
INSTRUCCIONES IMPORTANTES DE SEGURIDAD. LEA PRIMERO TODA LAS INSTRUCCIONES. GEAppliances.com INSTRUCCIONES DE TOMA DE TIERRA ¡ADVERTENCIA! El uso indebido del enchufe de tierra puede resultar en riesgo de descarga eléctrica.. Este electrodoméstico debe estar conectado a tierra. Si se produjera un cortocircuito, la toma de tierra reduce el riesgo de descarga eléctrica al proveer un cable de escape para la corriente eléctrica.
Acerca de las funciones de su horno microondas Es posible que las funciones y apariencias varíen con relación a su modelo a lo largo del manual. 1000 Watts Funciones del Horno 1. Manija de la Puerta. Empuje para abrir la puerta. La puerta deberá estar asegurada con la traba para que las microondas se activen. 2. Pestillos de la Puerta. 3. Ventana con Protector Metálico. SLa pantalla permite que la cocción pueda ser observada mientras se mantienen las microondas dentro del horno. 4.
GEAppliances.com Accesorios Opcionales Kits del Panel de Relleno JX48WH - Blanco JX48BL - Negro JX81J (número de venta) WB02X1124 (número del servicio técnico) Al reemplazar una campana de estufa de 36”, los kits del panel de relleno completan el ancho adicional a fin de brindar un aspecto de construcción a medida. Sólo para instalación entre gabinetes; no apto para la instalación al final del gabinete. Cada kit cuenta con dos paneles de relleno de 3” de ancho.
Acerca de las funciones de su horno microondas. Puede usar el horno microondas por tiempo o con funciones convenientes. No todos los modelos cuentan con todas las funciones. Express Cook 1 2 3 Add 30 Sec 4 5 6 Timer On/Off 7 8 9 Cook Time Power Level 0 Set Clock AM/PM Convenience Microwave Popcorn Beverage Potato Vegetable Reheat Weight/Time Defrost Clock Display Hold 3 Sec Controles de Cocción Consulte la Guía de Acciones Convenientes antes de comenzar.
GEAppliances.com Cómo Modificar el Nivel de Potencia Cook Time Power Level 1 2 3 4 5 6 7 8 9 Power Level 0 Set Clock Clock Display Start Pause El nivel de potencia se podrá ingresar o modificar de forma inmediata luego de ingresar el tiempo para Time Cook (Tiempo de Cocción), Time Defrost (Tiempo de Descongelación), Add 30 Sec (Agregar 30 Segundos) o Express Cook (Cocción Express). El nivel de potencia también se puede modificar durante la cuenta regresiva. 1.
Acerca de las funciones del temporizador. Tiempo de Cocción I Cook Time 1 2 3 4 5 6 7 8 9 0 Set Clock Power Level Clock Display Start Pause Le permite cocinar en el horno microondas por cualquier tiempo hasta 99 minutos y 99 segundos. Power level 10 (Nivel de potencia 10) se configura de forma automática, pero lo puede modificar para una mayor flexibilidad. 1. Presione Cook Time (Tiempo de Cocción). 2. Ingrese el tiempo de cocción. 3.
GEAppliances.com Guía de Cocción para la Cocción por Tiempo NOTA: Use el nivel de potencia 10 (Alto) a menos que se indique lo contrario. Verdura Cantidad Tiempo Comentarios Espárragos (tallos frescos) 1 libra 6 a 9 min., Med-High (7) paquete de 10 onzas 5 a 7 min. En un plato de horneado de vidrio rectangular de 1¼, coloque ¼ de taza de agua. Gire el plato luego de la mitad del tiempo. En una cazuela de 1 litro. 1 libra cortada en mitades paquete de 10 onzas paquete de 10 onzas 9 a 11 min.
Acerca de las funciones del temporizador Defrost Weight/Time 1 2 3 4 5 6 7 8 9 Power Level 0 Set Clock Clock Display Time Defrost (Descongelación por Tiempo) le permite descongelar durante un período de tiempo seleccionado. Consulte los tiempos sugeridos en la Guía de Descongelación. (Weight Defrost (Descongelación por Peso)) se explica en la sección Auto Feature (Función Automática)). 1. Presione Defrost Weight/ Time (Descongelación por Peso/ Tiempo) dos veces. 2.
GEAppliances.com Guía de Descongelación Comida Tiempo Comentarios Panes, Tortas Panes, buñuelos o panecillos (1 trozo) Pastelitos (12 oz. aprox.) 3 a 5 min. 1 min. Reordene luego de la mitad del tiempo. Pescado y Mariscos Lomos, congelados (1 lb.) Mariscos, trozos pequeños (1 lb.) 6 a 8 min. 5 a 7 min. Coloque el bloque en la cacerola. Coloque el bloque en la cacerola. Fruta %ROVD GH SOiVWLFR³ R (paquete de 10-oz.) D PLQ Carne Tocino (1 lb.) 2 a 5 min.
Acerca de las funciones del temporizador. Cocción Express 1 2 3 4 5 6 Ésta es una forma rápida de configurar el tiempo de cocción entre 1 y 6 minutos. Presione una de las teclas de Express Cook (Cocción Express) (de 1 a 6) para una cocción de entre 1 y 6 minutos en power level 10 (nivel de potencia 10). Por ejemplo: presione la tecla 2 para un tiempo de cocción de 2 minutos. El nivel de potencia se puede modificar mientras se está realizando la cuenta regresiva.
Acerca de las funciones convenientes. Popcorn 1 9 (less time) (more time) Use sólo con palomitas de maíz preempaquetadas para hornos de microondas que pesen entre 3.0 y 3.5 onzas. GEAppliances.com Para usar la función Popcorn (Palomitas de Maíz): 1. Siga las instrucciones del paquete, usando Cómo Ajustar el Programa de Cocción de Cook Time (Cocción con Temporizador) Palomitas de Maíz para Brindar un Tiempo si el paquete pesa menos de 3.0 onzas o de Cocción Más Corto o Más Largo supera las 3.5 onzas.
Acerca de las funciones convenientes. Reheat Recalentar La función Reheat (Recalentar) recalienta entre 1 y 3 porciones de muchas comidas cocinadas en forma previa. 1. Presione REHEAT (Recalentar). 2. Ingrese el tipo de comida de 1 a 6 para una porción (lea la Guía para Recalentar a continuación) 3. Presione 2 o 3 para recalentar 2 o 3 porciones. 4. Presione START (Iniciar).
GEAppliances.com Descongelación por Peso Defrost Weight/Time 1 2 3 4 5 6 7 8 9 Power Level 0 Set Clock Clock Display Start Pause La función Defrost Weight/Time (Descongelación por Peso/ Tiempo) le brinda dos formas de descongelar las comidas. Presione Defrost Weight/Time (Descongelar por Peso/ Tiempo) una vez para descongelar por peso o dos veces para descongelar por tiempo Use Weight Defrost (Descongelar por Peso) para carnes, aves y pescados que pesen hasta 6 libras.
Acerca de otras funciones. Recordatorio de Cocción Completa Para recordarle que colocó comida en el horno, este último mostrará “End” (Fin) y emitirá un pitido una vez por minuto hasta que abra el horno o presione el botón Cancel/ Off (Cancelar/ Apagar). Set Clock Configuración del Reloj Presione para ingresar la hora del día o para completar la hora del día mientras cocina con microondas. 1 2 3 4 5 6 1. Presione Set Clock (Configurar Reloj). 7 8 9 2. Ingrese la hora del día.
Acerca de otras funciones. GEAppliances.com Plato Giratorio Para obtener mejores resultados en su cocción, deje el plato giratorio encendido. Lo podrá apagar al usar platos más grandes. Presione TURNTABLE (Plato Giratorio) para encender o apagar el plato giratorio. Turntable Ventilador El ventilador elimina el vapor y otros vapores de la cocción superficial. Vent Fan Luz de la Superficie Surface Light Presione para encender o apagar la luz del horno.
Acerca de otras funciones. Estante (en algunos modelos) Cómo Usar el Estante al Cocinar en el Horno Microondas La comida se cocina mejor en el horno microondas cuando se coloca en el plato giratorio o en el estante en la posición baja. AVISO: Sólo use el estante para microondas al recalentar en más de un nivel. NO guarde el estante del horno dentro del microondas. ! ADVERTENCIA ARCO ELÉCTRICO: Si se observan arcos eléctricos, presione la tecla Cancel/ Off (Cancelar/ Apagar) y corrija el problema.
GEAppliances.com Cambie las posiciones luego de la mitad del tiempo. Cambie las posiciones luego de la mitad del tiempo. Cambie las posiciones dos veces. Estante y Recalentamiento Estante y Recalentamiento or Para recalentar 2 platos en el nivel inferior: 1. Multiplique el tiempo de recalentamiento por 11/2. 2. Cambie las posiciones luego de la mitad del tiempo. Para recalentar en 3 niveles (en algunos modelos) 1. Duplique el tiempo de recalentamiento. 2.
Términos del Microondas. Arco Eléctrico Arco eléctrico es el término que se usa para definir la producción de chispas en el horno microondas. Los arcos eléctricos son producidos por: 0HWDO R SDSHO GH DOXPLQLR HQ FRQWDFWR FRQ HO costado del horno. 3DSHO GH DOXPLQLR QR PROGHDGR D OD FRPLGD (los extremos doblados actúan como antenas). 0HWDOHV WDOHV FRPR SUHFLQWRV SLQFKRV GH DYH o platos con rebordes dorados. 7RDOODV GH SDSHO UHFLFODEOH TXH FRQWHQJDQ pequeños trozos de metal.
Cuidado y limpieza del horno microondas. GEAppliances.com Consejos Útiles Una limpieza completa de forma ocasional con una solución de bicarbonato y agua mantiene el interior fresco. Desenchufe el cable antes de limpiar cualquier parte del horno.
Cuidado y limpieza del horno microondas. Luz de la Placa de Cocción/ Reemplazo de la Luz Nocturna Reemplace la lámpara quemada por una lámpara incandescente de 120 voltios, 40 watts (WB36X10003), disponible a través de su proveedor de GE. Retire el tornillo Tornillos Carcasa del Filtro Tapa de la Luz Filtro de Carbón (en algunos modelos) 1. Para reemplazar la lámpara(s), primero desconecte la corriente desde el fusible principal o disyuntor, o desenchufe el cable. 2.
GEAppliances.com Retiro y Limpieza del Filtro Para retirar, deslice el mismo sobre la parte lateral usando la lengüeta. Empuje hacia abajo y afuera. Para limpiar el filtro de grasa, moje y luego agite el mismo en agua caliente y detergente. No use amoníaco ni productos de amoníaco, ya que oscurecerán el metal. Se podrá cepillar Retire los 3 tornillos de la rejilla para retirar la misma. suavemente para retirar cualquier suciedad incrustada. Enjuague, sacuda y deje secar antes de realizar el reemplazo.
Consejos para Solucionar Problemas. Problema Causa Posible Qué Hacer Es posible que un fusible de su hogar se haya quemado o que el disyuntor se haya desconectado. Reemplace el fusible o reinicie el disyuntor. Pico de tensión. Desenchufe el horno microondas; luego vuelva a enchufarlo. El enchufe no está totalmente insertado en el tomacorriente. Asegúrese de que el cable de 3 patas del horno esté completamente insertado en el tomacorriente. La puerta no está cerrada de forma segura.
Garantía del Horno Microondas de GE. Todo el servicio de garantía es provisto por nuestros Centros de Servicio de Fabricación, o un técnico autorizado de Customer Care® durante el horario comercial. Para programar una consulta del servicio técnico a través del Internet, las 24 horas, visítenos en GEAppliances. com, o llame al 800. GE.CARES (800.432.2737). Cuando llame para solicitar el servicio, tenga los números de serie y modelo disponibles. Abroche su recibo aquí.
Soporte al Cliente. Sitio Web de Electrodomésticos de GE GEAppliances.com ¿Desea realizar una consulta o necesita ayuda con su electrodoméstico? ¡Intente a través del Sitio Web de Electrodomésticos de GE las 24 horas del día, cualquier día del año! Para mayor conveniencia y un servicio más rápido, ahora puede descargar el Manual del Propietario, ordenar piezas, catálogos o incluso un servicio programado a través de Internet.